any idea why my rsx die isnt making contact with the ihs?

had someone delidd my ps3 CECHL01 fat. after the delid temps were high so i took her apart to see what the issue was and found out the die for the rsx isnt mkaing any contact with the ihs any ideas the ihs was not glued on os as to make it easier to apply new paste is needed

as you can see from the pics the cpu die makes perfect contact with the ihs the rsx not so much
 

Attachments

  • zl7ymvf5jx491.jpeg
    zl7ymvf5jx491.jpeg
    2 MB · Views: 726
  • zqyck3g5jx491.jpeg
    zqyck3g5jx491.jpeg
    2.3 MB · Views: 171
You need to clean very well the thermal adhesive on the 4 VRAM chips at the corners of RSX... and at the corners of the RSX IHS too
Use a tool made of plastic, or wood (or your fingernails) to scratch and remove the old thermal adhesive
 
@sandungas i tried a plastic spudger as its all i have on hand aside from a butter knife and a small flat head screw driver the spudger didnt the adhesive any other suggestions i do have some 90% isopropyl
A plastic spudger is fine, as well as a guitar pick or anything made of hard plastic, my most important suggestion is to dont use anything made of metal to avoid doing scratches
Actually, in the photo you uploaded it looks someone was trying to remove it, there are some lines in the direction of the blue arrow in the VRAM chip at bottom-left corner :D
I wonder if it was made with a toothpick or with a finger nail, you need to continue doing that until everything is very clean
zl7ymvf5jx491-jpeg.jpg


The isopropil maybe helps to weaken the adhesive, drop a bit of isopropil and wait a couple of minutes (if it evaporates wet it again and wait)
Do you have nail polish remover ?.. you know that transparent liquid that smells like something toxic, is stronger than isopropil and is going to weaken the adhesive better
 
Last edited:
A plastic spudger is fine, as well as a guitar pick or anything made of hard plastic, my most important suggestion is to dont use anything made of metal to avoid doing scratches
Actually, in the photo you uploaded it looks someone was trying to remove it, there are some lines in the direction of the blue arrow in the VRAM chip at bottom-left corner :D
I wonder if it was made with a toothpick or with a finger nail, you need to continue doing that until everything is very clean
zl7ymvf5jx491-jpeg.jpg


The isopropil maybe helps to weaken the adhesive, drop a bit of isopropil and wait a couple of minutes (if it evaporates wet it again and wait)
Do you have nail polish remover ?.. you know that transparent liquid that smells like something toxic, is stronger than isopropil and is going to weaken the adhesive better

nope no nail polish remover but i was told acetone was bad as it could damage the ram chips
 
nope no nail polish remover but i was told acetone was bad as it could damage the ram chips
Yeah, acetone is what i meant :)
Well.. i was thinking mostly in the photo i posted (with the RSX IHS), everything is metal, so the acetone cant make any damage

And on top of the VRAM chips... well the chips themselfs are not going to be damaged by the acetone because are made of silicon (a mineral)... is the "resine" at his sides what could be damaged (with coffee color), but this depends of the amount of acetone you drop in them. The point is to dont wet the resine at the sides... you just need to wet the top layer of the adhesive with light-grey color

i will keep that in mind
 
@sandungas bit of an update i removed the adhesive from the ram chips as well as the ihs and also for the cpu and cpu ihs as well temps for the cpu are under 60c in the last of us and under 65c for the rsx do theres about a 4-5c difference in temps between the cpu and rsx depending on the game so as you can see temps are much better also i used a combination of mx-4 and noctuia nt-h1 as thats all i had
 

Attachments

  • 287480923_1194039094754571_5802498106925986391_n.jpg
    287480923_1194039094754571_5802498106925986391_n.jpg
    131 KB · Views: 40
  • 287737313_1074845943446271_7262727053156289132_n.jpg
    287737313_1074845943446271_7262727053156289132_n.jpg
    153.6 KB · Views: 34
  • 288333615_757956238557519_2435842605889172422_n.jpg
    288333615_757956238557519_2435842605889172422_n.jpg
    333.6 KB · Views: 35
  • 288333627_3099384650372429_4487475871404028408_n.jpg
    288333627_3099384650372429_4487475871404028408_n.jpg
    135.6 KB · Views: 32
  • 288370614_1132906033953298_320179942864144296_n.jpg
    288370614_1132906033953298_320179942864144296_n.jpg
    162.5 KB · Views: 39
  • 288451861_1062735501327858_4309000363248486331_n.jpg
    288451861_1062735501327858_4309000363248486331_n.jpg
    155.4 KB · Views: 38
  • 288649833_345985121053635_1377687292705553725_n.jpg
    288649833_345985121053635_1377687292705553725_n.jpg
    132.8 KB · Views: 37
  • 289076851_5367422139947637_4891615442938387086_n.jpg
    289076851_5367422139947637_4891615442938387086_n.jpg
    127.6 KB · Views: 35
  • 290932230_427413822585397_3947700925065015318_n.jpg
    290932230_427413822585397_3947700925065015318_n.jpg
    183 KB · Views: 33
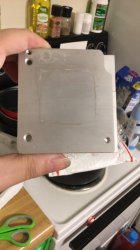
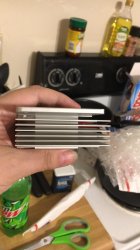
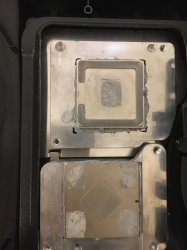
I cant identify the metal parts of your photos with the "fins" because im not so used to that specific model of heatsink, but it looks a lot better
Btw, there are some PS3 heatsinks where is not posible to separate that metal parts so what im going to say is a lot more tricky, but in your heatsink you already separated them

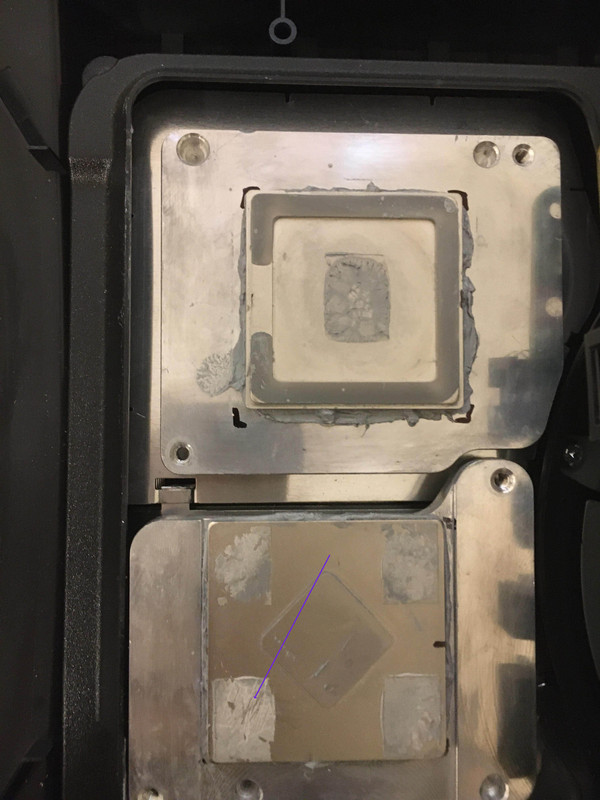
If you want to improve temperatures a bit more you could do a lapping:
https://www.l3p.nl/other-builds-mods/cpu-lapping/how-to-lap-an-i7-2600k/
https://www.l3p.nl/other-builds-mods/cpu-lapping/how-to-lap-an-i7-980x/
From the tutorial... is worthy to mention that it really needs to be made on top of a glass (because the glass are very flat), you need to buy 3 sandpaper of around 500, 1000, and 2000 grit... and yeah... is needed lot of patience, it could take a couple of hours
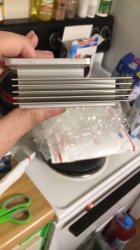
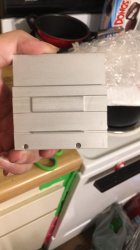
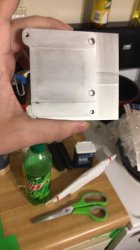
You could do this lapping on 4 metal surfaces (2 * at bottom of the heatsink blocks, and 2 * top of the IHS's)

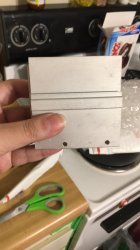
Another thing you could do is to increase the bending of the clamps at the back (but only a bit, be careful with this to dont abuse of it), i made some drawings about how to calculate and keep control of how much you are bending here:
https://www.psx-place.com/threads/h...sound-but-no-display.35685/page-2#post-315026

The 2 thermal pastes you mentioned are good but you made me doubt if you mixed them together when you said you used a combination of mx-4 and noctuia nt-h1
In theory... we should not mix them together, is very important to clean the old thermal paste before applying the new, specially if are different brands/products because have different chemical composition
Is pretty much the same that happens if we mix together 2 cosmetic products (that usually have tricky chemical formulas)... we dont know the result, it could happen that one of them creates a chemical reaction with the other and the components are "decomposed" and separates from each others, and degrades, etc...

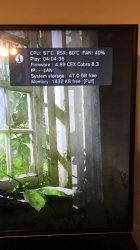
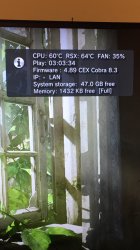
Other than that... there is not much you could do, but your current temperatures seems to be fine, the difference of temperatures in between CELL/RSX "ingame" (and with a big workload) depends of the PS3 model, but in PS3 slims is usual to have RSX 5ºC over CELL, so that looks normal
Im just mentioning all this details just incase you want to improve it a bit more the next time you replace the thermal pastes, but right now doesnt seems to be really needed, it seems the problem has been fixed
 
Last edited:

Similar threads

Back
Top