ElGris
Senior Member
@sandungas , man, you write A LOT!  Long time no see, btw. Well, uh, where do I start? I don't have much to say about this to be honest, the wire I used is 0.1mm I believe, is this very same: https://http2.mlstatic.com/D_NQ_NP_722617-MLA46756542988_072021-O.webp
Since I only used it to "cut" only corners, it didn't brake a lot, maybe a couple of times, 'cause I applied too much force in the worng way, maybe. A wire of that diameter is strong enough to do the kind of job I did on my delids, but if you want to go without heat, then you'll need to use your hands (and your brain too) to cut all that concret gap that in this case should be only silicone. The lubricant idea @Mello_1993 brougth to the table is really good, it avoids heat. I saw that technic also in a brazilian video, and If I recall well, the guy used a piece of metal sheet (cola can) and some thinner. Didn't think in use those 'cause I wanted to do it my way
Keep in mind that the more you saw, the more you need to work on the CELL, and that means more movement on those old lady bgas. In my case I remember that I had troubles with the wire being really thick, many times the wire was touching (or going) against the IHS, instead of the silicone/pcb side. Trying to do it in the correct way it's a little bit complicated, one of the reasons I dismissed this option. (don't like to waste too much time I guess).
About your other wire options, Sunshine is a really good chinese brand, if we can call it "good", same as Yaxun, Mechanic.. I don't know about the others. The reason why wires are thinner now is because noone is using UV glue anymore. Everything use OCA sheets now, and that has a thinner gap in between the glass and the screen/digitizer/module, so thick wires are not that useful now. Also, we are talking about a really thin tape, instead of glue, and not even mention concrete! haha.
I have a colleague that works exclusively with screens, I could ask him what size of wire he generally uses. But I think 0.1mm is just enough for this job, and the material is called "gold"? Well, that kind of colour.
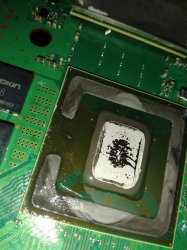
Finally, your slim delidding project, hmm.. there're two kind of slims with bumps, right? The ones that can be delid, and the ones that don't.
https://i.imgur.com/aAdVLkY.jpeg
(I think you edited this pic lol)
In this case a strong wire is mandatory, or maybe you'll need something solid like a thin blade like most people use, due the wire being weak against the bumps, you'll have to try it. Remember that if it is thicker than needed, the wire is going to touch the IHS more than you think.
The other day I was looking for something thin, like this: https://es.aliexpress.com/item/4000601357150.html
And damn, that crap is expensive over here! I need to fix those spaguetties some day anyway
Long time no see, btw. Well, uh, where do I start? I don't have much to say about this to be honest, the wire I used is 0.1mm I believe, is this very same: https://http2.mlstatic.com/D_NQ_NP_722617-MLA46756542988_072021-O.webpSince I only used it to "cut" only corners, it didn't brake a lot, maybe a couple of times, 'cause I applied too much force in the worng way, maybe. A wire of that diameter is strong enough to do the kind of job I did on my delids, but if you want to go without heat, then you'll need to use your hands (and your brain too) to cut all that concret gap that in this case should be only silicone. The lubricant idea @Mello_1993 brougth to the table is really good, it avoids heat. I saw that technic also in a brazilian video, and If I recall well, the guy used a piece of metal sheet (cola can) and some thinner. Didn't think in use those 'cause I wanted to do it my way
Keep in mind that the more you saw, the more you need to work on the CELL, and that means more movement on those old lady bgas. In my case I remember that I had troubles with the wire being really thick, many times the wire was touching (or going) against the IHS, instead of the silicone/pcb side. Trying to do it in the correct way it's a little bit complicated, one of the reasons I dismissed this option. (don't like to waste too much time I guess).
About your other wire options, Sunshine is a really good chinese brand, if we can call it "good", same as Yaxun, Mechanic.. I don't know about the others. The reason why wires are thinner now is because noone is using UV glue anymore. Everything use OCA sheets now, and that has a thinner gap in between the glass and the screen/digitizer/module, so thick wires are not that useful now. Also, we are talking about a really thin tape, instead of glue, and not even mention concrete! haha.
I have a colleague that works exclusively with screens, I could ask him what size of wire he generally uses. But I think 0.1mm is just enough for this job, and the material is called "gold"? Well, that kind of colour.
Finally, your slim delidding project, hmm.. there're two kind of slims with bumps, right? The ones that can be delid, and the ones that don't.
https://i.imgur.com/aAdVLkY.jpeg
(I think you edited this pic lol)
In this case a strong wire is mandatory, or maybe you'll need something solid like a thin blade like most people use, due the wire being weak against the bumps, you'll have to try it. Remember that if it is thicker than needed, the wire is going to touch the IHS more than you think.
The other day I was looking for something thin, like this: https://es.aliexpress.com/item/4000601357150.html
And damn, that crap is expensive over here! I need to fix those spaguetties some day anyway
")
")


 but my questions is about after the fact. after I'm done removing all that glue, dry thermal paste and silicone, how do I put it back? I've seen comments about using super glue but that sounds like it'd be a problem in case I ever wanted to do another delid.