I took this picture cuz I thought you might want it @sandungas. Its from that KTE-001... View attachment 36652
It's nice just to see how the traces are laid out under the RSX.
Nice, right now im not sure where it fits to upload it to wiki but i will keep it here in my PC to look at it later
Btw, now you have the perfect setup to map some of the pins of the mitsumi 810X with a multimeter
In wiki i mapped only 2 pins (3, 5) but the others are unknown (1,2,4,6,7,8) :/ https://www.psdevwiki.com/ps3/Talk:Regulators#Mitsumi_040_810X_.28close_to_RSX.29
Im sure some of them are going to the "inner ring" of RSX... thats the main output of the mitsumi
Maybe it have a secondary output... because the other mitsumi chips of the PS3 motherboard seems to do a dual voltage conversion
This kind of sketchup would be enought, im showing it just because i already had this image opened in my web browser while writing this, it was made by vyktor to map one of the temperature monitors in a PS3 COK-002 motherboard
Btw, in your post PS3 #13 - Huston we Have a Problem!
You had a problem in the resistor connected to pin 3 of the temperature monitor, right ?... the same line painted by vyktor in red color ?
Im wondering if this warning with the value 96 was an overheat alert... the 96 (in hexadecimal) is 150ºC in decimal... maybe the temperature monitor have that temperature hardcoded in it to trigger an alert signal
Code:
>$ shutdown
[ADT7461] *** alert flags still stay high(sts_reg:96) ***
shutdown
[SSM] state: 0600 -> 0000
[SSM] Error state is cleared.
(PowerOff State)
@RIP-Felix asked me to share this link again, it is a list of RSX readings while the chip is off the board, and wether or not the chip worked after reinstall, you can use this to see if your RSX is good before using. All readings were done in AUTO mode except for a few that I switched to Megaohms because the readings in auto were gathering 2 different readings in auto, so went with MOhms for the capture.
I've got a tool I made for finding where pins go when they try to hide, so let me jump in and save some time here.
So, for the 810x that is removed in this picture: 2,3,6,7 are ground. 8 looks to be incoming juice from the chip above the pair of 330 uf caps in the top right corner (per the pictured orientation). 4 and 5 appear to just go where they show themselves going. And pin 1 feeds two large areas on the RSX circled hastily in MS paint below. (obviously only every other pad on that long row, I just didn't know how to circle that properly with one quick pen stroke)
I toned out the rest of the board really quick and that's all I could find anywhere.
Also @sandungas unfortunately for you, my scrap pile is overwhelmingly COK-001, and I send the pile in for recycling a couple times a year, so you're SOL there.... I'll keep an eye out on the donor systems when they start coming in.
@RIP-Felix is that sheet that @Computer Booter just posted all of the readings you wanted me to take too?
Sort of. His voltage readings are from RSX's pulled off the board and then ohm tested. But...
RSX out of circuit and...
RSX on the MB...
...have different readings. We need to establish an average, +/- some normal deviation, for healthy readings. On the board is good for checking the health of the RSX and troubleshooting. And off the board is useful for reballers to know if an RSX is still good, before they replace a dead chip with a dead chip. Everybody knew about VDDC, but most people don't check the other 6 lines.
I have seen VDDR, RSX_VDDIO, and VDDA fail separately from VDDC. If you were only to look at VDDC, then you would think those dead RSXs were still good.
What I was asking you for was to rummage through your dead board pile and compile those voltages you can. In various states of working or dead. The only thing I need besides the ohms tests is if the RSX was working or dead (best guess). The list of measurements of the RSX off the board is growing,but the list of measurements on the MB is small. And I would argue that one is more useful to people looking to diagnose their console.
And just to add my experience to the pile, I do not rework with IHS in place. I don't think there's any IPC guidance on this subject, but I've got probably a thousand reballs under my belt on a variety of systems. Specifically with the 90nm PS3, the solder bleed is real, and rework with the IHS in place directs more heat through the RAM chips to make it worse. I also agree with the extra weight likely being the cause of those bridged balls.
@squeept ...many thanks for the guidance. Please could you give me some advise how to remove the IHS from the RSX, when the RSX is off the board. I'm not sure how to do this without potentially damaging the RSX in the process, any advice would be really appreciated.
@Workz_777 can't help ya there, never done it. I only use self-harvested replacements because I don't trust "NOS" chips from random sellers aren't just repackaged pulls from dead boards and they hope you'll think you're the reason it didn't work so you won't return it or chargeback. Preheating should loosen the adhesive a bit, but other than the obvious, no clue. My guess is the odds of damage are lower if you just place it as-is (plenty of people do it without issue) and delid after.
@RIP-Felix Gotcha, I should have some free time this weekend, I'll take a look over all that junk again. I have at least a handful of scrap boards here with the diagnostic sheets taped to them, so hopefully I can pull some useful info with a real history on it.
So with the IHS in place, you recommend putting little MLCCs under the RSX in the corners, so with the weight of the IHS it doesn't push down too much and cause the solder balls to bridge (like we saw with Felix's most recent reball)?
If so, what size MLCCs would you recommend, 0201 (0.6mm) or 0402 (0.5mm)? Will there be a risk, doing it this way, that the center of the RSX could bow / drop down while the corners stay at the right height? I'm asking because (all being well) i have a few reballs to do (Frankies) and want to get it right the first time, if possible.
I didn't have any of the right sized SMD's on hand to try that and had good results before without the. So I didn't see the need. This time I just used too much flux during the reflow and the chip hydroplaned. Also that Kingbow flux is good stuff, but bubbles more at Lead free temps than it does at leaded. So I shot myself in the foot using too much flux and lead free.
Coming into PS3 #13 (Part 1 here) I was riding high off @Computer Booter's recent successes and my own with PS3#12. So I felt like this was going to be the time I finally got a COK-001 done! I even reassembled the console after the first attempt, feeling confident it would work. Hubris! Frankie had to humble me!
At this point, mind you, this board had already been through 5 reflow cycles! So PS3 #13 on the 3rd day of "repair" will be subjected it's 6th reflow cycle at lead-free temps (250C)! It's already killed 2 RSX's and this will be the 3rd I'm feeding it. Honestly, this console has been nothing but trouble. Frankie refuses to be reanimated, begrudging every attempt I've made to revive him! The CPU reflow was a bad idea, but I needed to prove to myself that BE bitraining errors don't mean CPU. I knew that anyway, but I was overly confident my initial RSX reflow was good. Anyway, it resulted in the CELL core voltage (VDDC) ohm test falling from 2.0 to 1.5 Ohms. That's quite low!
This was the lowest point in the repair. The realization It probably wasn't going to work. I really felt at this point there was no chance for this Frankie. But despite how I felt I wanted to give Frankie every chance there was. Normal CPR had failed and now I'm pounding his chest with my bare fist!
Live...Damn you...LIVE!
I knew miracles can happen, so that's why I didn't just scrap this board. I wanted to see it through to the end. Even though I felt it was hopeless at this point...
Yesterday was a wild ride!
I removed the 40nm that was bridged. While prepping it for the reball, I had my Iron set to 460C and it melted some important pads on the 40nm RSX killing it! Copper will amalgamate with solder above 370C, so you don't want to work long on small traces/pads.
That was my last good 40nm RSX. I had 2 more in non-ideal states. One was only missing a single pad (AV3_CLK pad BA34), but not balled yet. The other was "NOS," but missing several pads! I checked Kiaw's RSX pinout to find what these pad were and to see if they were important. They are all VDDC +/GND pads. Most on the outer edge, but one from the center. It ohm tested good otherwise. And of course it was still balled with Lead-Free. So I had a choice to make. Attempt to repair BA34 and reball the chip, or take a chance that the missing VDDC +/GND pads aren't all needed. Which bad chip would I use?
I started by attempting to fix BA34 using a Wylie Lug, thanks to @Computer Booter who turned me on to them. The problem is that my solder mask is still en route. Has been for a month! Along with my T12-1403 "wide boi" soldering tip (to hopefully make cleaning the RSX/BGA easier). So I had no way of gluing the BGA pad in place, besides solder. I was able to solder it in place, but I feel like to moment I try to place the balls and reflow, it'll just swim out of position. Possibly even bridge an ajdcent pad. So I decided to take my chances with the one missing VDDC pads (plural).
I installed my last lead-free, pre-balled, 40nm RSX, which had multiple missing VDDC pads. What the heck, right? I have nothing to lose. It's not going to work anyway, this board is hosed!
All went as expected. I was so sick of prepping the board, reflowing, and cleaning that I was fighting the urge to rush or cut corners. But I did my due diligence. I was extra carful not to damage the pads removing excess solder, nor use too much flux. I confirmed the reflow with a gentile nudge. I let it cool slowly. I thoroughly cleaned off the flux residue afterwards. AGAIN! And I let it dry thoroughly.
Then I tested. I just threw the bare MB on the test bench hooking up wires. No heatsink, no power board. Just wanted to confirm what I expected - That Frankie was dead...dead!
I quickly shut it down before it overheated. Then I assembled it enough to do some further testing and it FREAKING BOOTED! HDMI was found, I switched to it came up like it was nothing. Then the HDD promted me to check it, since it hadn't been shutdown properly (go figure). I just canceled that to get to XMB. And it came up fine!
So far so good! That's where it became too good to be true. I've been here before! PS3 #8 was my first Frankie. It played PS1 and 3 games fine, but black screens on PS2 and I still have no idea why! So my first test was to throw a PS2 disc in there...
and...nothing!
It fed the disc just fine. So the Bluray Drive was powered. I heared it spin up, but no disc icon appeared in menu. CRAP! I confirmed the same with PS1 and PS3 games. By now it was hard to hear anything over the 60% fan speeds needed to keep the CPU at 79C. It needed delidded bad! Franky was cranky!
You would be too if your death slumber was intrerrupted by a tehcnomancer dragging you throug hell fire back to the mortal coil! Bitch had an attitude! So I unplugged the power that was keeping him animated and delidded his skull. Then I cooled his boiling hot brain with MX-4 and sticthed him back together. The lobotomy worked and he calmed right the eff down!
That's were my skills end! So I turned to @vyktormvmpay25 who helped me remarry the Bluray drive. I updated to 4.88 OFW, which completed sucessfully, something Victor say's is actually a good test of the hardware - That if it works, your MB is golden! That was a relief. Then I jailbroke to Evilnat 4.88.2 so I could go through the factory service tools mode and remarry the BD. It all went fine. Turns out that's all that needed to be done. I tested PS1, 2, and 3 games again and...
...Flawless Victory!
A massive thanks to Victor for helping me with that!
I let it idle for a few hours to monitors temps. webMAN needed 26 - 31% fan to maintain 53C (RSX), 68C (CELL), depending on ambient room temp. Testing up to this point had heated my room to 80F (27C). So when I started fan tests, it was pretty hot in my room. I cracked a window to get my room temp to a more reasonable 68F (20C) and it droped to 26% fan. So that's pretty great! I'd say at around 72F (22C) it idles with fan at about 29%. That's spot on from what I've seen before. RSX temps of 53C is the same for my other frankie with a 40 (PS3 #8). So at least they're consistant.
Oh, BTW this RSX is delidded. But I don't think it get's much better temps than "NOS" without a delid. Honestly I wonder if the Heatsink isn't heating the RSX up, as opposed to the RSX heating it up!
It didn't fail for the couple of hours it was on last night. I let it fully cool overnight and this morning it fired right back up no problem. It's still too soon to say if it's a sucess, but I'm hopeful!
I still need to install the MOSFET from a slim to reduce 1.2V VDDR to 0.95v. I'm fresh out of slims and don't have the 1800 ohms resistors I need to do it SONY's way. But @Computer Booter offered to send me a couple of MOSFETs. So once they come in I'll feel more comfortable stress testing it.
He also offered to send me that unholy miricle 65nm Frankie. It popcorned twice! It probably won't last very long, but I just want to see if I can come up with a good custom fan table for it before it dies. Thanks man that's super cool of you!
Still left to do (Assuming it keeps working)
^this is why I have a hard limit on number of rework cycles I'll put a board through. Poor little fella. You're gonna get an error message eventually that just says "kill me"
Coming into PS3 #13 I was riding high off @Computer Booter recent successes and my own with PS3#12. So I felt like this was going to be the time I finally got a COK-001 done! I even reassembled the console after the first attempt, feeling confident it would work. Hubris! Frankie had to humble me!
At this point, mind you, this board had already been through 5 reflow cycles! So PS3 #13 on the 3rd day of "repair" will be subjected it's 6th reflow cycle at lead-free temps (250C)! It's already killed 2 RSX's and this will be the 3rd I'm feeding it. Honestly, this console has been nothing but trouble. Frankie refuses to be reanimated, begrudging every attempt I've made to revive him! The CPU reflow was a bad idea, but I needed to prove to myself that BE bitraining errors don't mean CPU. I knew that anyway, but I was overly confident my initial RSX reflow was good. Anyway, it resulted in the CELL core voltage (VDDC) ohm test falling from 2.0 to 1.5 Ohms. That's quite low!
This was the lowest point in the repair. The realization It probably wasn't going to work. I really felt at this point there was no chance for this Frankie. But despite how I felt I wanted to give Frankie every chance there was. Normal CPR had failed and now I'm pounding his chest with my bare fist! knew miracles can happen...
Yesterday was a wild ride!
I removed the 40nm that was bridged. While prepping it for the reball, I had my Iron set to 460C and it melted some important pads on the 40nm RSX killing it! Copper will amalgamate with solder above 370C, so you don't want to work long on small traces/pads.
That was my last good 40nm RSX. I had 2 more in non-ideal states. One was only missing a single pad (AV3_CLK pad BA34), but not balled yet. The other was "NOS," but missing several pads! I checked Kiaws RSX pinout to find what these pad were and to see if they were important. They are all VDDC +/GND pads. Most on the outer edge, but one from the center. It ohm tested good otherwise. And of course it was still balled with Lead-Free. So I had a choice to make. Attempt to repair BA34 and reball the chip, or take a chance that the missing VDDC +/GND pads aren't all needed. Which bad chip would I use?
I started by attempting to fix BA34 using a Wylie Lug, thanks to @Computer Booter who turned me on to them. The problem is that my solder mask is still en route. Has been for a month! Along with my T12-1403 wide tip soldering tip (to hopefully make cleaning the RSX/BGA easier). So I had now way of gluing the BGA pad in place once it's in place. I was able to solder it in place, but I feel like to moment I try to place the balls and reflow thme it'll just swim out of position and break the connection. So I decided to take my chances with the one missing VDDC pads (plural).
So I installed the 40nm RSX missing VDDC. What the heck, right? I have nothing to lose at this point! All went as expected. I was so sick of prepping the board, reflowing, and cleaning that I was fighting the urge to rush or cut corners. But I did my due diligence. I was extra carful not to damage the pads removing excess solder, nor use too much flux. I confirmed the reflow with a gentile nudge. I let it cool slowly. I thoroughly cleaned off the flux residue afterwards. AGAIN! And I let it dry thoroughly.
Then I tested. I just threw the bare MB on the test bench hooking up wires. No heatsink, no power board. Just wanted to confirm what I expected - That Frankie was dead...dead!
I quickly shut it down before it overheated. Then I assembled it enough to do some further testing and it FREAKING BOOTED! HDMI was found, I switched to it came up like it was nothing. Then the HDD promted me to check it, since it hadn't been shutdown properly (go figure). I just canceled that to get to XMB. And it came up fine!
So far so good! That's where it became too good to be true. I've been here before! PS3#8 was my first Frankie. It played PS1 and 3 games fine, but black screens on PS2 and I still have no idea why! So my first test was to throw a PS2 disc i there...nothing. Well, it fed the disc just fine. So the Bluray Drive was powered. I heared it spin up, but no disc icon appeared in menu. CRAP! I confirmed the same with PS1 and PS3 games. And by now is was hard to hear anything over the 60% fan speeds needed to keep the CPU at 79C. It needed delidded bad! Franky was cranky!
You would be too if your death slumber was intrerrupted by a tehcnomancer dragging you throug hell fire back to the mortal coil! Bitch had an attitude! So I unplugged the power that was keeping him animated and delidded his skull. Then I cooled his boiling hot brain with MX-4 and sticthed him back together. The lobotomy worked and he calmed right the eff down!
That's were my skills end! So I turned to @vyktormvmpay25 who helped me remarry the Bluray drive. I updated to 4.88 OFW, which completed sucessfully, something Victor say's is actually a good test of the hardware - That if it works, your MB is golden! That was a relief. Then I jailbroke to Evilnat 4.88.2 so I could go through the factory service tools mode and remarry the BD. It all went fine. Turns out that's all that needed to be done. I tested PS1, 2, and 3 games again and they all worked flawlessly!
A massive thanks to Victor for helping me with that!
I let it idle for a few hours to monitors temps and with webMAN it required between 26% and 31% fan to maintain RSX 53C and CELL 68C, depending on ambient room temp. It had heated my room to 80F (27C) when I started fan tests (31%). I cracked a window to get my room temp to a more reasonable 68F (20C) and it droped to 26% fan. So that's pretty great!
It didn't fail for the couple of hours it was on last night. I let it fully cool overnight and this morning it fired right back up no problem. It's still too soon to say if it's a sucess, but I'm hopeful!
I still need to install the MOSFET from a slim to reduce 1.2V VDDR to 0.95v. I'm fresh out of slims and don't have the 1800 ohms resistors I need to do it SONY's way. But @Computer Booter offered to send me a couple of MOSFETs. So once they come in I'll feel more comfortable stress testing it.
He also offered to send me that unholy miricle 65nm Frankie. It popcorned twice! It probably won't last very long, but I just want to see if I can come up with a good custom fan table for it before it dies. Thanks man that's super cool of you!
Still left to do (Assuming it keeps working)
Thorough case and HS cleaning!
0.95v VDDR Voltage mod
15-blade D14F Fan upgrade (with cleaned and greased bearning)
WOW! ...just...wow! Half way through reading your post @RIP-Felix i was like - hmmmm, i think this is gonna have a happy ending. Impressive how you didn't give up no matter what. Oh and i lol'ed hard at "CPR" and "technomancer".
This gives me confidence that even if i do screw up my reball Frankies, i'm gonna try, try, and try again, and again, CPR it and try, try, and try again......and again! Muahahahaa!
Also, you should write some novels, you are really good at it, nice style, nice flow, it was like i was there lol. "PS3 to the Grave and Back" - by Doctor Von RIP-Felix-Housen.
Coming into PS3 #13 I was riding high off @Computer Booter recent successes and my own with PS3#12. So I felt like this was going to be the time I finally got a COK-001 done! I even reassembled the console after the first attempt, feeling confident it would work. Hubris! Frankie had to humble me!
At this point, mind you, this board had already been through 5 reflow cycles! So PS3 #13 on the 3rd day of "repair" will be subjected it's 6th reflow cycle at lead-free temps (250C)! It's already killed 2 RSX's and this will be the 3rd I'm feeding it. Honestly, this console has been nothing but trouble. Frankie refuses to be reanimated, begrudging every attempt I've made to revive him! The CPU reflow was a bad idea, but I needed to prove to myself that BE bitraining errors don't mean CPU. I knew that anyway, but I was overly confident my initial RSX reflow was good. Anyway, it resulted in the CELL core voltage (VDDC) ohm test falling from 2.0 to 1.5 Ohms. That's quite low!
This was the lowest point in the repair. The realization It probably wasn't going to work. I really felt at this point there was no chance for this Frankie. But despite how I felt I wanted to give Frankie every chance there was. Normal CPR had failed and now I'm pounding his chest with my bare fist! knew miracles can happen...
Yesterday was a wild ride!
I removed the 40nm that was bridged. While prepping it for the reball, I had my Iron set to 460C and it melted some important pads on the 40nm RSX killing it! Copper will amalgamate with solder above 370C, so you don't want to work long on small traces/pads.
That was my last good 40nm RSX. I had 2 more in non-ideal states. One was only missing a single pad (AV3_CLK pad BA34), but not balled yet. The other was "NOS," but missing several pads! I checked Kiaws RSX pinout to find what these pad were and to see if they were important. They are all VDDC +/GND pads. Most on the outer edge, but one from the center. It ohm tested good otherwise. And of course it was still balled with Lead-Free. So I had a choice to make. Attempt to repair BA34 and reball the chip, or take a chance that the missing VDDC +/GND pads aren't all needed. Which bad chip would I use?
I started by attempting to fix BA34 using a Wylie Lug, thanks to @Computer Booter who turned me on to them. The problem is that my solder mask is still en route. Has been for a month! Along with my T12-1403 wide tip soldering tip (to hopefully make cleaning the RSX/BGA easier). So I had now way of gluing the BGA pad in place once it's in place. I was able to solder it in place, but I feel like to moment I try to place the balls and reflow thme it'll just swim out of position and break the connection. So I decided to take my chances with the one missing VDDC pads (plural).
So I installed the 40nm RSX missing VDDC. What the heck, right? I have nothing to lose at this point! All went as expected. I was so sick of prepping the board, reflowing, and cleaning that I was fighting the urge to rush or cut corners. But I did my due diligence. I was extra carful not to damage the pads removing excess solder, nor use too much flux. I confirmed the reflow with a gentile nudge. I let it cool slowly. I thoroughly cleaned off the flux residue afterwards. AGAIN! And I let it dry thoroughly.
Then I tested. I just threw the bare MB on the test bench hooking up wires. No heatsink, no power board. Just wanted to confirm what I expected - That Frankie was dead...dead!
I quickly shut it down before it overheated. Then I assembled it enough to do some further testing and it FREAKING BOOTED! HDMI was found, I switched to it came up like it was nothing. Then the HDD promted me to check it, since it hadn't been shutdown properly (go figure). I just canceled that to get to XMB. And it came up fine!
So far so good! That's where it became too good to be true. I've been here before! PS3#8 was my first Frankie. It played PS1 and 3 games fine, but black screens on PS2 and I still have no idea why! So my first test was to throw a PS2 disc i there...nothing. Well, it fed the disc just fine. So the Bluray Drive was powered. I heared it spin up, but no disc icon appeared in menu. CRAP! I confirmed the same with PS1 and PS3 games. And by now is was hard to hear anything over the 60% fan speeds needed to keep the CPU at 79C. It needed delidded bad! Franky was cranky!
You would be too if your death slumber was intrerrupted by a tehcnomancer dragging you throug hell fire back to the mortal coil! Bitch had an attitude! So I unplugged the power that was keeping him animated and delidded his skull. Then I cooled his boiling hot brain with MX-4 and sticthed him back together. The lobotomy worked and he calmed right the eff down!
That's were my skills end! So I turned to @vyktormvmpay25 who helped me remarry the Bluray drive. I updated to 4.88 OFW, which completed sucessfully, something Victor say's is actually a good test of the hardware - That if it works, your MB is golden! That was a relief. Then I jailbroke to Evilnat 4.88.2 so I could go through the factory service tools mode and remarry the BD. It all went fine. Turns out that's all that needed to be done. I tested PS1, 2, and 3 games again and they all worked flawlessly!
A massive thanks to Victor for helping me with that!
I let it idle for a few hours to monitors temps and with webMAN it required between 26% and 31% fan to maintain RSX 53C and CELL 68C, depending on ambient room temp. It had heated my room to 80F (27C) when I started fan tests (31%). I cracked a window to get my room temp to a more reasonable 68F (20C) and it droped to 26% fan. So that's pretty great!
It didn't fail for the couple of hours it was on last night. I let it fully cool overnight and this morning it fired right back up no problem. It's still too soon to say if it's a sucess, but I'm hopeful!
I still need to install the MOSFET from a slim to reduce 1.2V VDDR to 0.95v. I'm fresh out of slims and don't have the 1800 ohms resistors I need to do it SONY's way. But @Computer Booter offered to send me a couple of MOSFETs. So once they come in I'll feel more comfortable stress testing it.
He also offered to send me that unholy miricle 65nm Frankie. It popcorned twice! It probably won't last very long, but I just want to see if I can come up with a good custom fan table for it before it dies. Thanks man that's super cool of you!
Still left to do (Assuming it keeps working)
Thorough case and HS cleaning!
0.95v VDDR Voltage mod
15-blade D14F Fan upgrade (with cleaned and greased bearning)
^this is why I have a hard limit on number of rework cycles I'll put a board through. Poor little fella. You're gonna get an error message eventually that just says "kill me"
I am concerned about reliability with it. I'm not sure if the CPU VDDC ohms will improve if I replace the tokins, but they have when I did before. I'm tempted to replace them, but I'll cross that bridge if and when I need to. These tokins have taken a beating and keep chugging!
WOW! ...just...wow! Half way through reading your post @RIP-Felix i was like - hmmmm, i think this is gonna have a happy ending. Impressive how you didn't give up no matter what. Oh and i lol'ed hard at "CPR" and "technomancer".
This gives me confidence that even if i do screw up my reball Frankies, i'm gonna try, try, and try again, and again, CPR it and try, try, and try again......and again! Muahahahaa!
Also, you should write some novels, you are really good at it, nice style, nice flow, it was like i was there lol. "PS3 to the Grave and Back" - by Doctor Von RIP-Felix-Housen.
This one lent itself to the formula of stories we're accustomed to. Everything is going fine --> Hero gets cocky --> Something bad happens --> Hero is humbled, regroups, works hard --> more struggle, it's looking bad. And at the climax, when it looks like the hero is done for --> then the Underdog preveils.
Hollywood trope that almost never plays out in reality. Except it did this time. Would've made a good YT vid.
I'm getting my Frankenstein cleaned up and ready to put back together. Gave it an ultrasonic bath, cooked it dry, then gave it one last test before I reassemble. Still looking good, but then a capacitor by CXM4024R popped. Like, literally popped. And that little guy handles some PS2 video stuff.... @RIP-Felix maybe this is why your Frankenstein isn't displaying video for PS2 games? Give those 1000uF guys a little poke and see what's up. If that's what happened to yours as well, I'm afraid we might be looking at some other kind of incompatibility or voltage mismatch that needs corrected. I'm just gonna replace all 3 and push forward, will report back in a bit. Takes me about 2 hours to get everything shiny and clean for reassembly.
It could certainly just be a fluke from all the baking and rework, but if we have more than one with this exact issue, I'm gonna be suspicious...
We've seen this issue in at least 4 consoles now. I don't remember if any of the others were frankies. It doesn't appear to be relate to the mod though. I have a COK-001 and COK-002 that work fine. So that first frankie was just bad luck.
I've got a tool I made for finding where pins go when they try to hide, so let me jump in and save some time here.
So, for the 810x that is removed in this picture: 2,3,6,7 are ground. 8 looks to be incoming juice from the chip above the pair of 330 uf caps in the top right corner (per the pictured orientation). 4 and 5 appear to just go where they show themselves going. And pin 1 feeds two large areas on the RSX circled hastily in MS paint below. (obviously only every other pad on that long row, I just didn't know how to circle that properly with one quick pen stroke)
I toned out the rest of the board really quick and that's all I could find anywhere.
Thanks, i wanted a confirmation that pin 1 is really VDDR. The RSX pad layout is the same than previous RSX models, and what you painted matches perfectly with the schematics we had before
Note in wiki im labeliing the output pin "RSX_VDDR" because im not sure the exact voltage of it, in the service manuals of the COK and SEM motherboards that line is named +1.2v_RSX_VDDR but im guessing in the service manuals of the PS3 models with a 40nm RSX model it have a different name because they lowered the voltage with the mitsumi 810x (probably is named +0.95v_RSX_VDDR if the calculations made by RIP-Felix are right)
The capacitor of pin 4 is important, in the datasheet is named "noise decrease pin", is a 0.01uf cap and his purpose is self explanatory. It seems botakompong was not using it because is not mentioned in this tutorial https://www.psx-place.com/threads/f...cecha-with-40nm-rsx.28069/page-76#post-324546
It cant be seen in this photo either, but i would add it because it doesnt seems to do any bad
About pins 2,6,7... in the datasheet is mentioned that are "not connected", and as far i see (without removing it from the board) are not connected either in PS3 motherboards JTP-001 and JSD-001
But... in lot of the mitsumi datasheets is mentioned that the ground pins (and the base of the component) are doing an additional function to allow to dissipate the heat to the motherboard ground plane
So.. maybe thats the reason why you said pins 2,6,7 are connected to ground in KTE-001, with the only purpose of dissipating heat ?, dunno. If thats true it would be something good to do
Actually, a lot of the mitsumi IC's have a metal plane at bottom for this purpose of heat dissipation, but the 810x (neither the other mitsumi chips of the PS3) doesnt have it :/
Thats how it came the idea of improving heat dissipation at bottom by a small drop of thermal silicone under the mitsumi 810x before soldering it, or a thin thermal pad under it
Okie dokie, Frank is running just fine. PS 1, 2, and 3 games are all good. Updating firmware now. This fella was a warranty sealed virgin on 3.50. A rare time capsule. For posterity, and for @RIP-Felix data scraping, it was previously YLOD 3 second, A0403034, A0404401, 2.7 ohm CELL, 1.7 ohm RSX (tossed in the recycling bin before I decided to start logging more ohm readings there) before the transplant. Chosen for two reasons: 1.) RSX ohms were on the low threshold for what I'll consider reballing, and 2.) it was already in the drying oven.
Also, I ripped a pad or three when I was ripping off the exploded cap(s), so this may have the longest jumper wire I've ever run...
@sandungas or anyone else, any time you need a pin toned out just tag me. I'm faster.
@M4j0r this is pretty much thanks to you, and I stand to profit from it. Pick your favorite non-profit charity and I'll toss $100 USD at it when this system sells.
And yes, I replaced the TOKIN caps because I'm probably going to end up offering a 3 year warranty on these, and I'm sick of people messaging me to ask if I replaced them.
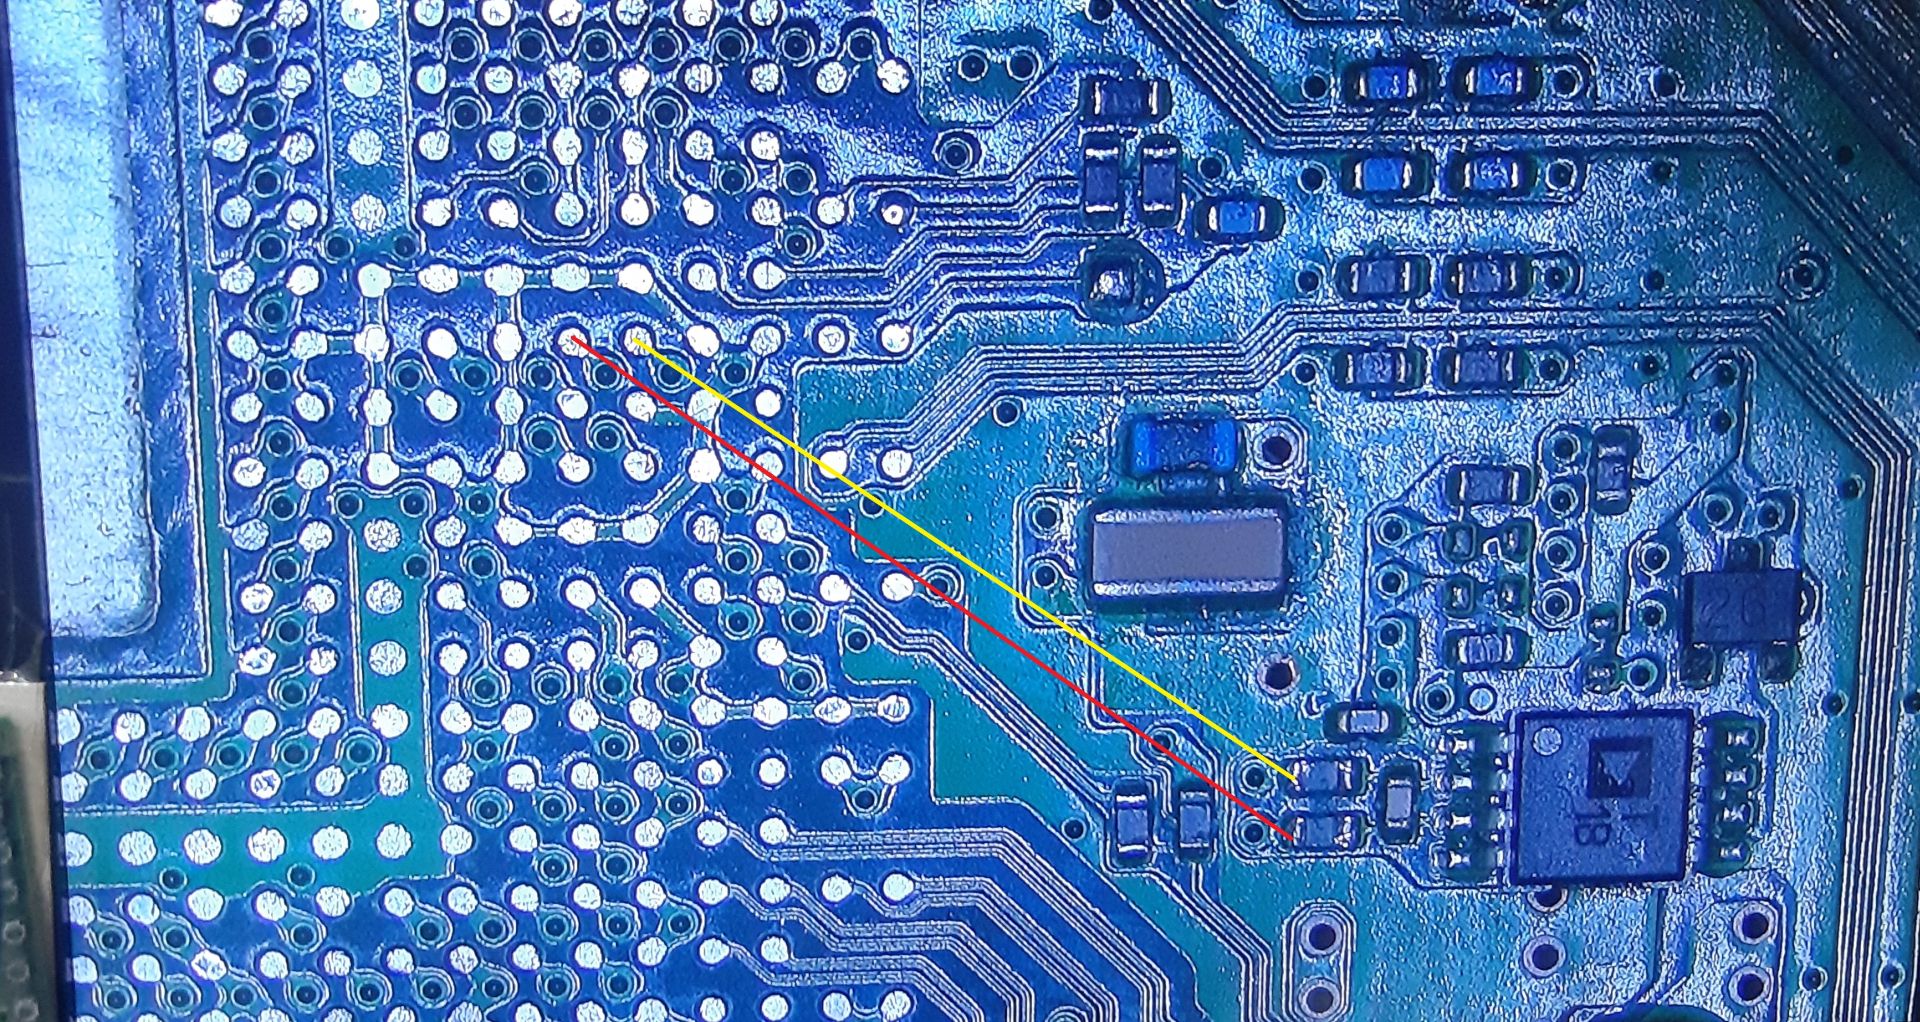
@RIP-Felix or @squeept i need you to check a few syscon pins from the KTE-001 scrap board of the photo, is a bit offtopic but im going to post it here because is related with research
Is a long story and it took many time to reach this point but i will try to resume it, in wiki we have a page where we are still trying to map the sherwood syscon pins https://www.psdevwiki.com/ps3/Template:Syscon_pinout_LQFP_128_pins
Syscon have 3 SPI buses (CELL, RSX, SB), the CELL SPI bus was confirmed by other wiki editor named zerotolerance... from that point (and by checking the official NEC/renesas datasheets) we know at which syscon pins are located the other 2 SPI buses (for RSX and SB)... but we dont know which one is each
The current version of the wiki page is assuming (with question marks, because is just speculation) the RSX SPI bus is at syscon pins 87,88,89,90... and the SB SPI bus at 17,18,19,20
So i made this image with the RSX SPI pads marked in yellow, if the speculation in wiki is right that pads goes to syscon pins 87,88,89,90 (i added the syscon pin number in the image)
Else... if the speculation in wiki is wrong are going to syscon pins 17,18,19,20. There are not more options, is one or the other
As far i can see in the photo, there is a resistor in between the RSX pad named "SPI MISO" and the syscon pin 89... so check for continuity at both sides of that resistor (and meassure the resistor if posible)
For the other line named "SPI MOSI" maybe happens the same and the resistor is at the opposite side of the board, please check that detail too
I also marked in blue 2 VIAS at the most bottom border of the image, is a shame that the photo doesnt shows a bit more down because that 2 lines are connected to 2 little transistors... and that transistors have a direct connection with syscon
Are 2 control signals, either to init RSX, to reset it, to send an alert, or stuff like that, are very special
As you can see i marked also 3 "candidate" pads in blue
Well.. what i need you to do is to follow the 2 traces that goes down from the VIAS to the transistors. The transistor have the pins exposed so you can touch the 2 traces with the multimeter at the transistor pins
And with the other tip of the multimeter touch the "candidate" pads of the RSX i marked in blue to find which one is each
EDIT:
Hmm, just for the record... there is a detail i forgot to mention in the image i drawn, the 2 VIAS i marked with the blue arrows are connected this way, lets say the blue arrow at bottom border of the photo is "VIA2" and the other on top of it "VIA1"
Syscon pin 48 --- transistor1 --- VIA1 (top on the photo) --- RSX pad ?
Syscon pin 76 --- transistor2 --- VIA2 (bottom on the photo) --- RSX pad ?
In other words... this 2 lines in between syscon and the RSX are not a direct connection because each line have a transistor in between syscon and RSX

")