This is not really a full tutorial, it's more about compilation of existing knowledge, which is becoming really hard to find on the internet.
The problem is that, scratched original or burned discs can kill the laser for some PS2 revisions (all 50k and some 70k). I won't write any more on this problem, I assume anyone who reads this thread already knows what it is.
The only known fully working hardware fix is the "PIC fix", which needs to be soldered onto the motherboard. Below is the list of steps you have to do:
Step 1A: You live in USA, buy premade
Just buy a pre-made PIC fix chip from ModsvilleUSA:
https://modzvilleusa.com/products/matrix-picfix-for-v9-v12-ps2-consoles-laser-fix
Trust me, it's a much easier, cheaper and mostly hassle free option. Unfortunately he doesn't seem to ship worldwide, and even if he did, the shipping would undoubtedly be crazy expensive. So that takes us to the option B
Step 1B: You don't live in USA, build it yourself
For this you will need a PIC chip programmer, the chip itself, the appropriate resistor depending on your console model, and optionally some general purpose through-hole PCB and mount for the chip. What I used:
- K150 programmer from China: https://www.aliexpress.com/item/162....order_list.order_list_main.19.2c631802I8SA2T
- PIC12F509-I/P DIP8 chip (Important: PIC12C508, PIC12C509 PIC12F675 will NOT work, I tested them).
PIC12F508 is probably okay too.
It has to be DIP8 package, others are too small to solder wires to, and probably won't fit in the programmer
- An ordinary through hole 1W 5% resistor with appropriate resistance (refer to diagrams from Step 2)
- A small universal PCB + DIP8 mount from my local electronic parts store. Warning - if you go this route, the whole thing wont fit on the motherboard under the radiator. This could especially be a problem in the slim consoles, in my FAT 50k I just routed the cables through the small hole meant for fan plug and into the expansion bay (it is possible to fit in there the PIC fix, 2.5'' HDD and this adapter https://www.thingiverse.com/thing:4749540/files)
Programming the chip
First get your K150 to work. You need Windows, if you have a Windows XP machine any driver you find will most likely work, on Windows 10 it's more hassle. For my programmer, I found these files on the internet, and they work for me (there are many versions, this is the only one that I got to work):
https://mega.nz/file/coNT3AQQ#bUN-CR1Y3pF3AwZO_fJ0oZkYUONPewqTndinZM9w2bo
1. Connect the programmer
2. Install the driver from the above link
3. In Windows device manager, choose driver version 3.4.25.218 (07.10.2011)
4. Disconnect the programmer, connect it again
5. Run microbrn.exe
6. Choose COM port shown in the device manager, click on the correct port even if it's already chosen
7. If nothing works, repeat steps 4-6 until microbrn display something like "K150 programmer ready"
8. Insert your chip into the programmer as shown on microbrn screen, make sure the dot on the chip is aligned like the yellow dot microbrn shows.
From now on, use this video as reference:
9. Important and easy to do wrong: read the chip contents and save the dump somewhere safe. Take an additional note (screenshot of the program is good) of the value in the last memory cell, as shown in the video. Do not program the chip before you do this
10. Load MFIX_H8.HEX file from https://github.com/MechaResearch/MechaPwn/blob/LangPwn/docs/Matrix PIC/MFIX_H8.HEX
11. Click CALIB, now insert the value your chip had before (the one you saved)
12. You can now click program, and then verify
If everything went smoothly, you now have a PIC fix. Disclaimer: I messed up the calibration step (I didn't save the value chip had in the last memory cell, before I programmed it), and my PIC fix still appeared to work correctly. But there is no reason for anyone else to make the same mistake.
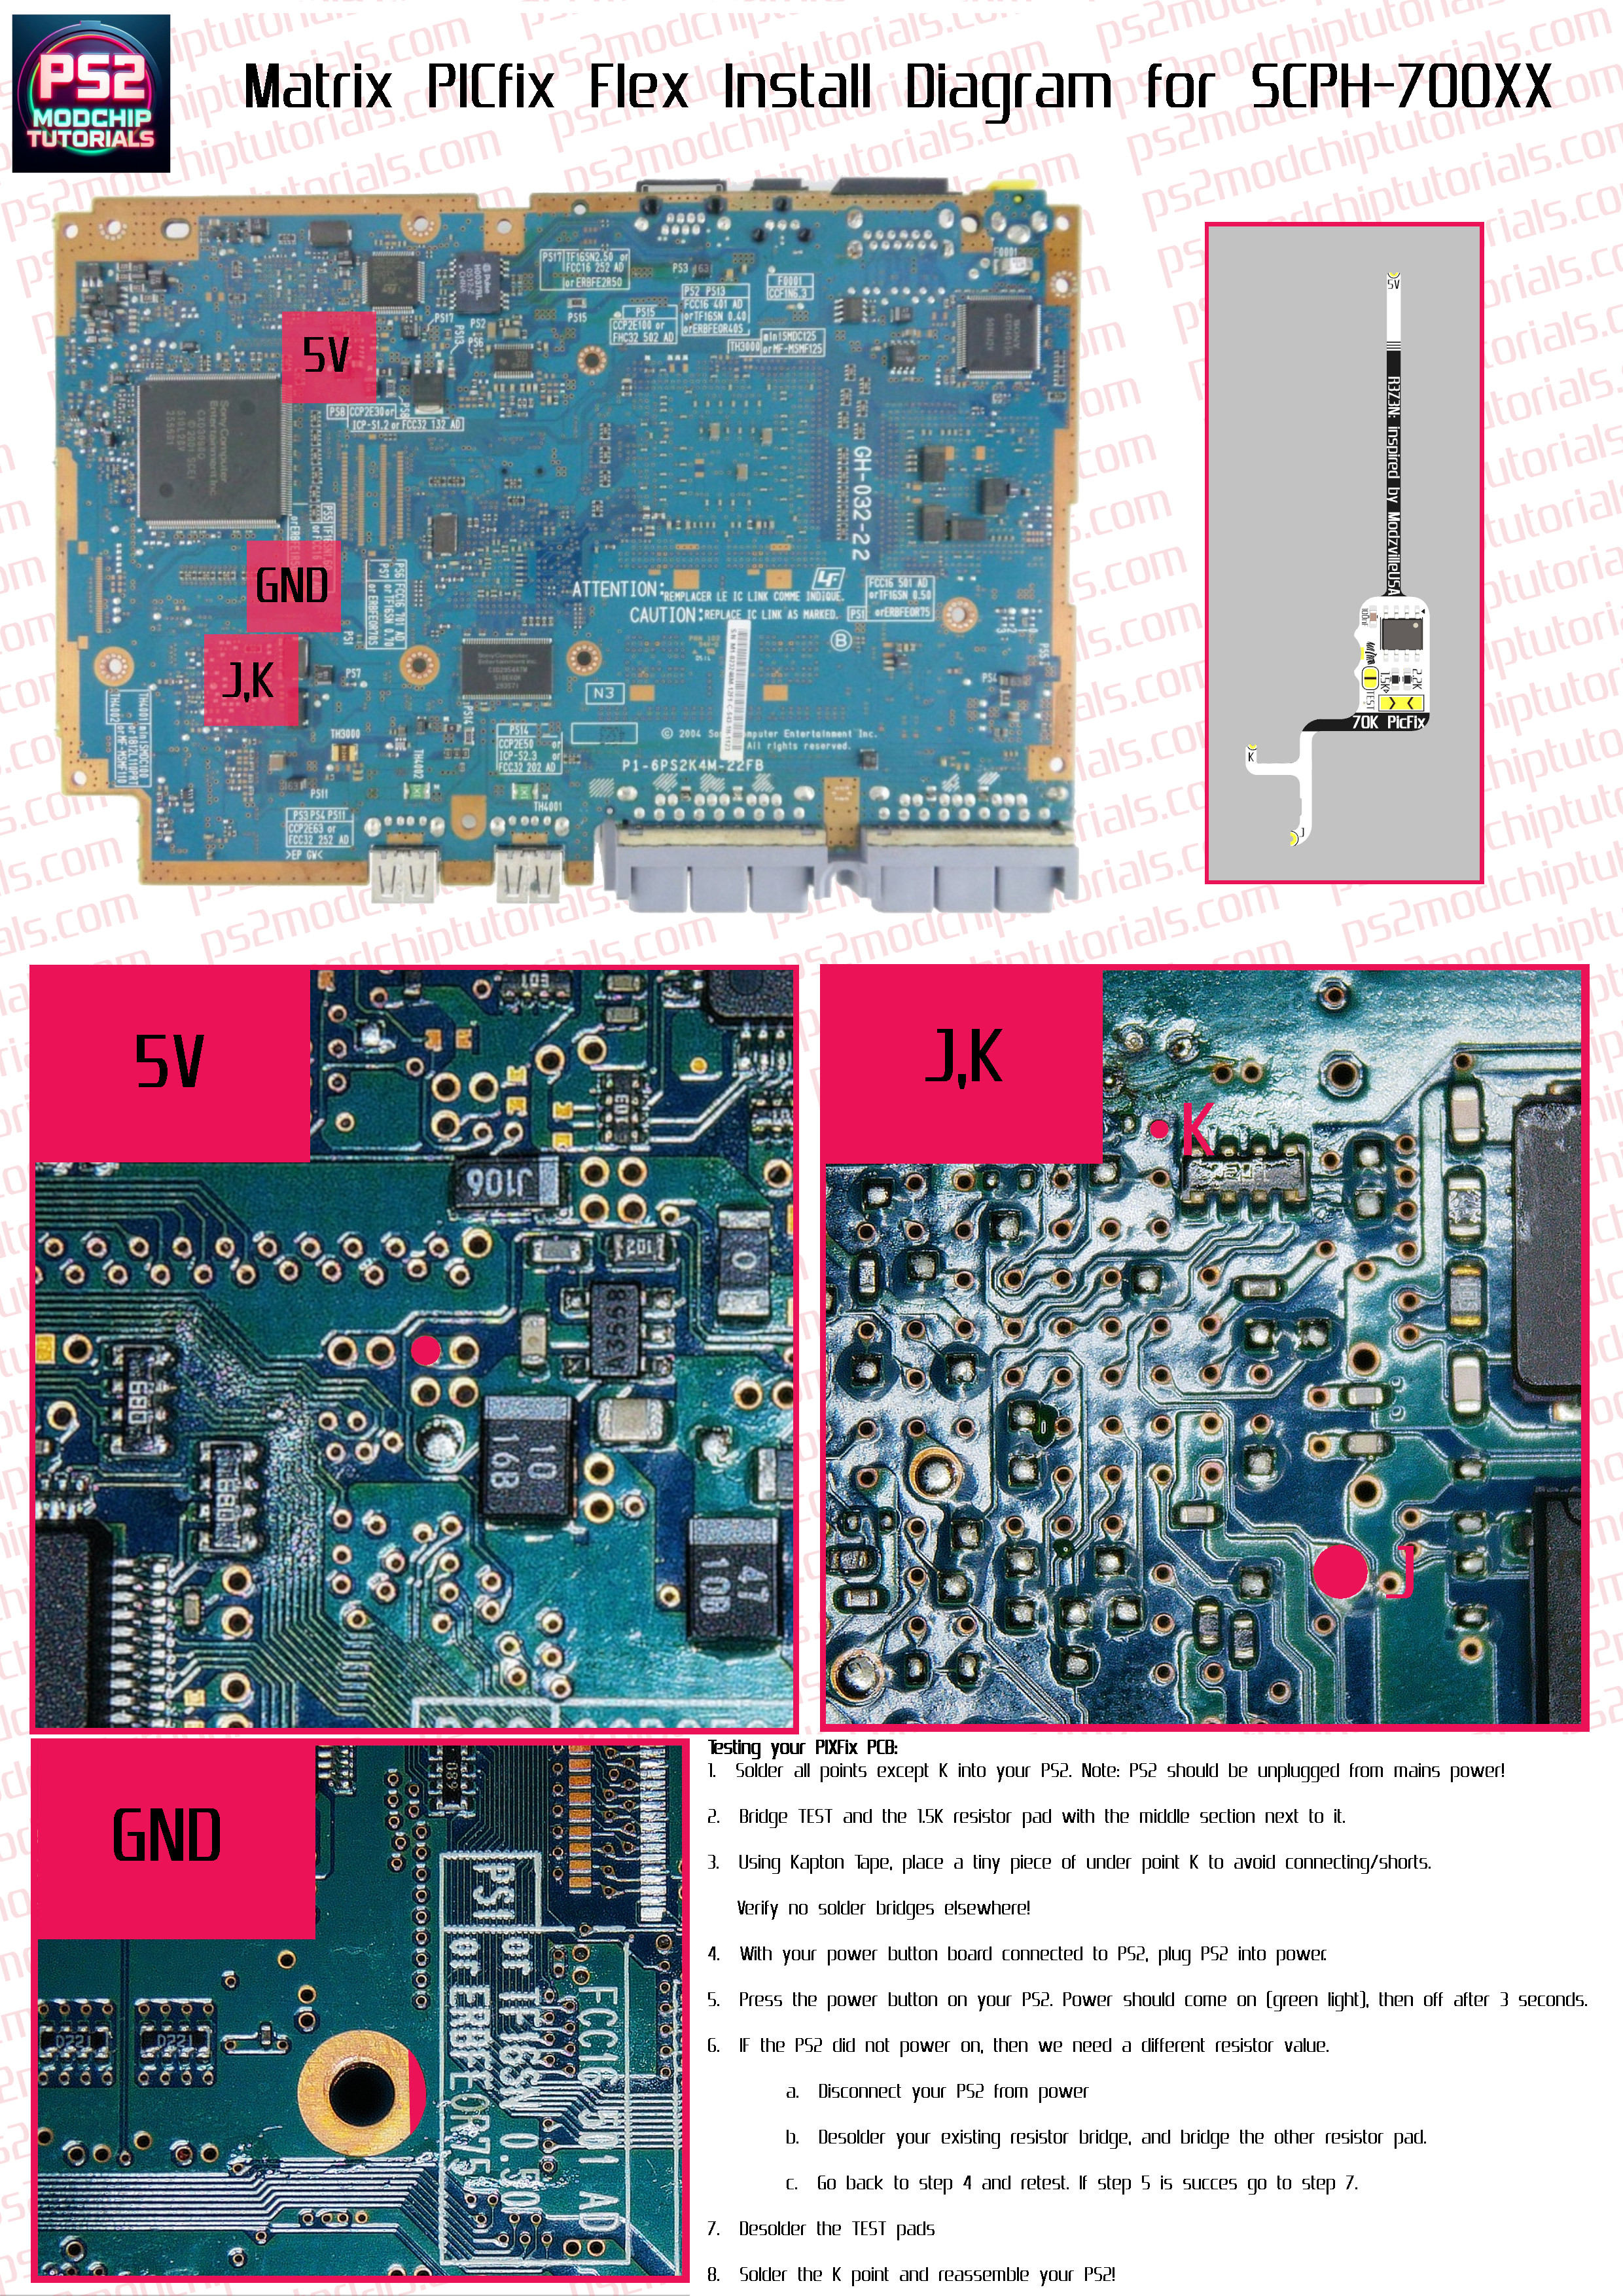
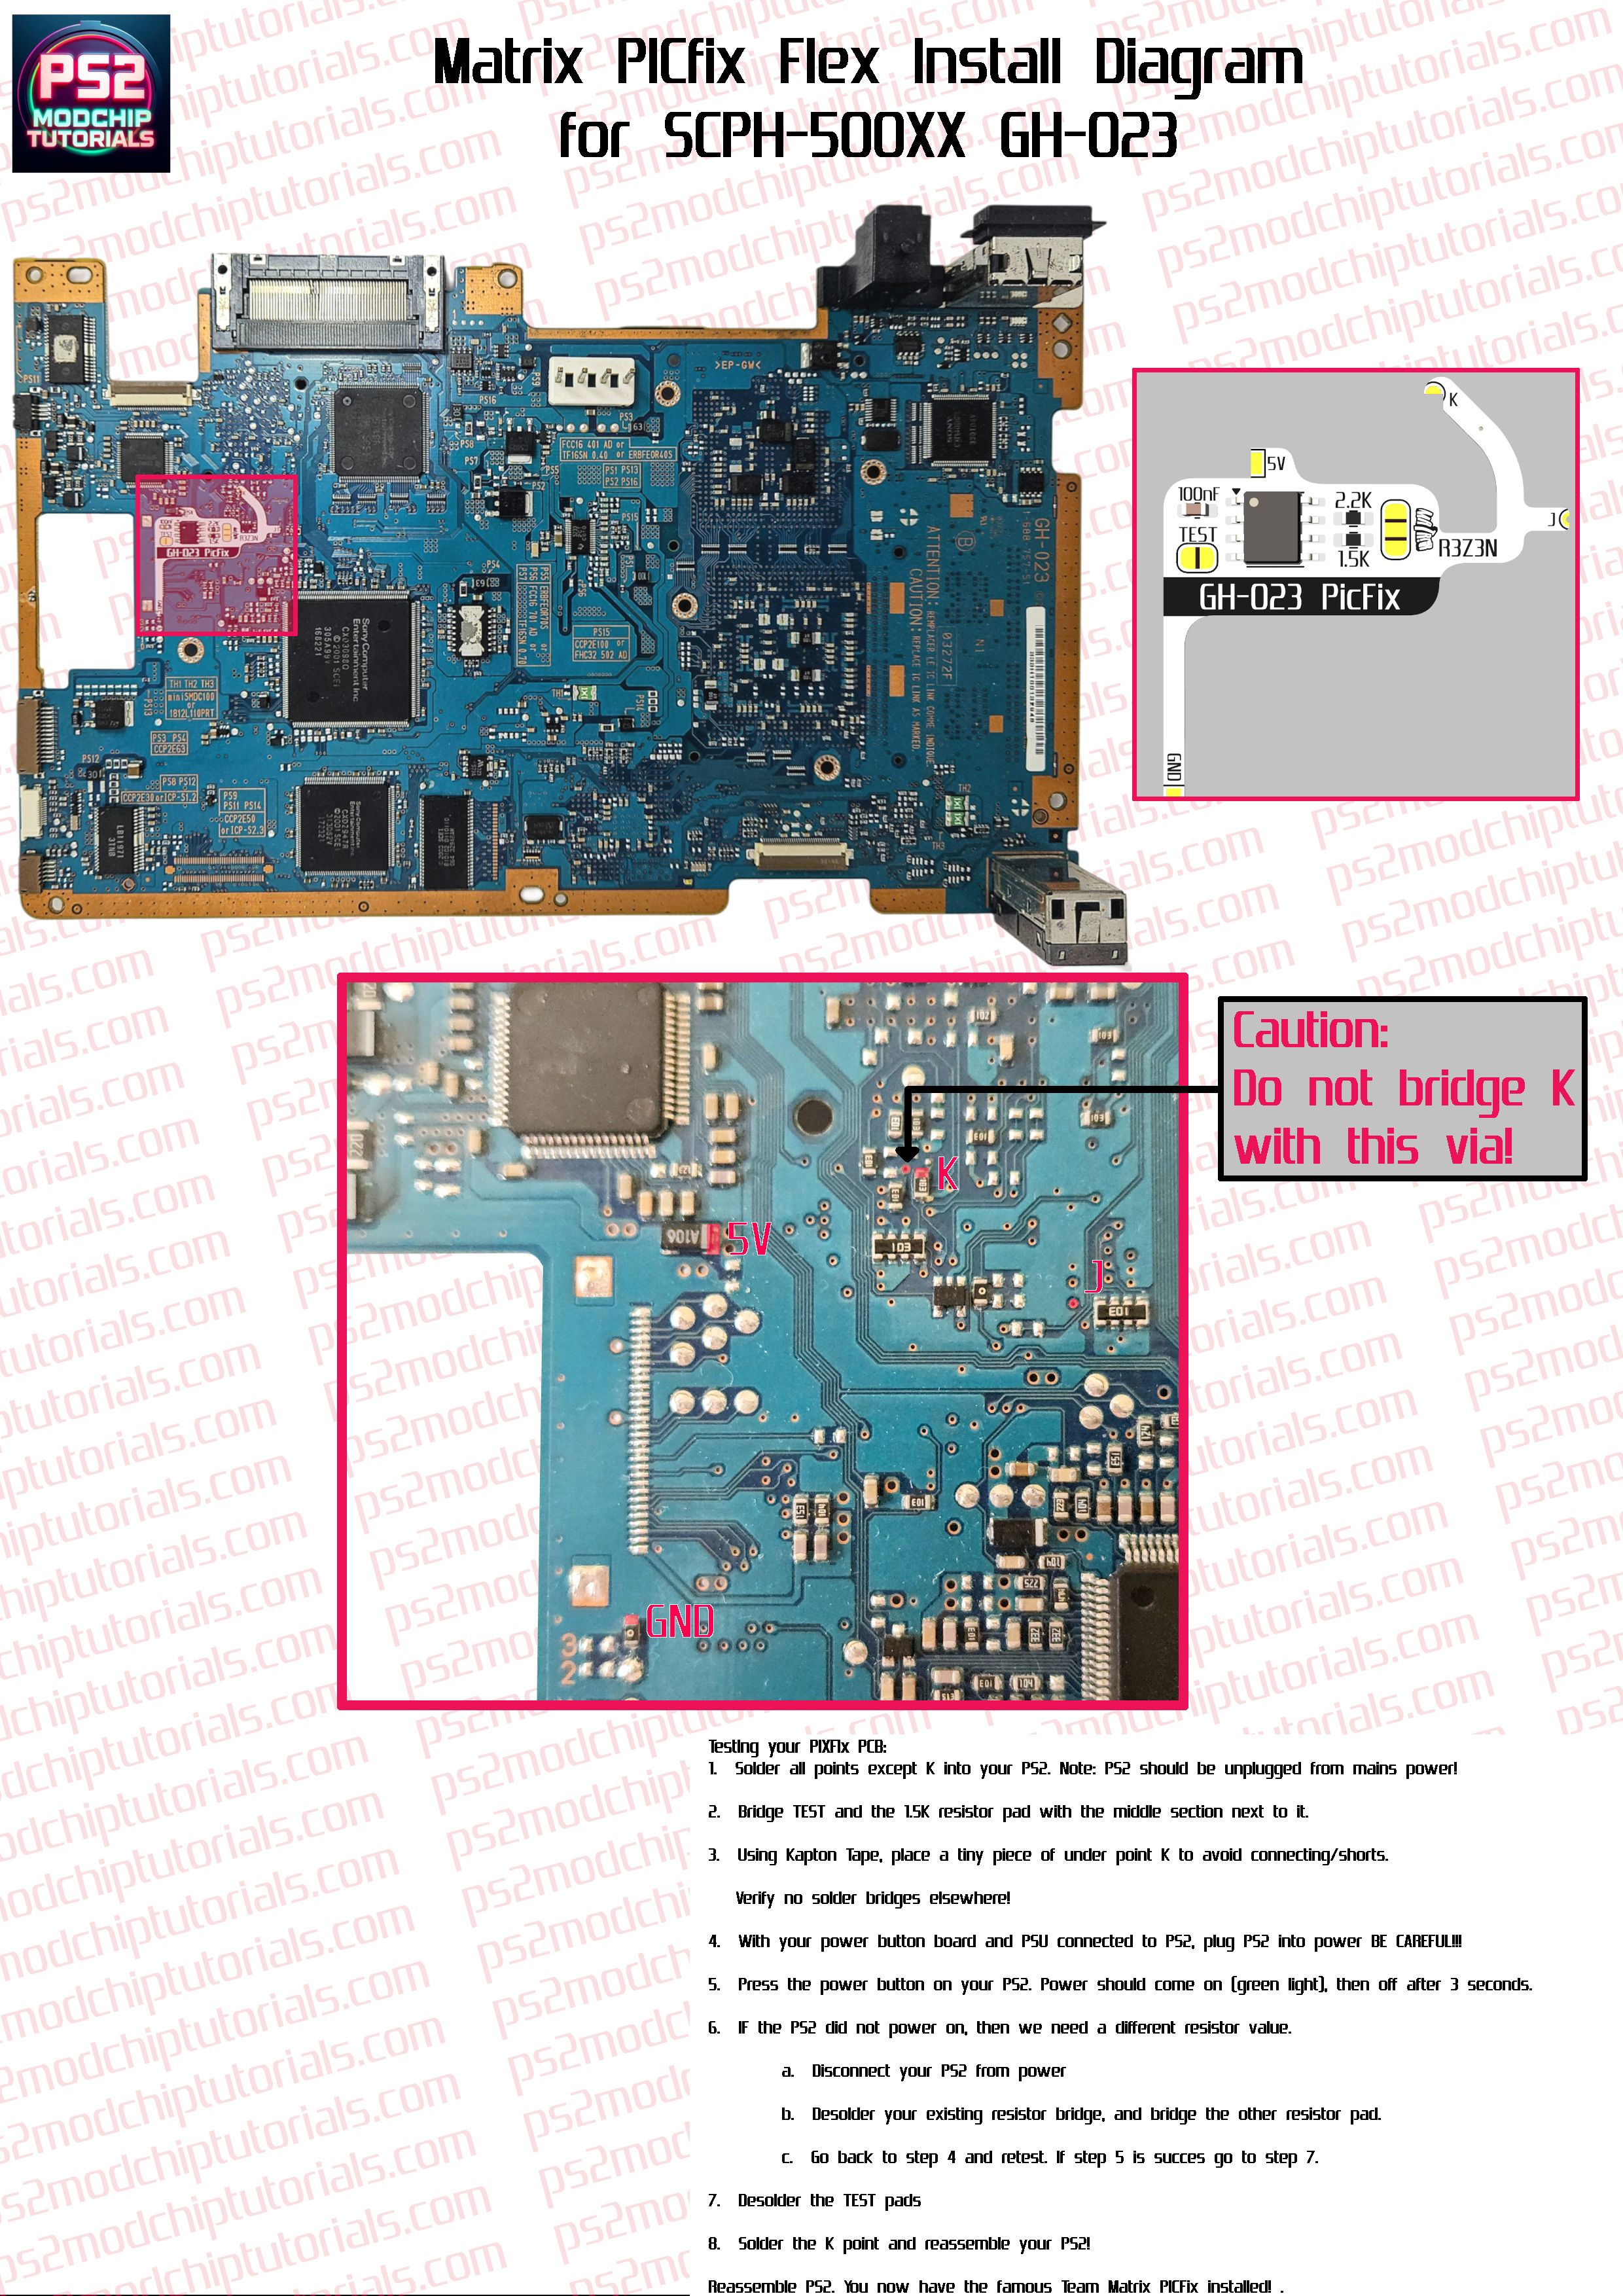
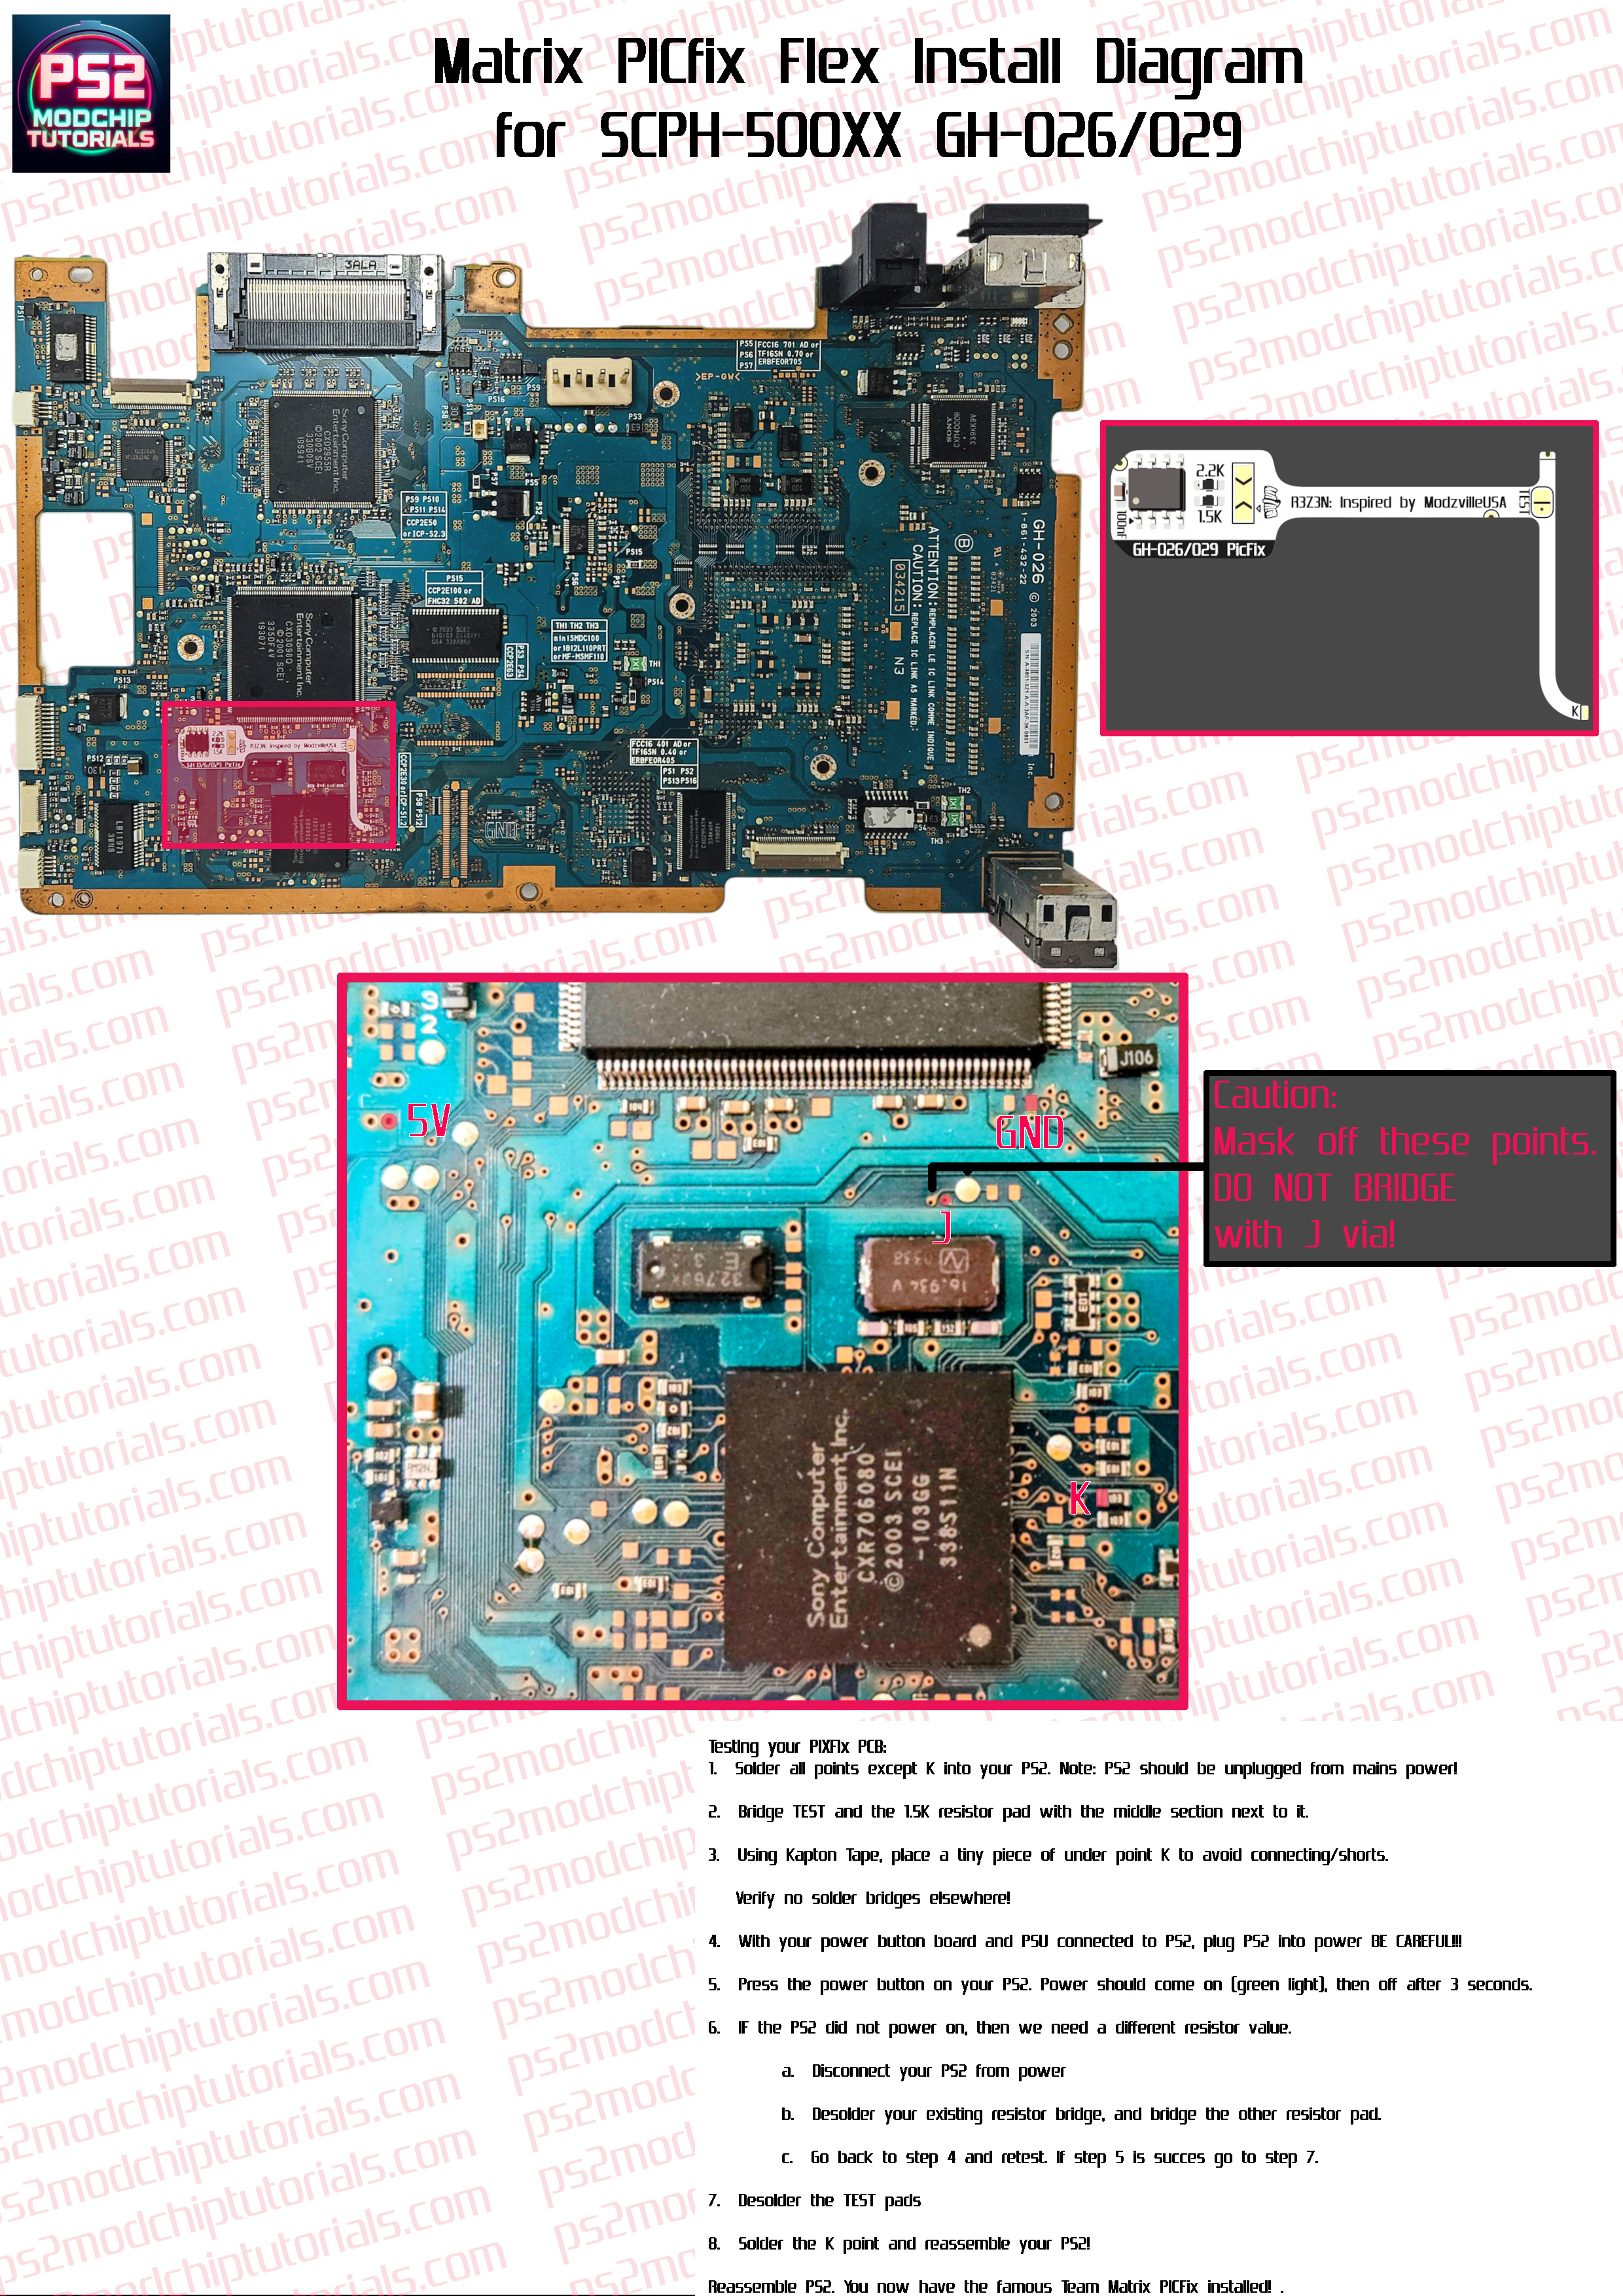
Step 2: Installing the PIC fix
I'm not going to write a detailed tutorial, I'm terrible at soldering myself. Just watch these videos to get a sense of what you need to do:
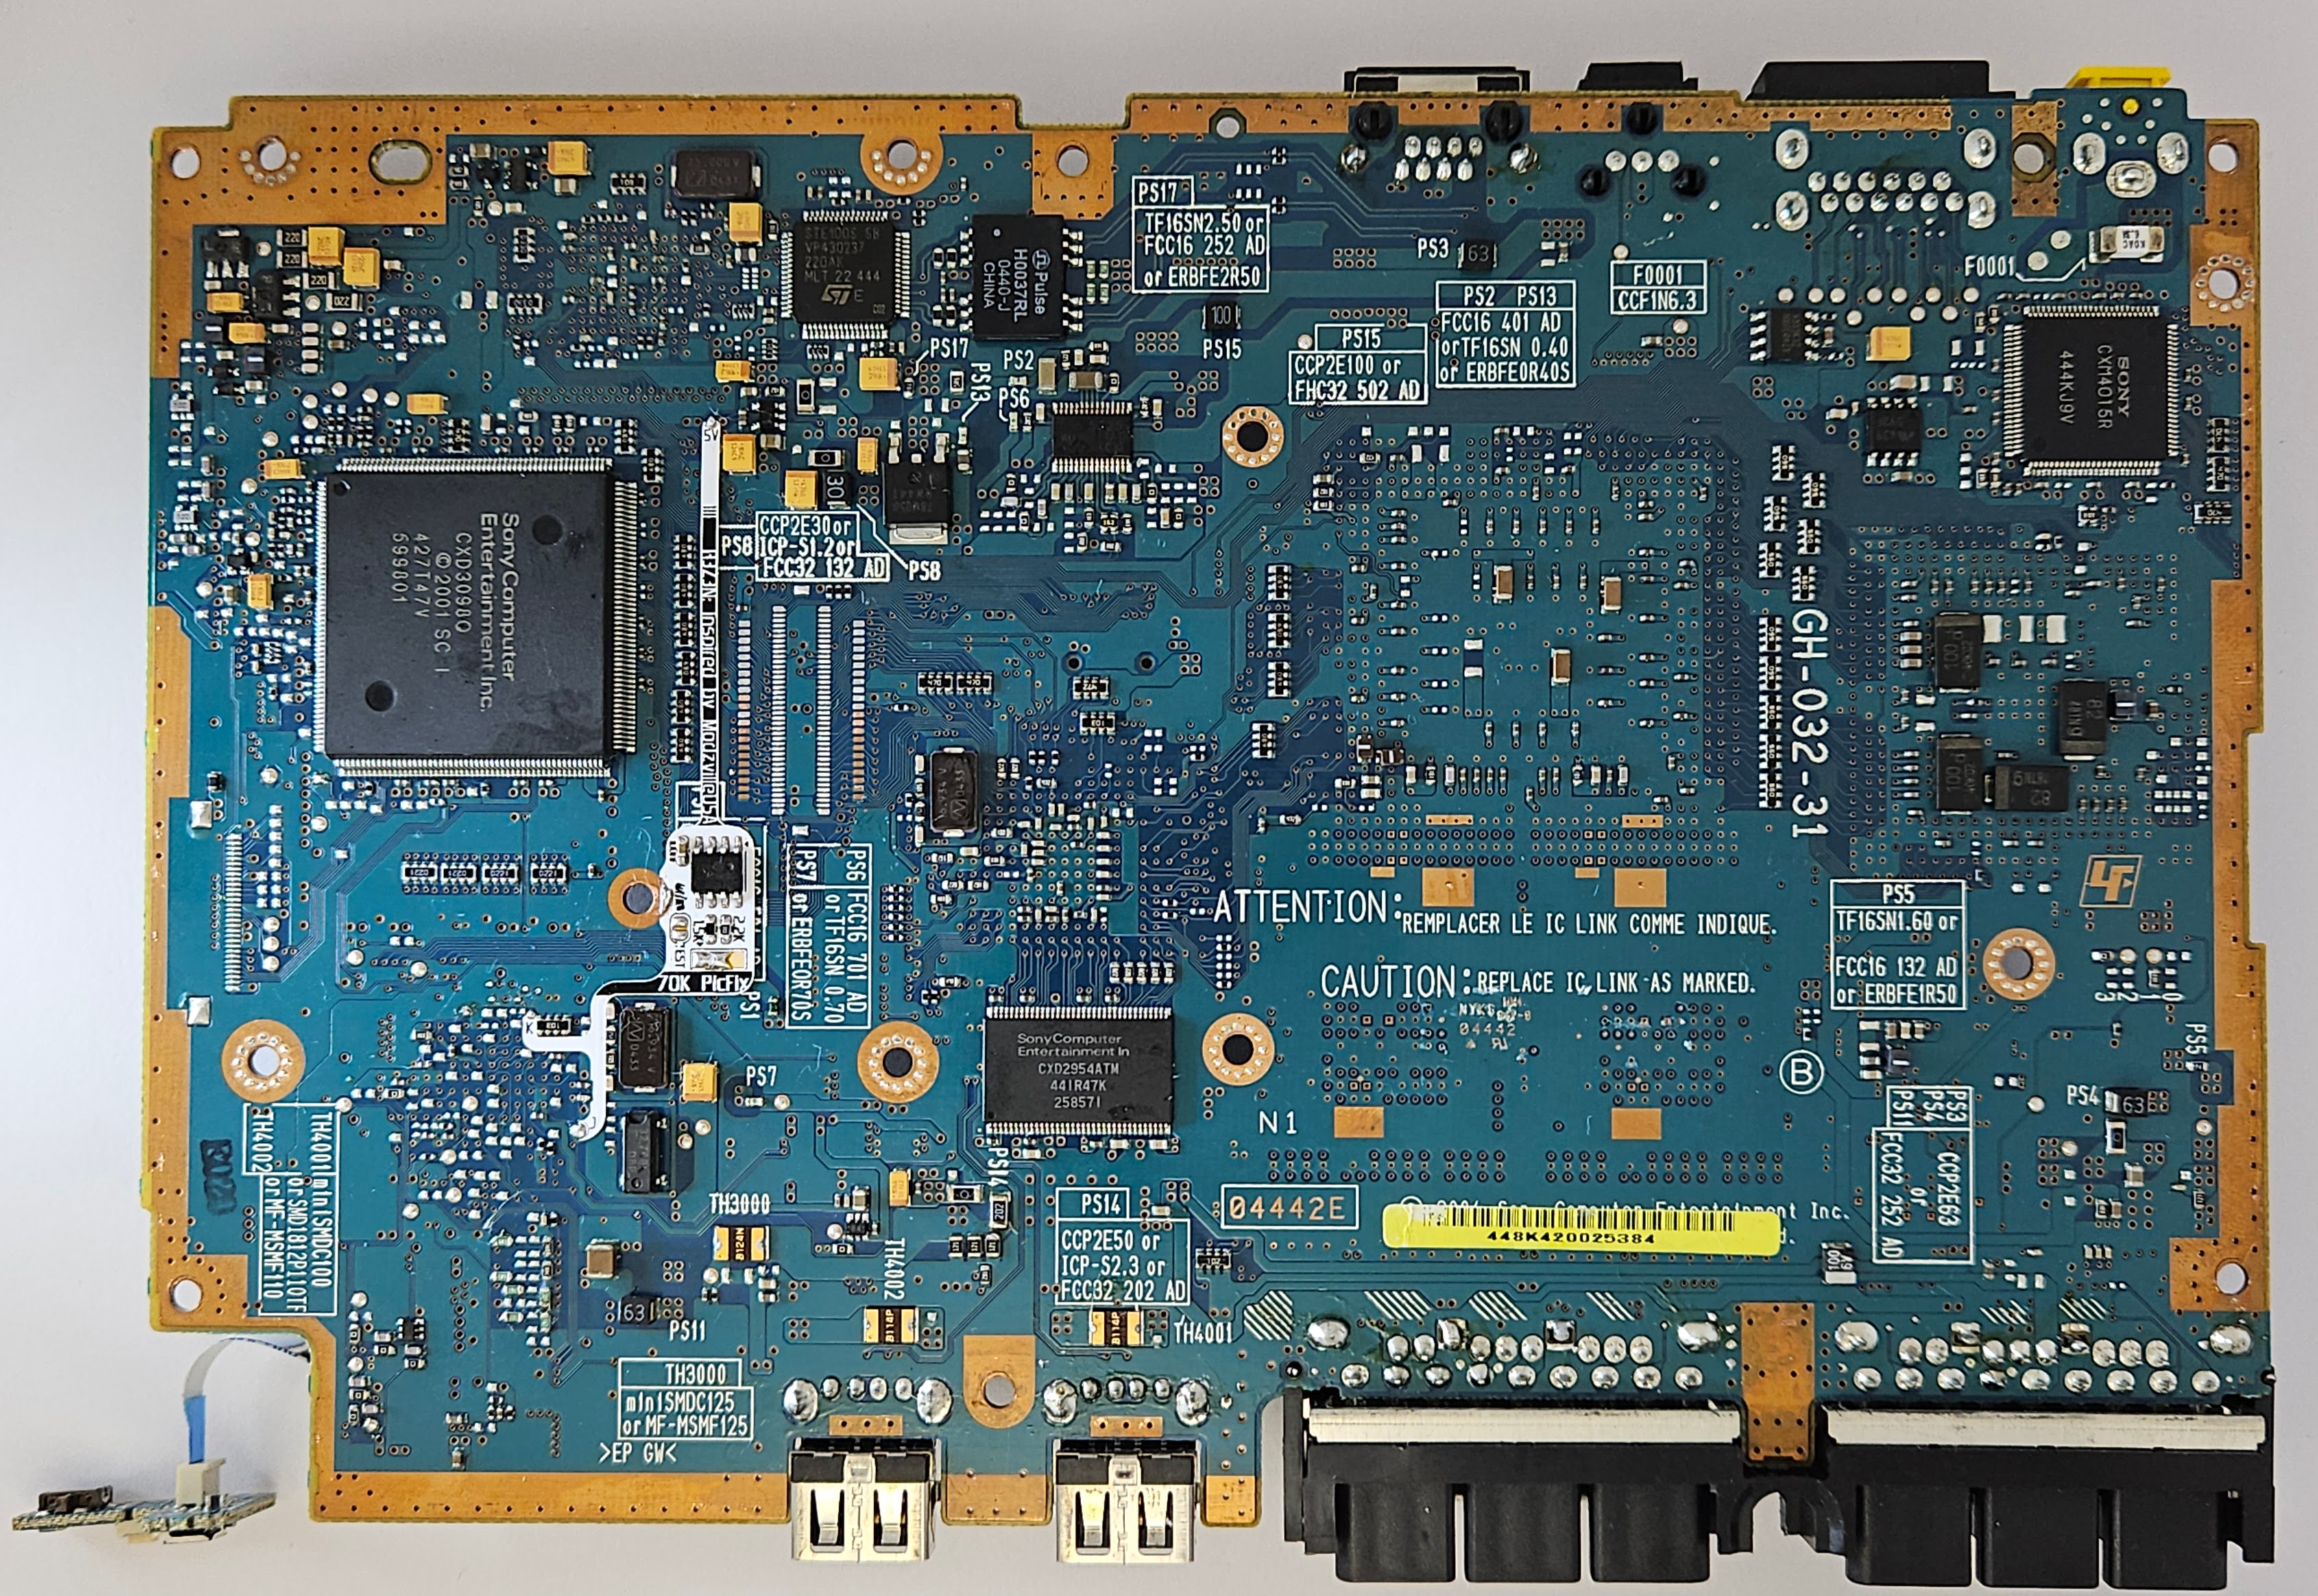
Read the installation diagrams and original Matrix team readme:
https://github.com/MechaResearch/MechaPwn/blob/LangPwn/docs/PICfix.md
https://github.com/MechaResearch/MechaPwn/blob/LangPwn/docs/Matrix PIC/MatrixFix508v2.txt
My tips:
- If you have the option, buy 2-3 PIC chips instead of one, they're cheap and if something goes wrong, you have a backup
- You should use really thin wires, I for example used the inside of a broken USB cable I had lying around
- Use thin solder and quality flux, especially when connecting to the tiny point K
- Buy kapton tape to insulate the area surrounding point K, if you're not good at soldering it's very hard to connect wires there and not ruin the components around it at the same time
- As described in MatrixFix508v2.txt, first connect pin 4 to GND instead of point K, then partially assemble your console and turn it on, to verify that the PIC Fix works as intended. I, for example, learned at this stage that PIC12F675 chips don't work at all, even though Microchip documentation specified that they're pin and code compatible with PIC12F509
- Make sure to properly insulate the entire chip with kapton tape when you're done
- While disassembling the console, feel free to perform other maintenance: replace the battery, thermal pads (I used 1.5mm and it works, same as this guy
), clean and relube DVD worm drive and gears (just don't use sticky silicone grease, I made that mistake and had to clean it all off)
That's about it. If you find an option to buy a pre-made PIC fix, definitely go that route, programming it yourself is a lot of hassle.
The problem is that, scratched original or burned discs can kill the laser for some PS2 revisions (all 50k and some 70k). I won't write any more on this problem, I assume anyone who reads this thread already knows what it is.
The only known fully working hardware fix is the "PIC fix", which needs to be soldered onto the motherboard. Below is the list of steps you have to do:
Step 1A: You live in USA, buy premade
Just buy a pre-made PIC fix chip from ModsvilleUSA:
https://modzvilleusa.com/products/matrix-picfix-for-v9-v12-ps2-consoles-laser-fix
Trust me, it's a much easier, cheaper and mostly hassle free option. Unfortunately he doesn't seem to ship worldwide, and even if he did, the shipping would undoubtedly be crazy expensive. So that takes us to the option B
Step 1B: You don't live in USA, build it yourself
For this you will need a PIC chip programmer, the chip itself, the appropriate resistor depending on your console model, and optionally some general purpose through-hole PCB and mount for the chip. What I used:
- K150 programmer from China: https://www.aliexpress.com/item/162....order_list.order_list_main.19.2c631802I8SA2T
- PIC12F509-I/P DIP8 chip (Important: PIC12C508, PIC12C509 PIC12F675 will NOT work, I tested them).
PIC12F508 is probably okay too.
It has to be DIP8 package, others are too small to solder wires to, and probably won't fit in the programmer
- An ordinary through hole 1W 5% resistor with appropriate resistance (refer to diagrams from Step 2)
- A small universal PCB + DIP8 mount from my local electronic parts store. Warning - if you go this route, the whole thing wont fit on the motherboard under the radiator. This could especially be a problem in the slim consoles, in my FAT 50k I just routed the cables through the small hole meant for fan plug and into the expansion bay (it is possible to fit in there the PIC fix, 2.5'' HDD and this adapter https://www.thingiverse.com/thing:4749540/files)
Programming the chip
First get your K150 to work. You need Windows, if you have a Windows XP machine any driver you find will most likely work, on Windows 10 it's more hassle. For my programmer, I found these files on the internet, and they work for me (there are many versions, this is the only one that I got to work):
https://mega.nz/file/coNT3AQQ#bUN-CR1Y3pF3AwZO_fJ0oZkYUONPewqTndinZM9w2bo
1. Connect the programmer
2. Install the driver from the above link
3. In Windows device manager, choose driver version 3.4.25.218 (07.10.2011)
4. Disconnect the programmer, connect it again
5. Run microbrn.exe
6. Choose COM port shown in the device manager, click on the correct port even if it's already chosen
7. If nothing works, repeat steps 4-6 until microbrn display something like "K150 programmer ready"
8. Insert your chip into the programmer as shown on microbrn screen, make sure the dot on the chip is aligned like the yellow dot microbrn shows.
From now on, use this video as reference:
9. Important and easy to do wrong: read the chip contents and save the dump somewhere safe. Take an additional note (screenshot of the program is good) of the value in the last memory cell, as shown in the video. Do not program the chip before you do this
10. Load MFIX_H8.HEX file from https://github.com/MechaResearch/MechaPwn/blob/LangPwn/docs/Matrix PIC/MFIX_H8.HEX
11. Click CALIB, now insert the value your chip had before (the one you saved)
12. You can now click program, and then verify
If everything went smoothly, you now have a PIC fix. Disclaimer: I messed up the calibration step (I didn't save the value chip had in the last memory cell, before I programmed it), and my PIC fix still appeared to work correctly. But there is no reason for anyone else to make the same mistake.
Step 2: Installing the PIC fix
I'm not going to write a detailed tutorial, I'm terrible at soldering myself. Just watch these videos to get a sense of what you need to do:
Read the installation diagrams and original Matrix team readme:
https://github.com/MechaResearch/MechaPwn/blob/LangPwn/docs/PICfix.md
https://github.com/MechaResearch/MechaPwn/blob/LangPwn/docs/Matrix PIC/MatrixFix508v2.txt
My tips:
- If you have the option, buy 2-3 PIC chips instead of one, they're cheap and if something goes wrong, you have a backup
- You should use really thin wires, I for example used the inside of a broken USB cable I had lying around
- Use thin solder and quality flux, especially when connecting to the tiny point K
- Buy kapton tape to insulate the area surrounding point K, if you're not good at soldering it's very hard to connect wires there and not ruin the components around it at the same time
- As described in MatrixFix508v2.txt, first connect pin 4 to GND instead of point K, then partially assemble your console and turn it on, to verify that the PIC Fix works as intended. I, for example, learned at this stage that PIC12F675 chips don't work at all, even though Microchip documentation specified that they're pin and code compatible with PIC12F509
- Make sure to properly insulate the entire chip with kapton tape when you're done
- While disassembling the console, feel free to perform other maintenance: replace the battery, thermal pads (I used 1.5mm and it works, same as this guy
That's about it. If you find an option to buy a pre-made PIC fix, definitely go that route, programming it yourself is a lot of hassle.