PS3 (Research/Experimental) - NEC/TOKIN Capacitors Replacement - YLOD

Hi i had already posted a thread about my PS3 CECHL01 having problems with some games like (the last of us and bioshock infinite) and in fact it is a issue with the NEC/TOKIN capacitors, i discovered this issue thanks to @Naked_Snake1995 . But the problem is that in my country there are not a single specialized technician in replacing those capacitors and not to mention that these tantalum capacitors for replacement are really hard to find with those values here. So i decided to do it myself (im not a good welder but i have some experience). I have many questions before i start doing the procedure.

1.- From what part of the board should i start ? from the top (in where the rsx and cell are not present) or from the bottom (in where they are present)?

2.- Should i start with the RSX nec tokin or with the CELL nec tokin?

3.- Do i need to bridge the tantalums as many mentions in this post?

4.- The NEC/TOKIN capacitors of the CELL in my ps3 have this code 0E128 and the NEC/TOKIN capacitors of the RSX have this code 0E108, so im guessing that i can use 330uf tantalums in the RSX but im not sure.

5.- What is the best method to remove the NEC/TOKIN without damaging the board and the trails of the capacitor?

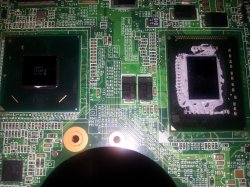
Can i use tantalums from a dead mini laptop board ? they are 330uf but idk the voltage they use... i have a photo of the mobo i want to extract the tantalums.

Thanks in advance
 

Attachments

  • 20191020_151052.jpg
    20191020_151052.jpg
    3.3 MB · Views: 616
It been mentioned in the first page of the value for the caps in replacing the nec tokin. And start from the RSX side one at a time but when you take two nec tokin off from the RSX you have to do the jumper method. Word of advise is take it easy when taking the nec tokin off as there's a few ways of taking it off by either damaging the nec tokon or prying it off slowly without damaging anything around the nec tokin like little caps or chip. There's videos of different method by youtube
 
It been mentioned in the first page of the value for the caps in replacing the nec tokin. And start from the RSX side one at a time but when you take two nec tokin off from the RSX you have to do the jumper method. Word of advise is take it easy when taking the nec tokin off as there's a few ways of taking it off by either damaging the nec tokon or prying it off slowly without damaging anything around the nec tokin like little caps or chip. There's videos of different method by youtube
But should i start from the top of the board (where rsx and cell are not present) or the bottom (where rsx and cell are present) ? the nec tokin from the rsx are always the responsable of the random shut offs of the ps3 ? what about the nec tokin of the cell ?
 
take a few pictures front and back of your board so we all can see what to do to help you.

On older board theres 8 nec tokin in total but some would have at least 4 or 2 nec tokin depending on revision

as for tan caps you need at least 4 caps per nec tokin two wont be enough
 
My PS3's board is a VER-001 so it has 8 NEC/TOKIN ! 4 tokins for cell and 4 tokins for rsx.
 

Attachments

  • VER-001-fuses-thermisters.back.jpg
    VER-001-fuses-thermisters.back.jpg
    1.9 MB · Views: 810
  • VER-001-fuses-thermisters.front.jpg
    VER-001-fuses-thermisters.front.jpg
    2 MB · Views: 413
yep just head a look it need 4 330uf tan caps per nec tokin on the rsx that total 8 330uf tan caps and the cell is 4 470uf tan caps per nec tokin total 8 tan capsas this is on the top of the board without the cell and rsx present

Start from the rsx side one at a time and test each time with the game that causing the crashing. And if the crashing stop test it for a few hours to vaild the fix is done

If you planning to take all 8 nec tokin off you have to do the jumper method

Make sure to get 2.5v 330/470 tan caps

here the links for ordering the new caps if possible

2.5v 470uf tan caps
https://www.aliexpress.com/item/328...1.0&pvid=74903a6f-c834-44bc-a77e-7ecaebffe1da

2.5v 330uf tan caps
https://www.aliexpress.com/item/328...1.0&pvid=1072b57d-db96-44f6-b58e-50ae27ef57f5
 
Last edited:
yep just head a look it need 4 330uf tan caps per nec tokin on the rsx that total 8 330uf tan caps and the cell is 4 470uf tan caps per nec tokin total 8 tan capsas this is on the top of the board without the cell and rsx present

Start from the rsx side one at a time and test each time with the game that causing the crashing.

If you planning to take all 8 nec tokin off you have to do the jumper method
ok i should focus only on top of the board as many stated that if the nec tokins in the bottom of the board are removed then the tantalums needs a bridge wire because these nec tokin have an internal bridge jumper. Well thanks @Edwired. Can i use 330uf tan caps on RSX ? im asking because the nec tokin on the rsx of the board VER-001 is a 0E108 wich have 1000uf and 2.5v so 470uf x4 = 1880uf its too much for one tokin.
 
according to your board the 0E108 is 1000uf to make it come close or above that valve you need 4 330uf = 1,320‬uf per nec tokin replaced which is ok, the 0E128 is 1200uf 4 470uf = 1880uf. The trick is in the math of getting close to the original or above value not below the original value
 
according to your board the 0E108 is 1000uf to make it come close or above that valve you need 4 330uf = 1,320‬uf per nec tokin replaced which is ok, the 0E128 is 1200uf 4 470uf = 1880uf. The trick is in the math of getting close to the original or above value not below the original value
yeah thanks bro
 
The way i figured if there 4 1000 uf = 4000uf the value of 16 330uf = 5280uf as theres no harm going abit above to give the either cell or rsx extra feed as it can keep up the workload. But i havent tested it yet as im waiting on my post to have the 50x 2.5v 470uf tan caps as well 10x original nec tokin incase things going funny on my board
 
Just did abit of math here if we kept the two bottom nec tokin and changed the top nec tokins for the tan caps it might be confusing here

1000uf x 4 = 4000uf for four nec tokin
1000 + 1000 + 330 +330 +330 + 330 + 330 + 330 + 330 + 330 = 4970uf this for two nec tokin and 8 330uf tan caps

1200uf x 4 = 4800uf for four nec tokin
1200 + 1200 + 330 +330 +330 + 330 + 330 + 330 + 330 + 330 = 5040uf this for two nec tokin and 8 330uf tan caps

Judging the original value and the new tan cap we are going over the original value just a small margin without the massive overshoot
yeah thats an enough amount of uf. im going to replace 1 nec tokin rsx for 4 tant caps 330uf and test the game if the issue persist so i need to replace another until the game becomes playable.
 
Yeah that correct way of doing that. I would swap one nec token on both cell and rsr for 4 tan caps at the same time to balance out sometime it mostly RSX related then again cell could be doing it as it mainly a guessing game to figure out which one is causing the problem
 
If you want to "diagnose"/test this issue before jumping straight to removing them (they are a PITA to remove, not like the videos I've seen online where they just pop off in one piece like nothing), I'd suggest to just piggy-back caps on the original ones to see which one that needs to be replaced.

EDIT: By the way: It looks like I'll get my train-wreck look-a-like YLOD CECHA01 imported from the states is arriving today. Unfortunately all seals has been broken and some nice person has cut a big "vent" hole in the bottom so the fan is completely visible.

I'll update you guys regarding replacing the tokins, all fingers double crossed :encouragement:
 
Last edited:
And, im not sure if what im going to say exists in all PS3 models, but in CECH-25xx series there are 4 "dummy" smd components at the corners of CELL/RSX that seems to be there to prevent the substracte to "squeeze" the BGA solders
Lets say... the substrate cant move down because is laying on top of them, touching them
The height of that components is the distance in between the substrate and the main motherboard

All this details prevents the bending of the motherboard and deformations of the solder balls

g

Just to add onto this in my experience ive found them across all early models but not always which i found very odd? even when opening a factory seal unit. I tend to remove them as my IR rework station generally moves them about and out of place upon removing the BGA's or somtimes i can easily knock them with my desolder braid so i found just removing is best so they dont sit uneven if they have moved and i dont notice. Is it recommended to remove these? i cant really say yes do it but for me it still worked fine since i found some with out them i saw no issue leaving them removed as long as i made sure my BGA's were 100% flat upon re-fitting. i just called these "stand offs" which basically as u described they are stands for the BGA's to sit/rest on.
 
If you want to "diagnose"/test this issue before jumping straight to removing them (they are a PITA to remove, not like the videos I've seen online where they just pop off in one piece like nothing), I'd suggest to just piggy-back caps on the original ones to see which one that needs to be replaced.

EDIT: By the way: It looks like I'll get my train-wreck look-a-like YLOD CECHA01 imported from the states is arriving today. Unfortunately all seals has been broken and some nice person has cut a big "vent" hole in the bottom so the fan is completely visible.

I'll update you guys regarding replacing the tokins, all fingers double crossed :encouragement:
Sorry for my ignorance bro im not a native speaker, but what is a PITA ? and what do u mean with piggy back caps on the original ones ? thanks
 
Sorry for my ignorance bro im not a native speaker, but what is a PITA ? and what do u mean with piggy back caps on the original ones ? thanks
Hi buddy! No problem at all. PITA is short for pain in the a* =)

By piggy-back I meant that you could solder a capacitor onto the legs of the original NEC tokins (in parallel) before removing them in order to check if it solves your YLOD problem. No need to remove the tokin before testing, assuming it's not a dead short.

On a side note:
Thanks to some testing done by @squeept we learnt that fully shorted NEC tokin could result in instant YLOD, so I'd first use a multimeter to check if the resistance between the ground and positive pads/legs to see that it's not a dead short. If so, obviously this NEC must be found and removed.
 
Last edited:
Hi buddy! No problem at all. PITA is short for pain in the a* =)

By piggy-back I meant that you could solder a capacitor onto the legs of the original NEC tokins (in parallel) before removing them in order to check if it solves your YLOD problem. No need to remove the tokin before testing, assuming it's not a dead short.

On a side note:
Thanks to some testing done by @squeept we learnt that fully shorted NEC tokin results in instant YLOD, so I'd first use a multimeter to check if the resistance between the ground and positive pads/legs to see that it's not a dead short. If so, obviously this NEC must be found and removed.
Thank u so much bro @jacobsson ! that's an interesting idea, im going to do that first in order to check what tokin is the responsable of the issue.
 
Back
Top