PS3 (Research/Experimental) - NEC/TOKIN Capacitors Replacement - YLOD

Just adding another success story!

I own a CECH-A01 since launch and it started failing in 2012 where it would shutdown in the middle of a game. I had it reballed at ps3repairshop.com (no longer in business), but the same thing happened again in 2014 so I bought a super slim and put my fat in my garage.

Fast forward to few months ago, I started reading about how the fat can be made into the ultimate retro gaming machine with CFW. I took out the old PS3 can tried using it. Yup, still YLODed less than 10 minutes into TLOU. I then came across this thread and got curious. I bought a lot of two clean but YLOD CECH-A01s on eBay, both still with the warranty sticker (so no funny business), with the intention of practicing the repair before doing it on my own console. The last time I soldered something was adding a DMS3 modchip to my PS2 in 2003. :)

I was too successful and was able to revive both eBay consoles. I was able to play the entire TLOU prologue on both of them with no issues at all. It's only been a day, but they seem to still be working without issues. If I'm able to fix my original console, then I'll have 3 fully functional CECH-A01s, enough to last me a lifetime of retro gaming.

For reference, here's my fix:
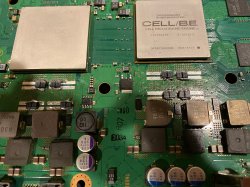
Replaced all the NECs with 32 capacitors. The capacitors are KEMET T520B337M2R5ATE009 from Mouser (Newark has them at a discount now). They're not cheap, but they're the closest specs to the NECs that I could find, and they were B case, so I could fit on the board without having to put them at an angle. They're 330uF/2.5V/9mOhms.
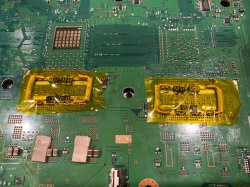
Bridged with 2 wires only using 14 gauge wire (important!)

I had some learning moments with the first PS3! I tried to replace only a few capacitors, but it didn't work until replaced all of them. Also, the first time I bridged it, I used 22 gauge wire, despite the advice in previous posts. It booted up for 10 seconds and then turned off and subsequently had instant YLOD. I opened it up to see that the wire burnt up (see picture). I replaced it with 14 AWG which works now.

Anyhow, thanks for all the information!

kinda glad i seen someone use the same Tal caps i did early on in this thread, i never had any success from 12 consoles i attempted this on using these so i can at least confirm in my cases re-balling was the fix with the ones i tested these on and not these caps. They are perfect for this so i might get some more motivation to try more consoles now. keep us updated how the consoles go over time.
 
i just ordered these for my CECHB01 to see if these will work on it, can you post another photo of the other side of the board?

The caps on this side aren't perfectly aligned because it's cramped there and I soldered it in places where it was easier to reach with my soldering iron.

I went out into the apocalypse and got some 14 AWG solid wire from the hardware store and replaced my one 14 AWG stranded wire with two instead. This should distribute the amps so that it's less likely to overheat. The machines still turns on but I haven't had the time to test it more.

I've been thinking, given size of the B case, I could put all 32 on the back side where it's easier to solder and keep the NECs on the other side as the bridge. This would eliminate the need for bridging wires and even if the NECs were bad, I would have the full set of new caps.
 

Attachments

  • IMG_0534.jpg
    IMG_0534.jpg
    877.6 KB · Views: 416
  • IMG_0535.jpg
    IMG_0535.jpg
    1 MB · Views: 409
Is this guy fixable?

8191fa135c7ce0a7ac08f8cca6718858.jpg


several triangles on the picture and it sometimes have picture and sound and sometimes just sound. Controller syncs too.

I opened it up and saw multi layers of Kleenex on the back side of RSX&CPU. I've removed them and now no picture no sound and no red light on digital optical output on the back of the console.
 
Last edited:
Is this guy fixable?

several triangles on the picture and it sometimes have picture and sound and sometimes just sound. Controller syncs too.

I opened it up and saw multi layers of Kleenex on the back side of RSX&CPU. I've removed them and now no picture no sound and no red light on digital optical output on the back of the console.

Put pressure back on say just the GPU and see if u get the same results as the pics again. see if u can isolate the issue by doing this then try just the CPU.

Is the red light very very dim on the optical output if u open its little flap? when in this state can the controllers sync? kinda looks like partial GLOD to me so far.

I've tried that but got nothing

Does a reflow make it?
 
I've one question. I've used the tantalums from a 3000's model to try to fix a 2000's. Result is. After 4-5 secs the console shuts down. The console longer stays on than it was before. What should I do next? Why doesn't it stay on?
 
I've tried that but got nothing

Does a reflow make it?

If its GLOD, no a replacement GPU will be needed. U could try reflowing it if its not and as a test to see if u get different results but always best to re ball. reflowing wont tell u if u have any contamination on the existing pads or if u had a cold solder join etc... but if u had a cold join the pressure test should have shown u something but since it didn't chances are its not that. keeping in mind the pressure test doesnt always work 100% either but generally it does have a better chance to show any signs of life if its still there usually.

I've had a PS3 Slim CECH 3001a that was artifacting too and the only solution for me was reflowing the cpu and gpu and after that i added a new thermal paste on it. No more problems till this day...

This really doesn't help much as it doesn't tell u or us which component was as fault as u did both BGA sites. highly unlikely both sites needed reflowing if that was the case. slims were common for having contamination on their BGA sites from factory tho.
 
If its GLOD, no a replacement GPU will be needed. U could try reflowing it if its not and as a test to see if u get different results but always best to re ball. reflowing wont tell u if u have any contamination on the existing pads or if u had a cold solder join etc... but if u had a cold join the pressure test should have shown u something but since it didn't chances are its not that. keeping in mind the pressure test doesnt always work 100% either but generally it does have a better chance to show any signs of life if its still there usually.


This really doesn't help much as it doesn't tell u or us which component was as fault as u did both BGA sites. highly unlikely both sites needed reflowing if that was the case. slims were common for having contamination on their BGA sites from factory tho.
Mine was artifacting in first place and then it became GLOD, only reflowing the cpu and the gpu ( i did a quick reflow 3 mins and 20 sec on both sides at the same time and after that i added new thermal paste because the original was dried ) was my only solution and it's working fine till this day.
 
Mine was artifacting in first place and then it became GLOD, only reflowing the cpu and the gpu ( i did a quick reflow 3 mins and 20 sec on both sides at the same time and after that i added new thermal paste because the original was dried ) was my only solution and it's working fine till this day.

I wont go into this too much as its not related to this thread but if it was GLOD the substrate was more than likely the cause since u said it was GLOD, so it will come back at some point its just a matter of when. U can recover GLOD GPUs sometimes but they are always temporary. u cant reflow anything in that short amount of time and if u used a heat gun i highly doubt u even reflowed the solder properly.
 
I just have removed all TOKIn caps of a CECHA model PS3 and replaced them with 470uf 6.3v tantalum caps (yellow ones). Luckily It works but have some doubts because I installed 14 caps instead of 16 for every 4 TOKIns. Should I install 2 more?

Here are some pics. I know it's not a perfect job and I have toasted my caps "shame".

dd339e4f65ecb6e326bd74fecb45b5ce.jpg
 
Hi
All
I have BC ps3, motherboard is cok-002
I replaced all the caps with working and tested TANT ones and put link wire but the wire burnt after about 5 mins or so while I was hovering through the ps3 menus

I then retested all the TANT caps but was about to put them back but to find I have a short on the 12v
How Can I find what is causing this short
Can i use bench power supply

I have checked all the board cant find any burnt / cracked components
At the moment there are no TANT caps soldered
Checked that solder is not shorting anything also

Please can someone help me
Thanks
your GPU or CPU might be fried this would cause a short.you need to use multi meter and test from the starting point of your 12v power trace. Anything could be shorted. It is impossible to just know the answer without proper testing. My suggestion is read all the posts in this guide to get more information. Pictures are a good start so people can see the quality of your work. Good luck:grenade:
 
Hi
I have been reading and checked all the board but don't see anything burnt
Is there a quick way of finding the short
oscilloscope
download.jpeg.jpg

Or trace it like I told you with multi meter from the starting point of your 12v. But I think you are in a pickle. And still no pictures. So offers of help will diminish. If you don't follow advice. And think there is a magic quick answer. If there was a quick answer you would have gotten one . The answers you have received are most common problems. :troutslap:
 
Last edited:
oscilloscopeView attachment 25152
Or trace it like I told you with multi meter from the starting point of your 12v. But I think you are in a pickle. And still no pictures. So offers of help will diminish. If you don't follow advice. And think there is a magic quick answer. If there was a quick answer you would have gotten one . The answers you have received are most common problems. :troutslap:
I have removed all the tant caps i put
 
Back
Top