PS3 Tantalizer - Beta Release (v0.2b)
(Order or Download from OSH Park HERE)
EDIT: I removed v0.2b when releasing v0.3b
Notes:
- If you choose to use this PCB, you are doing so at your own risk! I cannot be held responsible for any damages or loss of life resulting from use of this product!
- This PCB is designed to make it easier and safer to attach tantalum/MLCC capacitors to your PS3. Removing the NEC/TOKINs and replacing with Tantalum/MLCC capacitors is an experimental mod not guaranteed to fix the problems you are experiencing. You must properly troubleshoot your console to decide if this mod is right for you.
- You must order a minimum of 3 boards. I recommend ordering 3x (currently 3x costs $4.20 - No I didn't plan that). That will get you get 9 total. That will be enough to replace all the NEC/TOKINs on a PS3 and give you a spare in case there is a defect in the other 8.
- MLCC pads are meant for 0805 case size.
- Tantalum pads are a standard 7.3x4.3x1.9mm (LxWxH). You can use other types of capacitors that fit this footprint, such as aluminum polymer, tantalum polymer, etc.
- You must choose 0.8mm board thickness in the options during checkout. This ensures it'll fit underneath the RF shield when you reassemble the console.
- You must buy 1.9mm height capacitors. This ensures it'll fit underneath the RF shield when you reassemble the console.
- You can download the Gerber files from OSH Park if you perfer to have another board house manufacture your Tantalizers. Just be sure they know the edges are castellated and that you need 0.8mm board thickness.
Pictures:
View attachment 32937 View attachment 32930 View attachment 32942 View attachment 32941View attachment 32939View attachment 32936 View attachment 32940
Discussion:
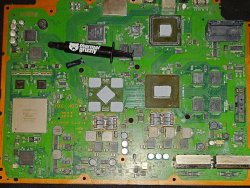
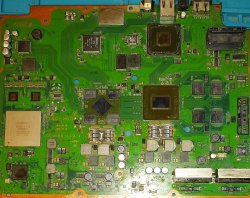
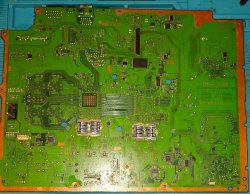
I recieved the latest alpha revision and it looks good. I got the castellated edges right this time and they wick the solder really easily. This was much easier to install without adding too much heat. I think they might be easiest to install with a chisel tip or perhaps a knife edge. I used a T12-C4 for the thermal mass. This worked well to drive the heat down to the rails, but did make it hard to control. So some of the Thermal VIAs got filled with solder, not a big deal. With flux they wicked well, and produced the easiest install I've had yet! So mission accomplished!
I have not attempted to use them yet, so they are untested on console. The one pictured above was installed on a dead board just to test how easy it is to install. I did confirm with a multimeter that the rails are not shorting or anything. They are electrically sound. The next step is to populate and test. I have opened the beta, so anyone can DL or order them from OSH Park.
Just be warned that they need a little trimming. They come from the factory with some burrs that need removed. Takes a few minutes, but it's not hard.
View attachment 32938 View attachment 32931
It's fine if you don't want to participate in the beta, potentially burning down your house or damaging your PS3. Once others and I have installed it and confirmed they work, I'll update the listing on OSH park with the v1.0, indicating a fully tested/working PCB.