M4j0r
Developer
Story time:
In early 2024, two faulty NPX-001 boards where bought by @chattrapat_s and subsequently the eMMC was dumped. @zecoxao and me then analysed the dumps.
We noticed some things in the dumps, more exact, the eEID: The bd drive related parts were not initialized and the IDPS was set to a fallback/fake value (00 00 00 01 00 83 04 00 03 FF FF FF D4 16 F2 BB). The cISD also suggested that the Wifi was disabled.
We came to the conclusion that these boards were dumped from the production line because they didn't pass the automated tests so they never went through the final steps.
The firmwares contained in the flash image were also interesting: One firmware contained a full 4.40 "JIG" firmware (like the already known 2.43) which can be e.g. used to remarry the bd drive, remarry syscon, initialize the RTC, etc. .
The other firmware only contained lv0, lv1ldr and lv1. However the lv1 is not like a normal lv1, it is special.
It's actually the third TestBench firmware that has been dumped, the other two are from 2005 and only work with CEB prototypes (no RSX support).
The TestBench firmware is used in the factory for automated tests to check if the PS3 is working correctly.
I started to do some tests with the TestBench firmware on my DECR-1000A, starting with loading it over the network and checking how it behaves. It worked fine so I built an ebootrom next and flashed it to the DECR.
That also worked fine so I emulated a CECHA using the DECR (see here).
Next, I created a PUP and flashed it to my DECHA prototype, the results can be seen here.
So how can you profit from that?
Well, you can find a TestBench PUP based on 3.55 DECH OFW here: 3.55 DECH TestBench PUP (it was tested on a DECHA prototype, DECHA, DECHJ and DECHL prototype). Only the CoreOS was changed.
The TestBench firmware (the same CoreOS) will work on all targets (CEX/DEX/TOOL/ARCADE....) but I only have DECH/DECR hardware for tests, so I can't provide PUPs for other targets.
How to install it safely and prepare the automated test?
Well, I did my test the following way:
1. Install 3.55 DECH OFW
2. Install 3.55 DECH OFW again (to affect both firmware banks)
3. Install 3.55 DECH TestBench firmware
4. Make sure the South Bridge UART output is enabled (Syscon EEPROM value).
5. Connect to the SouthBridge UART (115200, 8N1).
6. Start the PS3 and watch the serial console.
How to start the tests?
The PS3 will ask you for the input parameter:
You can then type/paste your test config.
For a CECHA/DECHA this is the config which Sony used back in 2007 (tweaked so it will work with the newer TestBench suite):
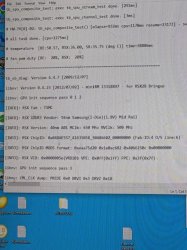
During the tests, you'll also get some output on the screen, but the progress/results are logged via the SB UART (example).
To poweroff the PS3 just press the power button or hit enter and then enter "shutdown".
To get out of the TestBench firmware you need to change the active bank (as seen here).
The input parameter is just
I hope some people can make use of that and diagnose some faults earlier or just easier in the future.
FYI: @RIP-Felix
In early 2024, two faulty NPX-001 boards where bought by @chattrapat_s and subsequently the eMMC was dumped. @zecoxao and me then analysed the dumps.
We noticed some things in the dumps, more exact, the eEID: The bd drive related parts were not initialized and the IDPS was set to a fallback/fake value (00 00 00 01 00 83 04 00 03 FF FF FF D4 16 F2 BB). The cISD also suggested that the Wifi was disabled.
We came to the conclusion that these boards were dumped from the production line because they didn't pass the automated tests so they never went through the final steps.
The firmwares contained in the flash image were also interesting: One firmware contained a full 4.40 "JIG" firmware (like the already known 2.43) which can be e.g. used to remarry the bd drive, remarry syscon, initialize the RTC, etc. .
The other firmware only contained lv0, lv1ldr and lv1. However the lv1 is not like a normal lv1, it is special.
It's actually the third TestBench firmware that has been dumped, the other two are from 2005 and only work with CEB prototypes (no RSX support).
The TestBench firmware is used in the factory for automated tests to check if the PS3 is working correctly.
I started to do some tests with the TestBench firmware on my DECR-1000A, starting with loading it over the network and checking how it behaves. It worked fine so I built an ebootrom next and flashed it to the DECR.
That also worked fine so I emulated a CECHA using the DECR (see here).
Next, I created a PUP and flashed it to my DECHA prototype, the results can be seen here.
So how can you profit from that?
Well, you can find a TestBench PUP based on 3.55 DECH OFW here: 3.55 DECH TestBench PUP (it was tested on a DECHA prototype, DECHA, DECHJ and DECHL prototype). Only the CoreOS was changed.
The TestBench firmware (the same CoreOS) will work on all targets (CEX/DEX/TOOL/ARCADE....) but I only have DECH/DECR hardware for tests, so I can't provide PUPs for other targets.
How to install it safely and prepare the automated test?
Well, I did my test the following way:
1. Install 3.55 DECH OFW
2. Install 3.55 DECH OFW again (to affect both firmware banks)
3. Install 3.55 DECH TestBench firmware
4. Make sure the South Bridge UART output is enabled (Syscon EEPROM value).
5. Connect to the SouthBridge UART (115200, 8N1).
6. Start the PS3 and watch the serial console.
How to start the tests?
The PS3 will ask you for the input parameter:
Code:
# Input args from SB-UART.
[INFO]: input-args:For a CECHA/DECHA this is the config which Sony used back in 2007 (tweaked so it will work with the newer TestBench suite):
Code:
diag_suite=1 display_isd=1 HoldPrintfOutput=0 RestrictPrintfOutput=0 spu_noise_chirp_en=0 spu_noise_chirp_vmx_en=0 rsx_ioif_test_spu_dma_test23_small=1 RsxIntegrateStopTime=5,5,5,1,1 AudioMuteOn=0,0,1,1,1 RsxIntegrateDispMode_0=3,4,5,3,60 RsxIntegrateDispMode_1=3,4,5,3,1 RsxIntegrateLoopCtrl=1,0,1,1,1 RsxIntegrateOutputFormat=0,9,9,0,0 RsxIntegrateRefCRC0_0=0x16360bbe,0x5e05530b,0x37d1ee61,0,0x1b664efd RsxIntegrateRefCRC1_0=0x68881f0c,0x5e05530b,0x37d1ee61,0,0x1b664efd RsxIntegrateRefCRC0_1=0x68ed0dee,0x51c3ee63,0x08ab0ee3,0,0x3493a097 RsxIntegrateRefCRC1_1=0x16fb0a17,0x51c3ee63,0x08ab0ee3,0,0x23501270 RsxIntegrateRefCRC_F0_0=0x327513f8,0x7b5bb004,0x2373e04e RsxIntegrateRefCRC_F1_0=0x27623615,0x7b5bb004,0x2373e04e RsxIntegrateRefCRC_F0_1=0x327513f8,0x7b5bb004,0x2373e04e RsxIntegrateRefCRC_F1_1=0x27623615,0x7b5bb004,0x2373e04e sb_diag_config=cookie_base sb_pci_config=sif_bridge sb_gbe_en=1 sb_ata0_en=1 sb_misc_en=1 sb_uhc1_en=1 sb_ebus_en=1 tb_sb_pci_test=1 rsx_ioif_test_gsif_en=1 ps2gokan_test_en=1 ps2gokan_gx_with_spu_matmult=1 tla_test=1 spu_load_max=7To poweroff the PS3 just press the power button or hit enter and then enter "shutdown".
To get out of the TestBench firmware you need to change the active bank (as seen here).
The input parameter is just
Code:
switch_bank_indicator=1I hope some people can make use of that and diagnose some faults earlier or just easier in the future.
FYI: @RIP-Felix
Last edited: