You are using an out of date browser. It may not display this or other websites correctly.
You should upgrade or use an alternative browser.
You should upgrade or use an alternative browser.
PS3 [Tutorial] Connect ATX Power Supply to PS3
- Thread starter Naked_Snake1995
- Start date
Coldheart2236
Moderator
Please check your Inbox.Mods, any have idea to block this person from keep mentioning myself? Thanks.
amirzaim
Member
Made a little update on this PSU mod, this time using 200W pico PSU and also 130W power brick that is laying around in my room. Also, i'm salvaging the HDMI splitter that left unused and modified as a DC jack port as it is difficult to pull the DV jack port out from the HDMI splitter PCB.

I'm also put pieces of hard plastic which taken from RAM module packaging and applied onto small passage between RSX clamping screw in order to force down the heatsink to make contact with RSX die.
I'm also put pieces of hard plastic which taken from RAM module packaging and applied onto small passage between RSX clamping screw in order to force down the heatsink to make contact with RSX die.
sandungas
Developer
The PICO PSU's are pretty cool, just a few btw's...Made a little update on this PSU mod, this time using 200W pico PSU and also 130W power brick that is laying around in my room. Also, i'm salvaging the HDMI splitter that left unused and modified as a DC jack port as it is difficult to pull the DV jack port out from the HDMI splitter PCB. View attachment 37080
I'm also put pieces of hard plastic which taken from RAM module packaging and applied onto small passage between RSX clamping screw in order to force down the heatsink to make contact with RSX die.
You need to isolate the PICO PSU electrically to prevent short circuits, an easy way to do it would be like building some kind of "plastic envelope" to put it inside, but a better one would be to build some kind of little plastic case for it
And remember you need to keep the original PSU plastic shell (empty) in his original place, because it works as a sealed "air tunnel" to push the air outside. Without it the fan is not able to push the hot air outside the PS3
The PICO PSU should go inside the original PSU plastic shell, maybe you could drill some holes in it to grab it at his center (the airflow through the original PSU shell is going to cool down the PICO PSU)
EDIT:
Hmmm... just another idea
If you are going to keep the original PSU plastic case in his place with the PICO PSU inside it... then there are going to be lot of space inside the PSU that is pointless (the corners creates air loops and turbulences that generates noises)
So... i would "fill" the PSU shell with some material to smooth the corners and minimize the turbulences
Basically... the ideal design for an air tunnel would be a straight pipe... is imposible to achieve that in a PS3 but you need to get the most closer posible to it
Last edited:
sandungas
Developer
Im reading my post again and im not sure if i was clear enought with what i said about removing turbulences inside the PSU shell @amirzaim is tricky to explain with words, but i made a drawing that shows the "problem" a lot better
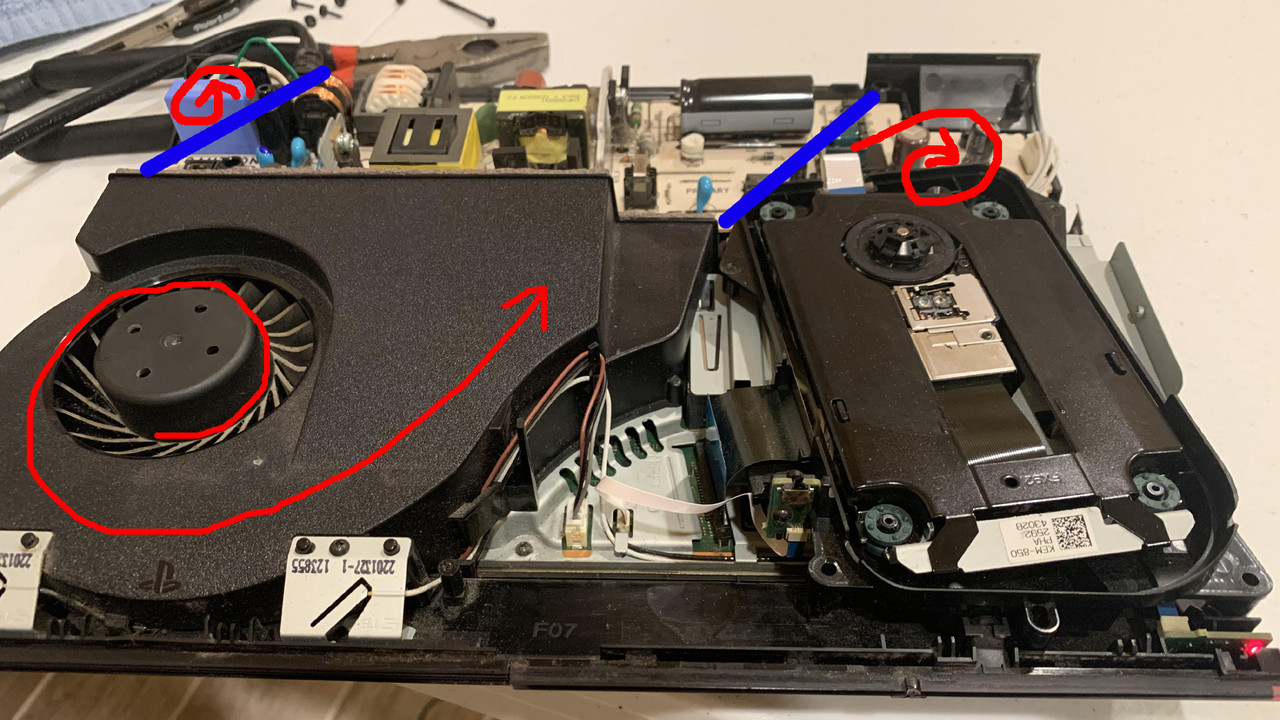
The PS3 uses "axial" fans (also named "centrifugal fans")... this means the air inside the fan shell is forced to spin "against" the walls... in other words it tryes to escape in radial directions
And the fan is spinning in counter-clockwise direction.... so inmediatly after going outside of the fan shell (into the PSU shell) it have a huge tendency to go to the right direction
Thats a real problem in the factory design because the PSU shell doesnt have "air outakes" all along his back... and it can be fixed because there is a circuit board inside the PSU
But in your case you are going to remove the circuit board inside the PSU... so... this allows you to redesign the PSU shell to improve his geometry
Basically... the idea is to create 2 "walls" (represented with the blue lines) to remove the 2 turbulences at the inner corners of the PSU shell (represented with the spiral red arrows)
If i where you, im not sure how i would do, you could "cut" the PSU at the corners and seal them with glue and plastic pieces. This is going to look a bit ugly but seems to be doable
The other option i see is to buy a (very) big tube of silicone and fill the corners with it, the only payback is that is going to increase the weight of the PS3 a lot because is needed a lot of silicone to fill that corners... but well... it should work
Maybe the best solution is a combination of both... just crop some plastic and try to seal it very well with silicone
And remember, you can use a plastic globe with a finger "wet" in oil to apply the silicone with your own hands... not only in the 2 corners in my drawing but in all the edges (all the angles with 90º to soften them)
Im not sure if this mod changing the geometry of the PSU shell is going to improve the CELL/RSX temperatures... or the cooling of the PICO PSU circuit board... but anyway... is the kind of project where the quality of the "final product" is doubtful (because it depends of how you do it), but the principles of why you are doing it are right (if my analisys of the problem is correct, and i think it is)
amirzaim
Member
Im reading my post again and im not sure if i was clear enought with what i said about removing turbulences inside the PSU shell @amirzaim is tricky to explain with words, but i made a drawing that shows the "problem" a lot better
The PS3 uses "axial" fans (also named "centrifugal fans")... this means the air inside the fan shell is forced to spin "against" the walls... in other words it tryes to escape in radial directions
And the fan is spinning in counter-clockwise direction.... so inmediatly after going outside of the fan shell (into the PSU shell) it have a huge tendency to go to the right direction
Thats a real problem in the factory design because the PSU shell doesnt have "air outakes" all along his back... and it can be fixed because there is a circuit board inside the PSU
But in your case you are going to remove the circuit board inside the PSU... so... this allows you to redesign the PSU shell to improve his geometry
Basically... the idea is to create 2 "walls" (represented with the blue lines) to remove the 2 turbulences at the inner corners of the PSU shell (represented with the spiral red arrows)
If i where you, im not sure how i would do, you could "cut" the PSU at the corners and seal them with glue and plastic pieces. This is going to look a bit ugly but seems to be doable
The other option i see is to buy a (very) big tube of silicone and fill the corners with it, the only payback is that is going to increase the weight of the PS3 a lot because is needed a lot of silicone to fill that corners... but well... it should work
Maybe the best solution is a combination of both... just crop some plastic and try to seal it very well with silicone
And remember, you can use a plastic globe with a finger "wet" in oil to apply the silicone with your own hands... not only in the 2 corners in my drawing but in all the edges (all the angles with 90º to soften them)
Im not sure if this mod changing the geometry of the PSU shell is going to improve the CELL/RSX temperatures... or the cooling of the PICO PSU circuit board... but anyway... is the kind of project where the quality of the "final product" is doubtful (because it depends of how you do it), but the principles of why you are doing it are right (if my analisys of the problem is correct, and i think it is)
Now I can understand why PS3 fan flowing is bit complicated. Sony still doing a same design flaw again by doing same thing on PS4 consoles as well where the PSU being heat-stressed by the air coming from the heatsink until PSU is going dead which costing the service from official Sony Centre more than $200. Pico PSU mod seems only for temporary while I'm planning to do restoration by replacing old housing with non-functional disc tray lid with a new ones. But anyway, pico PSU mod is much nicer than ATX PSU mod that sometimes looks messy, could be improved by removing all stuffs inside PSU altogether, leaving 12V connector and 4-pin port for connector cable.
Speaking of PSU connector cables, I'm really want to find the replacement cables but it seems that it's much harder to find and only PS4 cables are usually on sale. Anyway, does the PS4 4 pin PSU connector cables are compatible with PS3 super slim models?
sandungas
Developer
Yeah, the same "problem" exists in the other playstations since PS3 slim, and are actually 2 problems
One of the problems is we are "throwing" the hot air from the CPU/GPU/APU into the PSU circuit. In the practise this doesnt seems to be a huge problem because the PSU's doesnt uses to malfunction by that pointless overheat, but anyway, is bad
The other problem are the air turbulences created inside the PSU plastic shell, because obviouslly all them have squared angles and are pretty much like a rectangled "brick". The fan "injects" air into them in a angle... so there are always 2 corners of the brick with air turbulences. This turbulences are very bad because doesnt allows the hot air to escape (it could create hot spots), also all the angles generates noises
The ideal design is pretty much like this, the nature evolution nailed it thousand of years ago
Is pretty much like the exhaust pipe of an engine or a trumpet... the geometry of the "section" of the corridor is mantained but increases all along

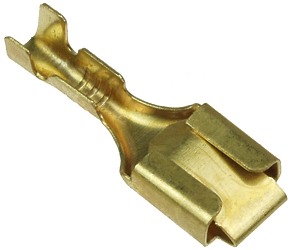
Im not sure if the plugs of the PS3 superslim PSU matches with PS4, but imo the best solution is to use this, are named "terminals", easy to find locally because are used in cars, bikes, etc...
Also, most probably in the same shop you are going to find different types of "plastic caps" to isolate this terminals and to achieve a good finishing
One of the problems is we are "throwing" the hot air from the CPU/GPU/APU into the PSU circuit. In the practise this doesnt seems to be a huge problem because the PSU's doesnt uses to malfunction by that pointless overheat, but anyway, is bad
The other problem are the air turbulences created inside the PSU plastic shell, because obviouslly all them have squared angles and are pretty much like a rectangled "brick". The fan "injects" air into them in a angle... so there are always 2 corners of the brick with air turbulences. This turbulences are very bad because doesnt allows the hot air to escape (it could create hot spots), also all the angles generates noises
The ideal design is pretty much like this, the nature evolution nailed it thousand of years ago
Is pretty much like the exhaust pipe of an engine or a trumpet... the geometry of the "section" of the corridor is mantained but increases all along
Im not sure if the plugs of the PS3 superslim PSU matches with PS4, but imo the best solution is to use this, are named "terminals", easy to find locally because are used in cars, bikes, etc...
Also, most probably in the same shop you are going to find different types of "plastic caps" to isolate this terminals and to achieve a good finishing
amirzaim
Member
Hi all...
Since my PS4 slim got some issues with its PSU, so I decided to put the PC ATX PSU mod on my PS4 slim. Surprisingly, those wire diagram for PS4 slim is exactly same as the PS3 ones so I decided to give it a go and finally managed to boot my PS4 slim with my SFF ATX PSU that had been lying around since then.

So far, the simple PC ATX mod on my PS4 slim is now working well and I'm also decided to tidy up a little bit by arranging its cables and also mounting its SFF ATX PSU onto the PS4 slim.


Since my PS4 slim got some issues with its PSU, so I decided to put the PC ATX PSU mod on my PS4 slim. Surprisingly, those wire diagram for PS4 slim is exactly same as the PS3 ones so I decided to give it a go and finally managed to boot my PS4 slim with my SFF ATX PSU that had been lying around since then.
So far, the simple PC ATX mod on my PS4 slim is now working well and I'm also decided to tidy up a little bit by arranging its cables and also mounting its SFF ATX PSU onto the PS4 slim.
amirzaim
Member
Xbox 360 PSU may have different layouts and power ratings compared to PS3/PS4 PSUs.why not just use an xbox 360 psu?
However, mixing PS3 mobo with xbox 360 PSU isn't a good idea.
Nascar1243
Member
This is a good way to check the power supply if you have the PS3 Slim or Super Slim turning on and off only if you know what you are doing, I can easily see people accidentally injecting the wrong voltage into the wrong areas and frying the board, but if you know what you are doing, not a bad guide, however this on and off issue is a new form of YLOD, so the best next step to diagnosing the problem is to do a syscon diagnosis, I got videos and gave that information to RIP-Felix who did put it in his syscon tutorial video, I am still figuring out why they changed the sequence, but there is an easier step to do if you have the console turn on and then off, there is LED Diag mode which you won't even need to open the console for and works on the 21xx, 25xx, and 30xx models, you just need to run a fan test by unplugging main power, hold the eject button and while doing so, plug the console back into power, this will initiate the fan test, once that test is over, hit the power button 3 times, the eject button 3 times, and the power button again twice, then it will start a sequence that will first show a yellow light, then give either a green led for a 0 or a red led for a 1, this is producing the code in binary, if the 4 number sequence seems odd, then it is probably in hex and producing a letter for an error code like 14FF or 5FFF, this is an easy way to grab a syscon error code without even needing to grab an ATX Power Supply, I will link a video as well to it.
Sent from my iPad using Tapatalk
Sent from my iPad using Tapatalk
Similar threads
-
 PS3 Error 8002f14e. My Blu Ray drive isn't functioning, no power to the BD Drive.
- Started by iVirtualZero
- Replies: 15
-
-