PS3 Fault finding YLOD with the SYSCON - First steps and Error reporting

4 v is normally because that power supply around cpu/gpu is calculated very well and it should vary depending how consumers will act. So as example if add under 2 ohms instead of 3 ohms power think its likely an short I think. Well the basic method is about the same. That 1.2v is an node of circuit compared with Ohm second law.
If I am right in further test I can test power supply by removing that coil and separate to get constant 1.2v. I do not suggest that to anyone without a lab power supply where it can see/set voltage/amps. Something may be fried or I may not be right.

I am wondering, what is the voltage of your 40nm RSX?
 
Are there more images for the test pads for the other Syscon solder points?

I feel like these should be added to the official guide.


Sent from my iPhone using Tapatalk
I think this should cover every single retail board
 

Attachments

  • 0 - COK-001 COK-002_compress25.jpg
    0 - COK-001 COK-002_compress25.jpg
    238.8 KB · Views: 2,466
  • 1 - SEM-001_compress59.jpg
    1 - SEM-001_compress59.jpg
    307.6 KB · Views: 2,425
  • 2 - DIA-001 DIA-002_compress11.jpg
    2 - DIA-001 DIA-002_compress11.jpg
    168.2 KB · Views: 2,439
  • 3 - VER-001_compress23.jpg
    3 - VER-001_compress23.jpg
    91.3 KB · Views: 2,437
  • 4 - DYN-001_compress81.jpg
    4 - DYN-001_compress81.jpg
    116.9 KB · Views: 2,428
  • 5 - SUR-001 JSD-001 JTP-001 KTE-001_compress15.jpg
    5 - SUR-001 JSD-001 JTP-001 KTE-001_compress15.jpg
    1.4 MB · Views: 2,642
  • 6 - All Superslim_compress80.jpg
    6 - All Superslim_compress80.jpg
    855.7 KB · Views: 2,439
I have a YLOD ps3 viewing the syscon log I found the error A0801002 I corrected it by changing the rsx capacitors.

I noticed that the tantalum sensors in the back were getting hot, so I rearranged them (it worked), then I did the same for the ones next to the rsx

now I have the error A0093004 so I think it could be a fuse
0yKLBcz
bM94uSf
Would you mind migrating to the Tokin fix thread now that you're down that rabbit hole?

Please provide:
  1. Model number of PS3
  2. Model number of Caps used to replace tokins and when you first had sucess.
  3. Pictures of your work
  4. Syscon errlog
  5. description of the consoles work history.
  6. Discription of the YLOD. How long from when you press PWR to when it beeps.
To answer your question, yes it's possable you have a fuse that blew, but it's also possable your caps are not soldered correctly. There are better ways to do it than you did in your pics. In your case, I suspect the 09 3004 is because of a high impedance path to ground through your bridge wires and soldering. It would also explain why your caps were getting hot before. Also, if they were getting hot before that could have shorted them out. Easy to check with a multimeter. What's the resistance between +/GND rails right now?

I would start by removing the caps you have on there. Then scrape away some solder mask to give you room to place the TaPol caps. Then redo the bridge wires using a shorter piece with a more direct path. Be sure to use flux and that nothing is shorting. Verify the Resistance beween +/GND rails is greater than 1Ohm. Also, be sure to touch your leads together to see what it reads. Mine changes, it used to read 0.4Ohm when touching Black to red, when it should read 0. Now it reads about 3 ohms. Anyway, you have to subtract that from the reading to get an accurate resistance.

Alternatively, you could also use my custom PCB to make things easier, but you'll need to be sure the caps you use are less than 2mm tall or they wont fit under the RF shield.
PS3 Tantalizer - Beta Release (v0.2b)
(Order or Download from OSH Park HERE)
Notes:
  • If you choose to use this PCB, you are doing so at your own risk! I cannot be held responsible for any damages or loss of life resulting from use of this product!
  • This PCB is designed to make it easier and safer to attach tantalum/MLCC capacitors to your PS3. Removing the NEC/TOKINs and replacing with Tantalum/MLCC capacitors is an experimental mod not guaranteed to fix the problems you are experiencing. You must properly troubleshoot your console to decide if this mod is right for you.
  • You must order a minimum of 3 boards. I recommend ordering 3x (currently 3x costs $4.20 - No I didn't plan that). That will get you get 9 total. That will be enough to replace all the NEC/TOKINs on a PS3 and give you a spare in case there is a defect in the other 8.
  • MLCC pads are meant for 0805 case size.
  • Tantalum pads are a standard 7.3x4.3x1.9mm (LxWxH). You can use other types of capacitors that fit this footprint, such as aluminum polymer, tantalum polymer, etc.
  • You must choose 0.8mm board thickness in the options during checkout. This ensures it'll fit underneath the RF shield when you reassemble the console.
  • You must buy 1.9mm height capacitors. This ensures it'll fit underneath the RF shield when you reassemble the console.
  • You can download the Gerber files from OSH Park if you perfer to have another board house manufacture your Tantalizers. Just be sure they know the edges are castellated and that you need 0.8mm board thickness.
Pictures:

View attachment 32937 View attachment 32930 View attachment 32942 View attachment 32941View attachment 32939View attachment 32936 View attachment 32940

Discussion:

I recieved the latest alpha revision and it looks good. I got the castellated edges right this time and they wick the solder really easily. This was much easier to install without adding too much heat. I think they might be easiest to install with a chisel tip or perhaps a knife edge. I used a T12-C4 for the thermal mass. This worked well to drive the heat down to the rails, but did make it hard to control. So some of the Thermal VIAs got filled with solder, not a big deal. With flux they wicked well, and produced the easiest install I've had yet! So mission accomplished!

I have not attempted to use them yet, so they are untested on console. The one pictured above was installed on a dead board just to test how easy it is to install. I did confirm with a multimeter that the rails are not shorting or anything. They are electrically sound. The next step is to populate and test. I have opened the beta, so anyone can DL or order them from OSH Park.

Just be warned that they need a little trimming. They come from the factory with some burrs that need removed. Takes a few minutes, but it's not hard.
View attachment 32938 View attachment 32931

It's fine if you don't want to participate in the beta, potentially burning down your house or damaging your PS3. Once others and I have installed it and confirmed they work, I'll update the listing on OSH park with the v1.0, indicating a fully tested/working PCB.

In general terms, the 10-80 1002's occur first, when the caps are insufficient to remove noise. The noise starts to interfere and you get instability first durng intense games. As it gets worse, it YLOD in regular games or just randomly. At that point people usually just get rid of the console. So it's uncommon to see an instant YLOD (>1s) or Non-Instant YLOD (1-10s) with bad tokins. Usually the YLOD will be in that 10s+ territory, unless the tokins were physically damaged. Previous reflow(s) are one example. A botched tantalum mod is another. If you did botch a tantalum mod, they can cause 2-10s YLOD, typically in the 4-5s range if they are still throwing 10-80 1002 error codes. But that's really only for insufficient capacitance or maybey the wrong caps used. More likely, you'll get an instant YLOD, in which case it'll throw 09 3004. That just means your soldering job needs redone. So if you get an Instant YLOD after the tantalum mod, you need to look for shorts, cold solder joints, not enough bridge wires, etc. If you get 2-10s YLOD and 1002 errors, you need better caps!
 
I realized about something handy related with the syscon UART testpads, if we order them in groups based in his location on the motherboards they matches exactly with how we grouped the testpads for the hardware flashers using the concept of "layouts", are the same groups that appears in this list:
https://www.psdevwiki.com/ps3/Teensy++_2.0#Schematics_by_motherboard_.28retail.29

There are 6 syscon UART testpads layouts:
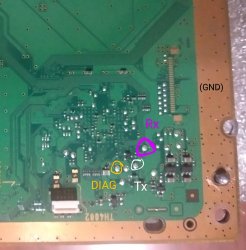
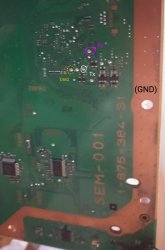
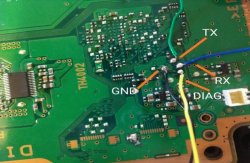
Layout 1 = COK-001, COK-002, SEM-001 (PS3 fat, mullion syscon, NAND flash)
Layout 2 = DIA-001, DIA-002 (PS3 fat, mullion syscon, NOR flash)
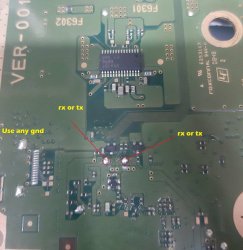
Layout 3 = VER-001 (PS3 fat, sherwood syscon, NOR flash)
Layout 4 = DYN-001 (PS3 slim, sherwood syscon, NOR flash)
Layout 5 = SUR-001, JTP-001, JSD-001, KTE-001 (PS3 slim, sherwood syscon, NOR flash)
Layout 6 = All PS3 superslim models (the testpads are very close to syscon chip in all them)

And is not a coincidence, the reason why they matches is because that concept of "testpad layout" we has been using unofficially represents the "jig-pins" used officially... you know... it should be some kind of frame with tenths of pogo-pings (i guess made of metal or with a 3D printer) and a thick cord with tenths of wires going to a PC
If at some point they needs to interact with a different motherboard they disconnects the "jig-pin" frame for "layout 2" and connects other for "layout 5" and attachs it to the motherboard like a sandwich

-------
@RCWD21 yeah, if this talk about the flasher extends too much is better to create a new thread... at this point you are not sure if is going to extend too much but anyway... as an intro...
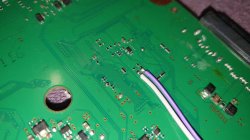
The point is... when you "inject" the 3.3v externally you are doing it by soldering the wire into a "3.3v rail" that powers the flash chips but also some other components of the motherboard around, in some cases the voltage regulator that can be soldered on the teensy could not be enought, most people using teensy with PS3 motherboards with NAND was powering the whole thing externally with a ATX PSU (the orange wires)

You can solder the 3.3v wire in several places, directly to the motherboard... or in the teensy
But remember... this should be the only voltage active in the PS3 motherboard, in other words, dont power the PS3 with the PS3 PSU... actually the best thing you can do is to remove the PS3 PSU
I'm going to start a new thread regarding the issues I'm having with the Teensy and the related software for dumping the nand flash.

Also I'm using a spare ps3 power supply and regulating it down to 3.3v which I'm supplying to the teensy.

But I'll post all that in the new thread to keep it out of this one

Sent from my SM-G965U using Tapatalk
 
@sandungas @vyktormvmpay25 I started a new thread for my new issues called CECHB01 Teensy Troubles. Its in the general ps3 section. If yall could take a look when you have time that would be much appreciated!

Sent from my SM-G965U using Tapatalk
 
Are there more images for the test pads for the other Syscon solder points?

I feel like these should be added to the official guide.


Sent from my iPhone using Tapatalk

I'm going to restructure my git repo, and correct any misinformation etc.

So if someone can do a pull request on any ideas etc.

If you have not used github pull request, then follow their help guides, its very easy and will benefit you in an IT career, as most of us devs and engineers use git to source control software etc.
 
I recently performed a de-lidding of my CPU on a VER-001 motherboard. Think it was the L model. Thought I had done a perfect job until I realized one of the caps got borked. I've since tried soldering it back in place several times and I keep getting an immediate shut off YLOD. My resistance was reading 11 ohms last I had it in place. It's the one that's removed in this picture right now. I'm not 100% i'm using the right replacement. I'm just wondering does someone by chance have a picture for what the resistance should be (mainly for these 3 caps)? I just want to confirm i'm using the right cap for the replacement since i've already had a lot of trial and all error so far. I need to invest in one of these syscon readers soon. I'd love to contribute to this thread more.

EDIT: I was mistaken. I've now corrected it. It was a VER-001 model mb
upload_2021-5-21_9-30-49.png
 
Last edited:
From people's experience, especially with their own consoles, can "becount" reported by syscon be trusted at all?

I'm finding myself in a weird predicament. My original PS3 slim that I had since 2009 is showing 26 days uptime with ~ 580 bringups and ~490 power downs as per WebMAN. Which I believe holds true as having bought it right before starting my master's in college and moving onto the PS4 in 2013, it had very little play time.

Now, I've picked up a couple 60G backwards compatible CECHC03/04 unitsand managed to bring both to life, with one having had power IC failure and the other having bad thermal interface issues on CELL. Now, the unit with a failed IC shows to have been on for 23 days with 580/540 power cycles and latest error codes around 2009, whereas the unit suffering from thermal issues comes up as having 866 days uptime, 570/480 cycles and latest error codes in April 2021.

I'm struggling to believe that the 866 day console was constantly left on (to constitute roughly same cycle count as my slim and the other BC)? Despite the thermal issues, having delided both chips, neither have the blue/purple tint to them signifying they didn't really suffer from a lot of heat when the console was used as a daily driver.
 
IDK, those don't seem out of the ordinary to me...
  • Slim = 26 days up | 580 startups | 490 shutdowns (76mins/session)
  • C03 = 23 days up | 580 startups | 540 shutdowns (61mins/session)
  • C04 = 866 days up | 570 startups | 480 shutdowns (43hrs/session)
The first 2 are more of what I would expect to see for an average gamer. Sometimes you play a game for a few minutes and shutdown to go do something else. Other times you get into a game for a couple of hours. Sometimes you watch a movie, or stream a show, listen to music, and etc. The average usage over that time is probably an hour or two (per session) over the consoles life.

The third consoles usage time is consistant with a data farm or server. Remember that the CELL processor was the most powerful multi-threaded processor at the time. It was popular for number crunching and servers. The OtherOS function allowed linux distos to be loaded on it, so that it could be easily networked together in arrays for that purpose. And at $500-600 a piece they were affordable from that standpoint. Sony got sued for removing the feature too. These consoles would be left on all day every day and only shut off when there was a power outage or something. So ofte you'll see a much larger bringup number than shutdown number. And if it wasn't shutdown properly, the uptime doesn't get recorded. Your console, on the other hand, looks to have had regular shutdown cycles. The system admins must have set it up to shutdown regularly. Perhaps they did something that required the console to be shutdown regularly, like regular maintenance...who knows?

43hrs on time would give you 5 hours down every other day for maintenance. That might be a standard maintenance schedule...IDK. Are there any system admins here?

43hrs is pretty close to 48hrs. Perhaps their system was set yto reboot every 2 days for system stability. I have my router on a light timer. It shuts off in the middle of the night every day, because It used to dropout randomly or lockup up when it was powered on 24/7. I found doing this fixed the issue. So maybe that's a regular thing, to install updates or whatever.
 
Last edited:
Hey back again, just after some clarification on an error.

Syscon error 1301 or A0401301 would usually indicate a damaged CELL correct?

Also would be interesting to set up a database on these error codes similar to the secondary error codes for the Xbox 360 where people can add comments on how they resolved the error.
 
SYSCON TUTORIAL
(WINDOWS)
Disclaimer:
While it's a relatively safe and easy process, this tutorial involves some risk of harm to you and your console. If you proceed, you do so at your own risk. Please read the entire tutorial thoroughly before attempting.

This is a preliminary Tutorial. I will EDIT it as needed to correct information as time goes on. So please let me know if I made any mistakes and I'll correct them.


1. Required Materials, Software, and Setup
  1. $2-10 - Buy a USB to TTL Serial Cable. It must be 3.3v or be set to 3.3v!
    • I recommend male to female jumper wires. One end has male pin connectors that are great for the USB adapter I linked above. The other end has female connectors great for other popular USB adapters that have male pins instead. You can just cut the end off the side you don't need and solder that end to the RX, TX, and DIAG pads. You might need to get longer wires for that type of adapter, or just use a USB extension cable to reach your computer.
    • I recommend this Soldering iron. If you are going to get into repairing your own consoles, especially the PS3, then you NEED a good temperature controlled soldering iron. I recommend the one linked above, but you can decide for yourself. If you decide to get this iron, then I also recommend the following tips... T12-C4 has the thermal mass and area needed to power through the thick ground plane on the PS3. I set it to 340C and use it with solder braid to clean solder from the NEC/TOKIN rails. It's the only tip that can drive the heat into the board there. DO NOT EXCEED 350C or the copper pad can alloy with the solder and be destroyed. 350C is safe, and you can go higher for brief periods of time if you really need the extra heat, just don't linger there too long or it can destroy the pad and your tip! T12-JL02 is great for drag soldering fine pitch pins of ICs and microsoldering tiny SMD components. It won't work near ground planes or thick copper pads that don't have thermal relief. For them, and the best general purpose tip, get a T12-D24. That's the one I use the most, bar none.
  2. Solder a wire to the RX, TX, and DIAG test pads on your motherboard.
    • 0-cok-001-cok-002_compress25-jpg.33365
    • 1-sem-001_compress59-jpg.33366
    • 2-dia-001-dia-002_compress11-jpg.33371
    • Note, you do not need a DIAG wire for these models.
      3-ver-001_compress23-jpg.33372
    • Note, you do not need a DIAG wire for this models.
      4-dyn-001_compress81-jpg.33374
    • Note, you do not need a DIAG wire for these models.
      5-sur-001-jsd-001-jtp-001-kte-001_compress15-jpg.33377
    • Note, you do not need a DIAG wire for these models.
      6-all-superslim_compress80-jpg.33378
  3. Download current SYSCON script.
  4. Download Python and install it as follows...
    • In the setup CHECK THE BOX "Add PYTHON to PATH." This will allow you to use a windows CMD terminal to access the SYSCON. View attachment 33440
  5. Plug the USB UART adapter into your computer.
    • Be sure your adapter is set to 3.3v. Some adapters are selectable between 3.3v and 5v. Consult you adapters documentation to be sure it's set to 3.3v! Otherwise it could destroy the SYSCON chip and your console!
  6. Navigate to Device Manager and find which COM PORT windows assigned the USB adapter.
    • On windows 10 you can just search for "device manager." Then look under Ports for the USB adapter. Mine was given the name "Prolific USB-to-Serial Comm Port (COM4)." The information I need is the "COM4", that's what I'll need to put into the command line to gain acces to my SYSCON. Yours may be different. If you don't recognize the name it was given and are not sure which one it is, just unplug the adapter and watch to see which one disappears, then plug it back in and it should appear. Remember which USB port you plug the adapter into and use the same one from now on. It may assign a different COM port if you use a different USB port.View attachment 33443 View attachment 33442
  7. Flip the PWR rocker if your PS3 has one, or plug it in so that the standby LED illuminates.
  8. Now open a Command terminal as an Administrator.
    • On windows 10 you can just search for "cmd", then right click on the app and choose "run as administrator" in the dropdown box.View attachment 33445
    • You need to install some needed dependencies now. First, type in the following command.
      Code:
      pip install pyserial
      Follow the prompts if there are any. Next, type in this command:
      Code:
      pip install pycryptodome
      Follow the prompts if there are any. When I first did this it prompted me for an update and explained how to do it. So just follow instructions. You should get a message confirming a successful install after each command. These dependencies must be installed or the SYSCON script won't work! Also, you will get errors about PYTHON not being recognized if you didn't check the Box to add PYTHON to path when you installed it.
  9. Now you are ready to gain access to the SYSCON.

2. External Access Mode: Easier to access, less you can do.

  1. Connect RX & TX wires. DO NOT CONNECT DIAG.
    • Note: Beginning with L models (VER-001) you do not need a DIAG wire! The SYSCON chip changed to the Sherwood firmware. This firmware does not have an Internal access mode. Therefore it does not need a DIAG wire or special process for accessing internal access mode. These consoles do use a different command to access them, however! More on this later!
  2. Connect GND on your USB UART adapter to a GND on the PS3
    • DO NOT ground DIAG! Leave it unconnected for now.
    • We are just grounding the USB adapter to the console. The RF shield is the most convenient place to ground the USB adapter to. Or the copper ring around the perimeter of the motherboard will work. Alligator clips work great. You do not need to solder a connection! This is just to be sure the computer and PS3 are sharing the same GND reference. It's not strictly necessary, but good practice.
  3. Use the following command line structure to gain access.
    • First we need to change the directory to the SYSCON folder that contains the python script. We can do that with a "CD" (change directory) command according to this formula - CD [space] [directory path to the SYSCON script] [enter]. For example, this is the command I use:
      Code:
      CD C:\Users\HTPC\Desktop\PS3\SYSCON
      Hit ENTER to execute the command and change the directory. If it worked you will now see the folder path behind your blinking cursor.View attachment 33446
    • Now you are ready to enter the command string needed to run the SYSCON script. You can do that using the following formula. "python ps3_syscon_uart_script.py [COM port of your adapter] [CXR or SW]. Note if your console is an A - K model (COK-001/2/2W, SEM-001, or DIA-001/2) then you must use the CXR command. If it's an L - Super slim model use the SW command. For example, this is the command I use for my A model PS3:
      Code:
      python ps3_syscon_uart_script.py COM4 CXR
      If everything worked you will see >$ greet you!View attachment 33447
    • Now type in AUTH or auth. It is case sensitive, so if one doesn't work try the other. If you get Auth1 response invalid, after trying it both ways, then you got the RX and TX wires reversed. Turn off the console and switch the wires around. It's important you close the terminal and reset the console back to standby. Repeat step 1-3. This time it should say Auth Successful.
  4. Now you can use External commands like ERRLOG GET which will display the last 20 errors stored in the SYSCON.
The Timestamps are encrypted in EXTERNAL access mode (CXR and SW), so they don't make sense, but if you gain INTERNAL access (CXRF), they will. That can be useful information to establish a hystory of the console. There are Other useful internal access comands such as becount, which shows startup, shutdown, and PWR on time. That can give you an idea of how the console was used and how much wear and tear it has. Maybe it'll help you decide if the console is worth repairing. For example, a console with less usage time might be worth saving, because it's likely to last a long time. Also error codes 40 3034 are known to be associated with RSX issues only a reflow/reball might fix. That's a time consuming and difficult procedure only experiance technitions should attempt. Many repair shops consider these consoles not worth repairing. So this error code can save them alot of time and expense diagnosing the problem!

3. (OPTIONAL) Internal Access Mode - Unlocks more commands and controls
Okay, internal mode is pretty easy. However it's only for A - K models (COK-001/2/2W, SEM-001, DIA-001/DIA-002).
  1. AUTH in external CXR mode as normal.
  2. EEP GET 3961 01 --> should return "00000000 FF"
  3. EEP SET 3961 01 00 (changes the bit to allow internal access mode)
  4. EEP GET 3961 01 (verify the change) --> Should now return "00000000 00".
  5. Shut off console & close the CMD prompt/terminal. Connect the Diag wire to GND and turn console back on. It will beep 3 times and start flashing because the checksum doesn't match anymore. This is normal! We're going to fix that next...
  6. You need to use internal command CXRF now. Here's an example of the commands I have to use every time I gain access for a test, but you'll have to change the "COM4" to whichever comm port your usb to serial device was assigned. You can find it under usb devices in the device manager.:
    Code:
    CD C:\Users\HTPC\Desktop\PS3\SYSCON
    python ps3_syscon_uart_script.py COM4 CXRF
  7. AUTH (Uppercase) or auth (lowecase) whichever works. I've had to use both and sometimes is just requires the one or the other. IDK why. Once you get "AUTH successful", you're in!
  8. eepcsum --> will return addresses that "should be" somthing like "0x0038". The address you need to change is the line after the "sum:0x0100" line. The sum indicates the mismatch. Ignore the line before of after, the address you want to change is the one immediately following the sum line. So for example if the that line reads "Addr:0x000039fe should be 0x0038" then you do the following...
  9. w 39fe 38 00 (don't just copy this command. yours could be different! Just put it in like this example, based on your actual checksum mismatch. For example, if your address should be "0xff38" then your command should be "w 39fe 38 ff". Hit enter...
    • --> should just go to the next line or say write successful, I don't remember (you only have to do this once per console. Notice that the 00 and 38 are swapped? That is endian byte swaping. Be sure you enter this in correctly, or you'll have to do another write to fix it. But you can get it wrong and fix it. Just don't shut off the console until it's correct!
  10. r 39fe 02 (validate the change) --> if the checksums match now, then the "sum:0x0100" line will not be there anymore. That means the console will boot normally now.
  11. Turn off the console and turn it on again. The standby led will be solid red and stop flashing. That's because the checksum matches and you successfully gained internal access. Now you need to use step 6 and 7 from now on.
Now you can now use internal commands like "lasterrlog," "bringup," "powerstate," "errlog," and more. You can also adjust fan curves without custom firmware!
I just made this and wanted to post it here too.
 
Hiya,

A long-time lurker, finally a poster.

I have in me hands a CECHC03 that appears to have had the RSX reballed at one point (judging by the pool of flux on the board and an off-brand security label on the torx screw plug), then worked for some time as a BD player (came with a kiddy disk inside), got a YLOD and someone didn't feel like fixing it again and passed it on... Now, it had arrived here in this YLOD state, but I didn't know much about diagnostics via syscon, so went with the NEC/Token waft.

I had recapped this COK-002 on the side of the board without chips and the system came to life, silently glowing with a green light. Surprised, I had connected the HDMI lead and gotten to a point of seeing the XMB, twice, but both times the PS3 was shutting down due to the overheating. Fine, time to de-lid and re-paste everything, so I did .. and upon assembling everything back it had a YLOD again, a very quick one (0.5 sec) at that. So out went the NEC/Tokens on the chip side and replaced with TaPol counterparts. Now, the system boots into a GLOD (everything bar the SD board is connected), recovery doesn't work and I need to hold the power down for 10 sec to shut it off .. What's peculiar, is in the UART readouts I get from the syscon .. there's nothing, yet the system is dead.

Initial state of things after recapping, which lead to it booting into a GLOD:
Code:
>$ becount
becount
Bringup : 2466 times
Shutdown: 2342 times
Power-on: 107day 03hour 32min 44sec

>$ lasterrlog
lasterrlog
Last Error Code:0xa0801001, Time:0xffffffff
[mullion]$

>$ errlog
errlog
ofst[ 96]:err_code:0xffffffff, clock:0xffffffff
ofst[100]:err_code:0xa0404411, clock:0xffffffff
ofst[104]:err_code:0xa0403034, clock:0xffffffff
ofst[108]:err_code:0xa0404411, clock:0xffffffff
ofst[112]:err_code:0xa0403034, clock:0xffffffff
ofst[116]:err_code:0xa0404411, clock:0xffffffff
ofst[120]:err_code:0xa0403034, clock:0xffffffff
ofst[124]:err_code:0xa0404411, clock:0xffffffff
ofst[  0]:err_code:0xa0403034, clock:0xffffffff
ofst[  4]:err_code:0xa0404411, clock:0xffffffff
ofst[  8]:err_code:0xa0403034, clock:0xffffffff
ofst[ 12]:err_code:0xa0404411, clock:0xffffffff
ofst[ 16]:err_code:0xa0403034, clock:0xffffffff
ofst[ 20]:err_code:0xa0404411, clock:0xffffffff
ofst[ 24]:err_code:0xa0403034, clock:0xffffffff
ofst[ 28]:err_code:0xa0404411, clock:0xffffffff
ofst[ 32]:err_code:0xa0403034, clock:0xffffffff
ofst[ 36]:err_code:0xa0404411, clock:0xffffffff
ofst[ 40]:err_code:0xa0403034, clock:0xffffffff
ofst[ 44]:err_code:0xa0404411, clock:0xffffffff
ofst[ 48]:err_code:0xa0403034, clock:0xffffffff
ofst[ 52]:err_code:0xa0801001, clock:0xffffffff
ofst[ 56]:err_code:0xa0801001, clock:0xffffffff
ofst[ 60]:err_code:0xa0801001, clock:0xffffffff
ofst[ 64]:err_code:0xa0801001, clock:0xffffffff
ofst[ 68]:err_code:0xa0801001, clock:0xffffffff
ofst[ 72]:err_code:0xa0801001, clock:0xffffffff
ofst[ 76]:err_code:0xa0801001, clock:0xffffffff
ofst[ 80]:err_code:0xa0902203, clock:0xffffffff
ofst[ 84]:err_code:0xa0902203, clock:0xffffffff
ofst[ 88]:err_code:0xa0902203, clock:0xffffffff
ofst[ 92]:err_code:0xa0801001, clock:0xffffffff

Cleared the log and rebooted - no errors, yet the glaring GLOD is there. Would it not report at least some problem that prevents the darn thing from starting?

Code:
>$ clearerrlog
clearerrlog
ERRLOG CLEARED
[mullion]$

>$ bringup
bringup
[SSM] state: 0000 -> 0101
Bringup Mode #0 (0xFF)
[SSM] ssmCb_OnStartingBePowOn() called.
[SSM] First Boot.
[SSM] Bringup mode : syspm_stat=00000000/00000000
[POWSEQ] PowerSeq_Setup called.
[SSM] state: 0101 -> 0201
[POWSEQ] AV Backend Setup
[SSM] state: 0201 -> 0102
[SSM] state: 0102 -> 0202
[SSM] state: 0202 -> 0103
[SSM] state: 0103 -> 0203
[SSM] ssmCb_BeforeBeOn() called.
[SSM] state: 0203 -> 0104
Psbd_SbTransMode_Half:0x21e2

>$ errlog
errlog
ofst[  0]:err_code:0xffffffff, clock:0xffffffff
ofst[  4]:err_code:0xffffffff, clock:0xffffffff
ofst[  8]:err_code:0xffffffff, clock:0xffffffff
ofst[ 12]:err_code:0xffffffff, clock:0xffffffff
ofst[ 16]:err_code:0xffffffff, clock:0xffffffff
ofst[ 20]:err_code:0xffffffff, clock:0xffffffff
ofst[ 24]:err_code:0xffffffff, clock:0xffffffff
ofst[ 28]:err_code:0xffffffff, clock:0xffffffff
ofst[ 32]:err_code:0xffffffff, clock:0xffffffff
ofst[ 36]:err_code:0xffffffff, clock:0xffffffff
ofst[ 40]:err_code:0xffffffff, clock:0xffffffff
ofst[ 44]:err_code:0xffffffff, clock:0xffffffff
ofst[ 48]:err_code:0xffffffff, clock:0xffffffff
ofst[ 52]:err_code:0xffffffff, clock:0xffffffff
ofst[ 56]:err_code:0xffffffff, clock:0xffffffff
ofst[ 60]:err_code:0xffffffff, clock:0xffffffff
ofst[ 64]:err_code:0xffffffff, clock:0xffffffff
ofst[ 68]:err_code:0xffffffff, clock:0xffffffff
ofst[ 72]:err_code:0xffffffff, clock:0xffffffff
ofst[ 76]:err_code:0xffffffff, clock:0xffffffff
ofst[ 80]:err_code:0xffffffff, clock:0xffffffff
ofst[ 84]:err_code:0xffffffff, clock:0xffffffff
ofst[ 88]:err_code:0xffffffff, clock:0xffffffff
ofst[ 92]:err_code:0xffffffff, clock:0xffffffff
ofst[ 96]:err_code:0xffffffff, clock:0xffffffff
ofst[100]:err_code:0xffffffff, clock:0xffffffff
ofst[104]:err_code:0xffffffff, clock:0xffffffff
ofst[108]:err_code:0xffffffff, clock:0xffffffff
ofst[112]:err_code:0xffffffff, clock:0xffffffff
ofst[116]:err_code:0xffffffff, clock:0xffffffff
ofst[120]:err_code:0xffffffff, clock:0xffffffff
ofst[124]:err_code:0xffffffff, clock:0xffffffff

>$ shutdown
shutdown
[SSM] state: 0400 -> 0500
[POWSEQ] AV Backend Letup
[SSM] ssmCb_AfterBeOn() called.
[SSM] Shutdown mode ... req_wake_src = 000002F4, ctxt=00/00
[SSM] Shutdown mode : syspm_stat=00000000/00000000
[POWSEQ] PowerSeq_Letup called.
[SSM] state: 0500 -> 0000
(PowerOff State)

If I request powerstate before shutdown, it comes back with the following:
Code:
>$ powerstate
[SSM] state: 0104 -> 0204
[SSM] state: 0204 -> 0105
[SSM] state: 0105 -> 0400
(PowerOn State)
[SERV NVS] READ CMD
Boot Loader SE Version 1.5.0 (Build ID: 1798,18531, Build Data: 2007-01-10_12:09:26)
Copyright(C) 2006 Sony Computer Entertainment Inc.All Rights Reserved.
[SERV SETCFG] XDR (CH0,CH1) ASSERT
[SERV SETCFG] XDR (CH0,CH1) DEASSERT
[ERROR]: 0xb0002001 (FATAL) XDR Link not initilized.
ITC_DUMP000000000000000000000000000000000000000000000000000000000000000000000000000000000000000000000000000000000000000000000000000000000000000000000000000000000000000000000000000000000000000000000000000000000000000000000000000000000000000000000000000000000000000000000000000000000000000000000000000000000000000000000000000000000000000000000000000000000000000000000000000000000000000000000000000000000000000000000000000000000000000000000000000000000000000000000000000000000000000000000000000000000000000000000000000000000000000000000000000000000000000000000000000000000000000000000000000000000000000000000000000000000000000000000000000000000000000000000000000000000000000000000000000000000000000000000000000000000000000000000000000000000000000000000000000000000000000000000000000000000000000000000000000000000000000000000000000000000000000000000000000000000000000000000000000000000000000000000000000000000000000000000000000000000000000000000000000000000000000000000000000000000000000000000000000000000000000000000000000000000000000000000000000000000000000000000000000000000000000000000000000000000000000000000000000000000000000000000000000000000000000000000000
PTC_DUMP0000000000000000000000000000000000000000000000000000000000000000000000000000000000000000000000000000000000000000000000000000000000000000000000000000000000000000000000000000000000000000000000000000000000000000000000000000000000000000000000000000000000000000000000000000000000000000000000000000000000000000000000000000000000000000000000000000000000000000000000000000000000000000000000000000000000000000000000000000000000000000000000000000000000000000000000000000000000000000000000000000000000000000000000000000000000000000000000000000000000000000000000000000000000000000000000000000000009e90a45000000000a5d0ac3000000000a330a930000000009bb0a21000000000a4b0aa9000000000a4a0aa80000000009db0a31000000000a550ab50000000000000000000000000a330a91000000000a2b0a8a0000000009e60a3d000000000a460aa50000000009c80a1a0000000009da0a3a0000000009c60a240000000009ad0a0c0000000000000000000000000a0a0a640000000009e70a3c000000000a850ae2000000000a760ad40000000009cc0a270000000009cf0a2b0000000009d40a2e000000000a830add0000000000000000000000000a8e0aea000000000a6d0ac9000000000a070a59000000000a8e0ae6000000000a170a710000000009fb0a60000000000a860ae6000000000aa50af70000000000000000
MIC_DUMP0000000000000000000000000000000000000000000000003200000000000000000000000000000000000000000000000000000fffffff8000000000000120000000000000100000800000000000000000000000000000000800000000000000080000000000000000000000000000000000000000000000ffc0000000000000502000000000000000e00000000000006284055ad6b000005d7000000000000071800210000000000a963d6000000000edd61229594ba6b400000000000000001b87000000000000140002000000000004810000000000000100000000000000c8000000000000000000000000000000000010000000000000000000000000001b87000000000000140002000000000004810000000000000100000000000000c800000000000000000000000000000000001000000000000000000000000000502000000000000000e00000000000006284055ad6b000005d7000000000000071800210000000000a963d6000000000edd61229594ba6b40000000000000000800000000000000000000000000000000800000000000000080000000000000000000000000000000000000000000000ffc0000000000000061101700000000040000000000000007cfe000000000000e1c0000000000000000000000000000000000000000000000000fd400000000000000280000000000000000000000000000000000000000000000000000000000000000000000000000000000000000000000000000000130000000000000000
XIO_DUMP0001000a00090000020c00000373000000000018000000000000020c000710e109410000000f000f00200000a08000080001e10f000008540c540000000000010bad000000000000000000000000000c000c000c000c00580058005800580000000000000000007f007f007f007f4438443844384438931593159319931300ff00ff00ff00ff000000000000000000000bad00000bad00220bad00220bad00000000000000000bad3f000bad3f39000000000000000000000000000000000000000000000000000000000000000000000000000000000000000000000000000000000000000000000000000000000000000000000000000000000000000000000000000000000000000000000000000000000000000000000000000000000000000000000000000000000000000000000000000000000000000000000000060806080608060806080608060806080608000200020002000200020002000200020002000000000000000000000000000000000000000000000000000000000000000000000000000000000000000000000000000000000000000000000000000000000000000000000000000000000000000000000000000000000000000000000000000000000000000000000000000000000000000000000000000000000000000000000000000000000000000000000000000000000000000000000000000000000000000000000000000000000000000000000000000000000000000000000000000000000000000000000000000000000000000000000000000000000000000000000000000000000000000000000000000000000000000000000000060806080608060806080608060806080608000200020002000200020002000200020002000000000000000000000000000000000000000000000000000000000000000000000000000000000000000000000000000000000000000000000000000000000000000000000000000000000000000000000000000000000000000000000000000000000000000000000000000000000000000000000000000000000000000000000000000000000000000000000000000000000000000000000000000000000000000000000000000000000000000000000000000000000000000000000000000000000000000000000000000000000000000000000000000000000000000000000000000000000000000000000000000000000000000000000000060806080608060806080608060806080608000200020002000200020002000200020002000000000000000000000000000000000000000000000000000000000000000000000000000000000000000000000000000000000000000000000000000000000000000000000000000000000000000000000000000000000000000000000000000000000000000000000000000000000000000000000000000000000000000000000000000000000000000000000000000000000000000000000000000000000000000000000000000000000000000000000000000000000000000000000000000000000000000000000000000000000000000000000000000000000000powerstate
ATA Power          : ON
PCI Power          : OFF
RSX Power          : ON
XDR Power          : ON
Eurus Power        : ON
SB Power           : ON
RSX Thermal Sensor : AVAILABLE
BE Thermal Sensor  : AVAILABLE

Anyone have any clue as to how to peek and poke the thing in such a state? Cheers

im having the same exact issue. I'll post my log tomorrow. Same glod. Error seems to be 2203 however I have that "ERROR]: 0xb0002001 (FATAL) XDR Link not initilized" also. Is this cpu related? Did you by any chance scratch the cpu when deliding? You ever figure it out and brought it back to life?
 
Is there anyone familiar with the GUI for webMAN mod and know how to write the code that it displays? I'm curious if SYSCON commands such as lasterrlog, errlog, becount, and etc could be polled and displayed on screen, perhaps added to the system information list or added as an option under more information? That kind of thing.

I understand the console would first need some kind of UART connection and internal access enabeled. But is it even possible to access the SYSCON from within the OS? Are they completely compartmentalized?
 
Could be that made in kind of console as cmd which if we type help give us per unit info, it is possible that dump syscon via Linux on unit, a console could run rest, running a game emulator as total commander, I don't know exactly basics of Linux but could work, who knows more can agree or disagree.
They are just examples, it could probably have to reconfigure entirely os (pup) in order to gain total access.
Reading the way Renesas is programmed, Sony closed at very first entry acces for debbug at 1c03 or 1c02 if I remember correctly.
Edit
Syscon firmware key thread post 332
according this dumps OCD security ID should be on C4-CD? Second security id on 10C4-10CD?
There is nothing on C4-CD on nvs AA.
https://www.psx-place.com/threads/s...ic-release-by-zecoxao-what-does-it-mean.26148
 
Last edited:
Is there anyone familiar with the GUI for webMAN mod and know how to write the code that it displays? I'm curious if SYSCON commands such as lasterrlog, errlog, becount, and etc could be polled and displayed on screen, perhaps added to the system information list or added as an option under more information? That kind of thing.

I understand the console would first need some kind of UART connection and internal access enabeled. But is it even possible to access the SYSCON from within the OS? Are they completely compartmentalized?

You can access some areas from lv2 (https://www.psdevwiki.com/ps3/LV2_Functions_and_Syscalls#sys_sm.2Fsys_ctrl_Syscalls) or the services via lv1 (https://www.psdevwiki.com/ps3/SC_Communication).

They are just examples, it could probably have to reconfigure entirely os (pup) in order to gain total access.
Yes, it's possible to create a patch which allows you two access everything from the PS3 and PC side.

Reading the way Renesas is programmed, Sony closed at very first entry acces for debbug at 1c03 or 1c02 if I remember correctly.
Edit
Syscon firmware key thread post 332
according this dumps OCD security ID should be on C4-CD? Second security id on 10C4-10CD?
There is nothing on C4-CD on nvs AA.
https://www.psx-place.com/threads/s...ic-release-by-zecoxao-what-does-it-mean.26148
The NVS is not the firmware, the debug security bytes are stored in the firmware region.
Changing these doesn't help, you also need to change the other security byte which is saved in the protected area. It doesn't work like on the RL78, the security design is better.
 
Last edited:
Errorlog and becount are listed under lv2. That's good enough. Here's kinda what I'm envisioning...

Say you are going about your care free PS3 enjoyment, when suddenly you get a YLOD!

"WTF just happened?", you think!

Well, to get the answer you currently have to open the console (removing that warranty sticker), install wires, and use an unfriendly script to access the errorlog. From there you have to reference the code and try to make sense of it on this forum. That's very unfriendly, when you just want to know what happened.

I'm not saying you won't have to do that. If it's a true YLOD, the console won't boot up again and you are forced to. On the other hand, a YLOD might be due to overheating, or the caps are starting to wear out, and the console will boot back up as if nothing happened...

"Okay, that was scary! But everything seems fine, soo... I guess I'm good?"

That's dangerous thinking if the console is overheating, because it could lead to BGA defects, electromigration and related heat damage. Instead of having no way of knowing, perhaps the last error code could be displayed upon restart with a warning....
Error A0801200

Your console has recovered from a serious error. Please refer to [link to the error code database on the wiki] for more information.

Press
:but start: to continue
Or say you just bought the console second hand and are curious about it's usage history. Accessing the last 20 errors stored in the errlog and the becount would be useful information for that purpose. It might tell you if the console has been reflowed previously, used in a data farm, seen heavy or light use. Or it may have no errors stored. On a sealed console that would mean it's never had problems! For that it would be nice to have a menu accessible from the XBM.

Anyway, I think that would be a nice feature for custom firmware. I am not capable of programming this. So perhaps this is something to add to the poll request.
 
Errorlog and becount are listed under lv2. That's good enough. Here's kinda what I'm envisioning...

Say you are going about your care free PS3 enjoyment, when suddenly you get a YLOD!

"WTF just happened?", you think!

Well, to get the answer you currently have to open the console (removing that warranty sticker), install wires, and use an unfriendly script to access the errorlog. From there you have to reference the code and try to make sense of it on this forum. That's very unfriendly, when you just want to know what happened.

I'm not saying you won't have to do that. If it's a true YLOD, the console won't boot up again and you are forced to. On the other hand, a YLOD might be due to overheating, or the caps are starting to wear out, and the console will boot back up as if nothing happened...

"Okay, that was scary! But everything seems fine, soo... I guess I'm good?"

That's dangerous thinking if the console is overheating, because it could lead to BGA defects, electromigration and related heat damage. Instead of having no way of knowing, perhaps the last error code could be displayed upon restart with a warning....
Or say you just bought the console second hand and are curious about it's usage history. Accessing the last 20 errors stored in the errlog and the becount would be useful information for that purpose. It might tell you if the console has been reflowed previously, used in a data farm, seen heavy or light use. Or it may have no errors stored. On a sealed console that would mean it's never had problems! For that it would be nice to have a menu accessible from the XBM.

Anyway, I think that would be a nice feature for custom firmware. I am not capable of programming this. So perhaps this is something to add to the poll request.
Of course! This is great idea (which I remember it was the very first thing I asked when I joined this thread hehe)

Even if it doesn't replace the uart connection, it would be enough to confirm those cases where the machine actually revives (many cases).
Think of all the false positives from "heating the capacitors" or confusing stuff like that... Especially when it's actually a funny RSX (error 3034/44xx).

Accessible to everyone and seems like it could be reasonably possible to implement. (For those that know how of course)

For now... New people already have it easier than before. The video is finally out after months of waiting!
Sorry that it took so long and that it is so long, but oh well. Better late than never, especially if it's a good thing!

Thanks also to everyone that helped along the way

Cheers
 
Or say you just bought the console second hand and are curious about it's usage history. Accessing the last 20 errors stored in the errlog and the becount would be useful information for that purpose. It might tell you if the console has been reflowed previously, used in a data farm, seen heavy or light use. Or it may have no errors stored. On a sealed console that would mean it's never had problems! For that it would be nice to have a menu accessible from the XBM.

Anyway, I think that would be a nice feature for custom firmware. I am not capable of programming this. So perhaps this is something to add to the poll request.

I think coding an app (which is also compatible with HEN) would allow all users (<= 3.55 OFW/CFW and >3.55 CFW/HEN) to use it, a CFW would only work on hackable consoles.
 
What do hate most when a tool is failing. Now part of hot air was changed, but bottom heating will fail(set at 50 goes continuously on to maximum) , going to exchange the new pcb double heating control with mine. Hope it will be good enough for next 5 years at least
24f00db5d6a64e5bdbed8240bc274ba2.jpg
 

Similar threads

Back
Top