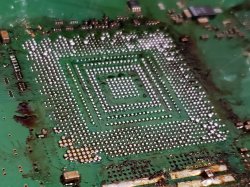
Well i just lifted my first GPU ever today. That was exhilarating. I'm pretty sure i ruined it, tho this board was beyond repair (cpu got murdered).
Im using a t-8280 preheater and an aoyue 852a pro hot air station with a 45x45mm square nozzle. The hot air station has a built in vacuum pickup tool which i attached when the gpu was finally hot enough to nudge around. Tho, i spent way too much time between lifting my hot air lamp away and grabbing the gpu with my vacuum pickip, and only the top side wanted to lift up. Increasing the suction of the pickup tool also increases airflow on the heatgun, and i did that while heatgun was away from the board, which took like 7-10 seconds. Way too much time.
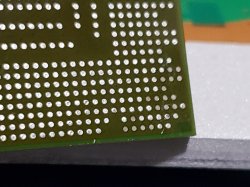
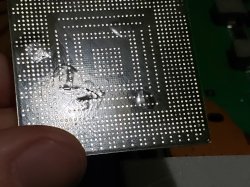
Anyway, I immediately backed off and brought the hot air lamp back down, and tried again when the GPU was able go be nudged again. This time i slowly increased air flow of my hot air station as i moved the lamp upwards, and as soon as i had my suction at 100% i lifted the gpu up with no hassle at all. After cleaning the GPU, i noticed some small bumps beneath it, i assume that's another bad thing that would have killed this GPU even if the pads were all fine. I'll share some photos of the results.
I have a couple more beyond repair boards in my basement, hopefully i can get my technique right with them.
Edit:
With the GPU now removed, i realized my vacuum pickup tool can carry it perfectly at minimum suction. Next time i do this, there probably wont even be 1 second between lifting the hot air lamp and introducing the pickup tool to the GPU.
Also, i forgot to mention i am using a temperature sensor. I placed the probe right next to the GPU's right side. I might need a second temp sensor on the left side, since that side is where the pads got ripped. I also tested my sensor for accuracy by putting it on my tongue, and that checked out fine.