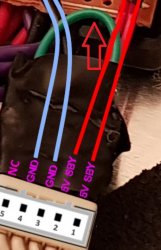
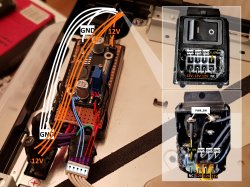
I have a question, the 5 pin connector, that last one, where you labled "NC", I see a green wire thats inserted? and then back into the first 5V?
I just put a pin in there because the first time, when I left it empty, it powered up, but when I press the power, it didnt go into YOLD.
So I was wondering what to do to that 5th pin.
2 wires seems to be able to power it, but how stable or safe it is I dont know, this was a brief test of concept and I was excited that it totally worked.
Next im trying to to revise it from what I see in the above post, to splice it into 3 wires, and test it on a working board, now that I know It does power up, and overall seems safe.
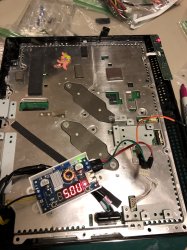
The last thing is, the housing unit, I looked all over, trying to get one where I can hide the 12V under the buck, I just couldnt. Do you know what parts you used for that black housing, thats ideal for cable management, because I basically have the 12V exposed, and a buck taped on top of it (the board was dead, I just wanted to get it working ASAP)
If you can help me explain that green loop, and what its doing, and that black housing (it looks like a gutted AC adaptor housing? with a board in between?) Might need to thrift for a few of those.
PS. Its possible I found out, because I was on a tight schedule, ordering anything from ebay took months at a time, like the 24 pin female motherboard that Im still waiting for....I used a 8 Pin ATX female, now it wont fit, you have to file down the shapes, because it wont match the dell's power. But once you do it does work (BUTTT I dont recommend this, because of the shape, of the ATX, your BLACK becomes the + 12V, and your yellow becomes the Ground...it was super confusing to keep everything straight in my head. I had to tape lable so my reflex didnt just attach the black to the ground).
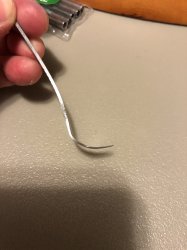
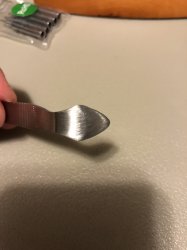
So after my next iteration, hopefully it will look much cleaner, and I'll spice the wires, the tool NSC recommend most was this thing, its just a metal scraper that cost 5 bucks, but you will have to file, cut, file, cut for about 2 hours!!!! to get it into the right shape and thickness.
Going to try to delided a dead board I got for free. I literally was sitting there for 2 hours, sanding it.
NSC expains that, I hope you can see in the picture, there is a bend ever so slight at the point where it cuts the silicone (where the painting knives are perfectly straight), so when you apply force, that bend (you are suppose to sand it so smooth that it cant even scratch paper) is going to kick to force upwards towards the heatsink, and 0% chance of scratching the die because it forces it to go up.
The last time I delid this one, when you use anything straight, if you apply force theres a 50-50 chance its going to go up or down, now experience and patience theres probably a good chance you can do it, but to a novice, if the force kicks the knife down, its point is going to scrape that die and you end up with what I have
")
So hopefully this works, so when the cutting edge is pointed ever so slightly up, the cutting point, if you accidentally push it too hard, its just going to try to cut the heat speader instead. I think I have to sand mine more

omg it was so tedious.
Here is the video where NSC expains the reasoning behind the tool:
PS. That wire, Amazon lost it, it never came, so I counldnt try it, try ordering again, it looks like its not in stock or its going to take weeks.