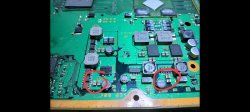
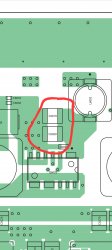
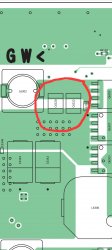
PS3 Reball ps3 Cell/RSX

Almost forgot about rest of rsx points of power lines
96575e09b0233c33ba08756840fc173f.jpg
5cdcb6cfbd4d24e25c7a3e81987bf338.jpg
d5bc4254a1d4556b701eff361269c345.jpg
023677dc6133921f2fb3e50bca1f9707.jpg
ca88568fffe87c0bf9fb577ce3acdab3.jpg
6921cd3d1957bb8e6249a305e42f3762.jpg
d660b12f4a750becdbb8386336ae060e.jpg
127309d25b47cbad59cc98ff3b85ca7b.jpg
ebdb52e023f97a3e2e3221ff8ed934e8.jpg
704c9b904e9c9e91f9fc965154eea4f1.jpg
Hey man.
What leaded solder balls do you use?
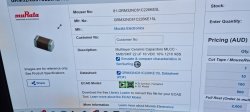
I bought a heap off Aliexpress when I bought my IR8500. They were cheap. Ebay is flooded with cheap ones aswell with no specifications in the description. Looking at like $10 for 25,000. I've seen others that are $60 upwards to $100. One site on the internet with full specs $298 for 50,000
Does it really matter?
I'm still learning to reball I've read every post in this thread and it's the best information I've come across yet. Going to put it into practice. I've got x2 40nm rsx to put onto some BC ps3. Are you able to explain how I can test them with a multimeter please?
And how to test the rsx that are currently on the mobos. I've got multimeters and a 12v direct injection box aswell if needed.
 
So I have an ACHI-IR PRO-SC and this is the profile i've been using for the past 6 months with advice from Vyktor with a few tweaks and have had zero issues with my reballs on PS3's ever since. I have my bottom heater set at 280 and keep it at that until top temp reaches 160, then i lower to 270 at 180, 260 at 190, 250 at 200, 240 at 210 and I usually just leave it there. For top heater these are my settings as of now, you can adjust the times up or down to make sure you are hitting the target temps. I also have my top heater aobut 1.5 - 2 inches away from the motherboard. For example, for L1, I have to have it run a bit longer in the winter to reach 160 since its colder in my basement. I am also using two TC for the top, one which is attached to the ACHI and one that is external. My bottom TC is also touching the bottom of my PS3 or 360. I can take pictures if needed

R1: step
L1 0 d1 360 r2 1.00
L2 190 d2 30 r3 1.00
L3 200 d3 25 r4 1.00
L4 210 d4 25 r5 1.00
L5 220 d5 25 r6 1.00
L6 230 d6 25 r7 end
hb 230.

Even though my L6 is set at 230 for 25 sec, I use the "nudge" test with tweezers, so once my balls are in the liquid state which is around 225, I can lift.
For reballing back lead, I usually stop before L4 reaches 210 and when my thermocouple reaches 205, and then I just let it cool on its own from there and have had zero issues.
For this, my bottom heater would be 10 degrees lower for all, so 270 until 160, 260 at 170, 250 at 180, 240 at 190 and then i leave it there.

I know i'm probably in the minority but I also reball my RSX using my top heater and haven't had any issues thus far, most others use a hot air wand and do it that way, but that'll be up to you. I have another profile for that which is basically
L1 210 d1 999 r2 1.00
For this i have my top heater probably an inch or so away, if i go 1.5 - 2 inches, some of my balls tend to drift or merge. Haven't had issues with any of my 40NM reballs thus far, so hopefully this can help you figure out how to dial in your own machine!


Hey mate. I'm trying to reball aswell and have an IR8500
I've made modifications to my machine raising the bottom heater to the point where its nealry touching the psu pins on the underside. I know that every machine is different and there are so many viaribles that contribute to the outcome. I tried your suggested temps and it pretty much turned the whole mobo into popcorn I've been using scrap boards but I'm starting to run out of them.
Do you have any other suggestions ideas?
Any help would be appreciated.

Can you post a picture of the board on the machine? My bottom heaters are exactly where they are stock, its the thermocouple from the bottome that i have touching the bottom side of the board
 
Can you post a picture of the board on the machine? My bottom heaters are exactly where they are stock, its the thermocouple from the bottome that i have touching the bottom side of the board

Thanks for your reply mate I appreciate it.
I've uploaded some images for you hope the link works.
I modified my bga machine so the heaters sit as close as possible so they dont have to work as hard. Used jig brackets and raised it approx 20mm.
Ive followed all your instructions.
The thermocouple is sitting on the bottom of the mobo.
most of the settings are the same. My bottom heaters are set at 500 dwell time to reach the 160 degrees on the bottom thermocouple.
I'm guessing my temps are reaching it far quicker than yours.
I did another test the other night with my bottom heater set at 190 degrees on a scrap board.
The RSX seems to be lifting at around 200-210 degrees but getting damaged in the process.
I have my height of the top IR set to 2 inches 4.8cm like suggested.
My bottom heater for some reason has a tendency not to stop at the desired temp and go about another 10 degrees above it so I installed a on/off switch for safety reasons.
With the bottom heaters set at 190 and the chip lifting at 200-210 do you think my temperature is still set too high?
I'm running out of scrap boards lol and IMO after an unsucessful lift if you try again and add more flux it won't lift at those temps anymore

TVwGaUc
 
All modifications in distance from bottom to board and from board to top are going to deviate all measurements. Test white A4 paper at 230 should bearly rust it for 30 seconds end, after tests it with 1 minute. This is a test to understand if top heating is doing even heat, need to check all at once. First bottom set it around 210 and test it. See how long it takes to reach 150. Now increasing by 10 Celsius each test time. Any ps3 slim board ever delaminated one.
Definitely need to learn where station start to melt lead or leaded. This is not something going quick.
There was a way to operate manual those, at least stop top heating in place to reach desired temperature near Ic.
We operate manually. Watch Computer Booter won't help that much as our stations are different.
I was looking to build one rework station with PID control but is bit different.
TC is also very important like I said before, 222 for Booter is 232 for me.
He got lucky enough to understand me and adapted same profiles around boards.
 
Thanks for your reply mate I appreciate it.
I've uploaded some images for you hope the link works.
I modified my bga machine so the heaters sit as close as possible so they dont have to work as hard. Used jig brackets and raised it approx 20mm.
Ive followed all your instructions.
The thermocouple is sitting on the bottom of the mobo.
most of the settings are the same. My bottom heaters are set at 500 dwell time to reach the 160 degrees on the bottom thermocouple.
I'm guessing my temps are reaching it far quicker than yours.
I did another test the other night with my bottom heater set at 190 degrees on a scrap board.
The RSX seems to be lifting at around 200-210 degrees but getting damaged in the process.
I have my height of the top IR set to 2 inches 4.8cm like suggested.
My bottom heater for some reason has a tendency not to stop at the desired temp and go about another 10 degrees above it so I installed a on/off switch for safety reasons.
With the bottom heaters set at 190 and the chip lifting at 200-210 do you think my temperature is still set too high?
I'm running out of scrap boards lol and IMO after an unsucessful lift if you try again and add more flux it won't lift at those temps anymore

TVwGaUc
Use kapton tape to avoid damage the chip.

See page number 5
 
Last edited by a moderator:
I have my height of the top IR set to 2 inches 4.8cm like suggested.

I would use 2-3cm. My top heater is like 500W and thats the height Ive always used.

The RSX seems to be lifting at around 200-210 degrees but getting damaged in the process

Whats getting damaged?

Put a test board in your machine. Set the temps for 150C and use a stop watch to verify how long your machines take to get it to 90 then 150C. Create test profile using those times, add a 15-30 second dwell time at each interval, repeat process until you are at reflow temps. 90, 150, 200, 225, you can add more steps if you feel it requires more time in that stage. Heat, soak, heat, soak, etc. finish off with a cooldown of 2-3C PER SECOND. Profiles will likely need to be modified depending on weather and current season.
 
All modifications in distance from bottom to board and from board to top are going to deviate all measurements. Test white A4 paper at 230 should bearly rust it for 30 seconds end, after tests it with 1 minute. This is a test to understand if top heating is doing even heat, need to check all at once. First bottom set it around 210 and test it. See how long it takes to reach 150. Now increasing by 10 Celsius each test time. Any ps3 slim board ever delaminated one.
Definitely need to learn where station start to melt lead or leaded. This is not something going quick.
There was a way to operate manual those, at least stop top heating in place to reach desired temperature near Ic.
We operate manually. Watch Computer Booter won't help that much as our stations are different.
I was looking to build one rework station with PID control but is bit different.
TC is also very important like I said before, 222 for Booter is 232 for me.
He got lucky enough to understand me and adapted same profiles around boards.

Hey man sorry about the late reply. The top IR ceramic was damaged from when I first got the bga from heating it up too quickly.
I just got a new IR heater yesterday and installed it. So now I'm ready to do some testing.
I've already worked out that having my bottom heater at 190 degrees is too hot and causes the mobo to pop so increasing it to 210 isn't a good idea.

When I was testing before it was summer time and ambient temperature was a lot higher. It's getting into winter now. I'll use the heat pump in my house and set that to around 20 degrees.

I'll run a test on the bottom heater first at 180 degrees and see how long it takes to reach 150 then we will progress with adding the top heater in? Does it really matter if the whole process takes longer than 12 minutes? If the temps don't get too hot I don't see why it should matter

I would use 2-3cm. My top heater is like 500W and thats the height Ive always used.


Whats getting damaged?

Put a test board in your machine. Set the temps for 150C and use a stop watch to verify how long your machines take to get it to 90 then 150C. Create test profile using those times, add a 15-30 second dwell time at each interval, repeat process until you are at reflow temps. 90, 150, 200, 225, you can add more steps if you feel it requires more time in that stage. Heat, soak, heat, soak, etc. finish off with a cooldown of 2-3C PER SECOND. Profiles will likely need to be modified depending on weather and current season.

The rsx got damaged but I didn't put tape over it like I normally do. (Was just a test board no matter)
I just got a new IR top ceramic and installed it so that's why I hadn't replied sorry.
I'm just about to do tests to see how long it takes to get to 150 degrees, before it was about 460 seconds then id start the top heater.
Why do I need to know how long before it hits 90 degrees? I thought you didn't start top heating till 150? I can write down the time it takes to get to 90 though.
Is it better to soak for 15 or 30? I usually soak for 30 seconds?
Can you clarify a little more what you mean here please.

finish off with a cooldown of 2-3C PER SECOND
 
Last edited by a moderator:
So I have an ACHI-IR PRO-SC and this is the profile i've been using for the past 6 months with advice from Vyktor with a few tweaks and have had zero issues with my reballs on PS3's ever since. I have my bottom heater set at 280 and keep it at that until top temp reaches 160, then i lower to 270 at 180, 260 at 190, 250 at 200, 240 at 210 and I usually just leave it there. For top heater these are my settings as of now, you can adjust the times up or down to make sure you are hitting the target temps. I also have my top heater aobut 1.5 - 2 inches away from the motherboard. For example, for L1, I have to have it run a bit longer in the winter to reach 160 since its colder in my basement. I am also using two TC for the top, one which is attached to the ACHI and one that is external. My bottom TC is also touching the bottom of my PS3 or 360. I can take pictures if needed

R1: step
L1 0 d1 360 r2 1.00
L2 190 d2 30 r3 1.00
L3 200 d3 25 r4 1.00
L4 210 d4 25 r5 1.00
L5 220 d5 25 r6 1.00
L6 230 d6 25 r7 end
hb 230.

Even though my L6 is set at 230 for 25 sec, I use the "nudge" test with tweezers, so once my balls are in the liquid state which is around 225, I can lift.
For reballing back lead, I usually stop before L4 reaches 210 and when my thermocouple reaches 205, and then I just let it cool on its own from there and have had zero issues.
For this, my bottom heater would be 10 degrees lower for all, so 270 until 160, 260 at 170, 250 at 180, 240 at 190 and then i leave it there.

I know i'm probably in the minority but I also reball my RSX using my top heater and haven't had any issues thus far, most others use a hot air wand and do it that way, but that'll be up to you. I have another profile for that which is basically
L1 210 d1 999 r2 1.00
For this i have my top heater probably an inch or so away, if i go 1.5 - 2 inches, some of my balls tend to drift or merge. Haven't had issues with any of my 40NM reballs thus far, so hopefully this can help you figure out how to dial in your own machine!

Are you manually changing the bottom heater at each level?
 
Hi Hi, with my thermocouples, I use the one that came with the achi + one of my own for the top to make sure they are always reporting the same temperature. I also changed the thermocouple that came with my IR PRO to a better one. For the bottom probe, I changed that also and I have it reaching and touching the bottom of the PS3. I had the regular ACHI top heater for many years but about 3 years ago, I got an ELSTEIN circular IR plate that I put, which works alittle better. How close is your motherboard to the bottom heater plates? In case, I let bottom do 75% of the work and top does the remaining to get to 225 or whatever is desired. Hope this helps.
Hey mate. Where did you get the ELSTEIN circular IR plate from? I've bought about 3 different IR cermaics now and they are all just Chinese junk and don't heat up evenly. This one is the closest I've got to even heat but it's Still not heating the bar up in the middle.
Not sure which one you have but I've googled looking everywhere for a Elstein RFS/80 230V 400W and can't find anyone that stocks it. They all just ask you to send an email for a quote and of the ones that have replied won't ship to Australia
 

Attachments

  • IR8500 IR.jpg
    IR8500 IR.jpg
    1.2 MB · Views: 58
Hey mate. Where did you get the ELSTEIN circular IR plate from? I've bought about 3 different IR cermaics now and they are all just Chinese junk and don't heat up evenly. This one is the closest I've got to even heat but it's Still not heating the bar up in the middle.
Not sure which one you have but I've googled looking everywhere for a Elstein RFS/80 230V 400W and can't find anyone that stocks it. They all just ask you to send an email for a quote and of the ones that have replied won't ship to Australia
Try this site and see how it goes, didn't personally bought anything from them.
https://www.otec-industry.com.ua/en/brand/elstein/rfs-80-400-w-230-v
 

Attachments

  • Screenshot_20240729_002150_Gallery.jpg
    Screenshot_20240729_002150_Gallery.jpg
    1.2 MB · Views: 57

Attachments

  • Screenshot_20240729_184632_Gallery.jpg
    Screenshot_20240729_184632_Gallery.jpg
    311.3 KB · Views: 34
  • Screenshot_20240729_184713_Gallery.jpg
    Screenshot_20240729_184713_Gallery.jpg
    350.2 KB · Views: 36
  • Screenshot_20240729_185458_Gallery.jpg
    Screenshot_20240729_185458_Gallery.jpg
    960 KB · Views: 31
Aren't they picture so you can't find them in list as text? , c'mon watch closer, otherwise I'll charge you 20 euros for technical support. [emoji6]
7c8edc3e44cfecf9f9db358f881ad295.jpg
 
Last edited:
Aren't they picture so you can't find them in list as text? , c'mon watch closer, otherwise I'll charge you 20 euros for technical support. [emoji6]
View attachment 43708

:D ha ha
They are in the pictures with the codes
The codes
C6019
C6020
C6320
C6322
Aren't in that list.

I just found the Reset syscon command in Wikipedia so all good there.
I don't know what that picture you uploaded means I can't read it. I'm not that advanced
 
Last edited:
Thank you. I've got them up.
Last place quoted me 100 euros for the part. 300 euros for shipping
$664 for a ceramic plate
For my repairs can you tell me me the values of these capacitors please or where to get them from?
They are the misc rail capacitors on the 60GB PS3

From Victors picture, they are 1210 sized 22u 16V mlcc's so thats what you'd be looking for
 
Thank you
From Victors picture, they are 1210 sized 22u 16V mlcc's so thats what you'd be looking for
Thank you very much I appreciate you telling me what they are. I couldn't read the schematic like you guys and Victor wasn't going to tell me lol

These ones?
Just not sure about the X6S part
 

Attachments

  • Screenshot_20240801_004816_Gallery.jpg
    Screenshot_20240801_004816_Gallery.jpg
    1.3 MB · Views: 31
Last edited:
Back
Top