PS3 (Research/Experimental) - NEC/TOKIN Capacitors Replacement - YLOD

Bad news, the ps3 YLODed.


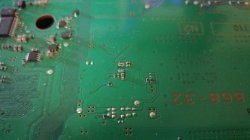
I replaced all the bottom caps and was navigating the menu and suddenly ylod.

I opened it up and low and behold a cap came loose. I have no idea why.

Resoldered

it works again but this time I dies again one more time.

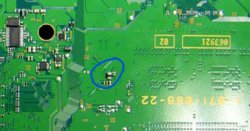
Then I find out more caps came off.

Now I made sure to solder tough on the caps and really wiggled them to make sure there were on tight.


I doubled checked for continuity and it was good.


Now the ps3 has a 3 second ylod.


I don't know what went wrong.

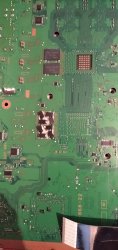
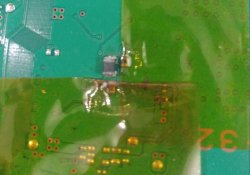
But this is my last spare motherboard. I won't be pursuing this anymore for the meantime as the other motherboard still has the 6 second ylod and all the caps are soldered good on there.


I really think something may have short circuitred.

But that's it for now folks, I guess my contribution will be that you can damage your RSX like that and still have it function. Just don't have it damaged anymore than that.

This is probably the next best guess to as what happened:


Last edited:
I have found the problem, it appears that one of these components (capacitor? ) has been damaged by reasons unknown.

I am not sure what component it is but I do have a spare one from a donor board that I can pull off.


I checked a pic of the COK-001 board and saw from inspection that I was missing this and now I know that this must be the problem.

Any idea how I should go about this???

1st image is mine and the 2nd one with a blue circle is from online.
 

Attachments

  • ghhgh.jpg
    ghhgh.jpg
    141.5 KB · Views: 294
  • edr.jpg
    edr.jpg
    64.4 KB · Views: 304
Last edited:
I have found the problem, it appears that one of these components (capacitor? ) has been damaged by reasons unknown.

I am not sure what component it is but I do have a spare one from a donor board that I can pull off.


I checked a pic of the COK-001 board and saw from inspection that I was missing this and now I know that this must be the problem.

Any idea how I should go about this???

1st image is mine and the 2nd one with a blue circle is from online.
Yeah i think that is what is causing the YLOD because i took a photo of my COK-001 mobo and i have that capacitor, look at this pic i took before changing all the NEC's on the mobo.
 

Attachments

  • IMG_20191220_192736.jpg
    IMG_20191220_192736.jpg
    2 MB · Views: 263
use the schematics online and u will be able to see exactly what its for and what to replace it with if u dont have a donor board.
 
I have a donor board.

Unfortunately it did not work. It instant YLODs now. But it did have a 6 second ylod once only once so it means it almost got running.
There were no pads underneath so I had to fill in some solder to where it sat.

Took off the piece from the donor board and made sure to not change its orientation even where it sat originally on donor board.

It's a shame it didn't work.

Now I have to go back to working on my other 80gb ps3 with the 6 second ylod.

That board has all of its components other than the nec caps off.

Any idea how to fix it?


pics are of the replacement from the donor board.

I think it went on quite well. It's such a shame this didn't work out.
 

Attachments

  • 20200130_034321-1.jpg
    20200130_034321-1.jpg
    819.5 KB · Views: 193
I have a donor board.

Unfortunately it did not work. It instant YLODs now. But it did have a 6 second ylod once only once so it means it almost got running.
There were no pads underneath so I had to fill in some solder to where it sat.

Took off the piece from the donor board and made sure to not change its orientation even where it sat originally on donor board.

It's a shame it didn't work.

Now I have to go back to working on my other 80gb ps3 with the 6 second ylod.

That board has all of its components other than the nec caps off.

Any idea how to fix it?


pics are of the replacement from the donor board.

I think it went on quite well. It's such a shame this didn't work out.

did u test the component?? rule out the pressure test on the BGA's, since it was running could suggest the caps were fine tho ive read a few times u mention ur caps have been loose makes me believe mayb ur soldering skills aren't up to scratch? are u using flux??? if its not tokin related mayb open another thread so we can try keep this thread uncluttered with different repairs.
 
did u test the component?? rule out the pressure test on the BGA's, since it was running could suggest the caps were fine tho ive read a few times u mention ur caps have been loose makes me believe mayb ur soldering skills aren't up to scratch? are u using flux??? if its not tokin related mayb open another thread so we can try keep this thread uncluttered with different repairs.


Yeah I'm using flux on the board. I think it has a lot to do with the way the caps were soldered. Instead of doing a strong secure joint with a bead the caps were just solder quickly.

I am certain it has to do with the soldering skills.

Caps coming off during operation is probably what killed it.

Take away is to solder properly.
 
That why taking pictures help to find missing caps and compoments before and after the work
yes this is true. I was able to find the missing component though through inspection.

Now I don't know what's wrong.

because it did have a 6 second ylod but now it's instant.


It's probably beyond repair now
 
Question is you said that the cap coming off during operation sounds like something is making the caps move during installation Did you add solder to the tan cap legs before placing it on the pads?
 
Question is you said that the cap coming off during operation sounds like something is making the caps move during installation Did you add solder to the tan cap legs before placing it on the pads?


Yes I did, but unfortunately I believe I didn't solder them well on. So when I use the clamps to screw on the heatsink the flex might have shifted the caps.
 
Last edited:
I little bit of my feedback here:

So my 100 caps arrived yesterday, and as soon as I could, I opened my fatties to bring them to live ^^
For this case, I had three BCs, 2 CECHA and 1 CECHC, the other ones I have, have GLOD sadly. Well I'll add info and behaviour before and after the replacement of the caps, and some pictures.

CECHA-1
Instant YLOD when turning it on. After I replaced the caps, I realized the console had no more instant YLOD, and instead just a HDMI signal with black screen, which means the console is ready to show image, the problem here is that the console since it's turned on, gets hot almost instantly, so after I applied thermal compound, I could get image via HDMI but for a couple of seconds because the PS3 turns off due temperature being so high. The fan goes at high speed while all this happens, so take in mind that if you see this after a caps replacement, then you need to delid the CELL.

CECHA-2
The same as CECHA-1, but in this case, no matter what, I couldn't get any image to confirm that the PS3 needs a delidding. But I'm pretty sure is only that since the same happened with the first CECHA (fan going crazy in a few seconds, black screen but little time to see any image and a caution message. The PS3 just shut down).

CECHE

Everything went perfect with this one. YLOD almost in 2 seconds and fan going crazy for a moment. After the replacement, It works really, really good. I must say that, first I used 3 caps per Tokin, on both RSX and CELL. I updated to 4.85HFW, installed HEN and saw the temperatures, which were really high, so I needed to put the fan at 45% when testing games. GT6, no problem with 3 caps per Tokin, TLoU gave me a shut down, so this time I tried 4 per Tokin (only on RSX), and had no problem with it after that. Uncharted 2 runs good too, but as I said, this one needs a delidding too, fuuuuuu..

So if you wanna buy a BC, it will need a delidding. NO MATTER WHAT. I'll add the rest of my feedback when those CECHA are delidded.

P/S: A CECHG that I had was working without 4 Tokins (before removed them it had YLOD). Weird, but don't ask what happened to it, I only can say that the delidding FAILED.

Caps: 470uf 6.3v

https://i.imgur.com/HnN4xkL.jpg
https://i.imgur.com/aLDCHI0.jpg
 
That strange the clamp only apply pressure on the cell and rsx no where else if that was the case it may be the metal case that enclose the whole board try checking the board if there is any sign of warping by checking it with a straight metal ruler
 
I little bit of my feedback here:

So my 100 caps arrived yesterday, and as soon as I could, I opened my fatties to bring them to live ^^
For this case, I had three BCs, 2 CECHA and 1 CECHC, the other ones I have, have GLOD sadly. Well I'll add info and behaviour before and after the replacement of the caps, and some pictures.

CECHA-1
Instant YLOD when turning it on. After I replaced the caps, I realized the console had no more instant YLOD, and instead just a HDMI signal with black screen, which means the console is ready to show image, the problem here is that the console since it's turned on, gets hot almost instantly, so after I applied thermal compound, I could get image via HDMI but for a couple of seconds because the PS3 turns off due temperature being so high. The fan goes at high speed while all this happens, so take in mind that if you see this after a caps replacement, then you need to delid the CELL.

CECHA-2
The same as CECHA-1, but in this case, no matter what, I couldn't get any image to confirm that the PS3 needs a delidding. But I'm pretty sure is only that since the same happened with the first CECHA (fan going crazy in a few seconds, black screen but little time to see any image and a caution message. The PS3 just shut down).

CECHE

Everything went perfect with this one. YLOD almost in 2 seconds and fan going crazy for a moment. After the replacement, It works really, really good. I must say that, first I used 3 caps per Tokin, on both RSX and CELL. I updated to 4.85HFW, installed HEN and saw the temperatures, which were really high, so I needed to put the fan at 45% when testing games. GT6, no problem with 3 caps per Tokin, TLoU gave me a shut down, so this time I tried 4 per Tokin (only on RSX), and had no problem with it after that. Uncharted 2 runs good too, but as I said, this one needs a delidding too, fuuuuuu..

So if you wanna buy a BC, it will need a delidding. NO MATTER WHAT. I'll add the rest of my feedback when those CECHA are delidded.

P/S: A CECHG that I had was working without 4 Tokins (before removed them it had YLOD). Weird, but don't ask what happened to it, I only can say that the delidding FAILED.

Caps: 470uf 6.3v

https://i.imgur.com/HnN4xkL.jpg
https://i.imgur.com/aLDCHI0.jpg


yeah delidding is almost necessary for these models as 90nm runs hot and super hot.

So I noticed that you bridged both the top and bottom sides of the caps.

From what I understand we only needs two wires.


I'd say:

CECHA-1:

- Delid
- replace all caps


CECHA-2:

- Delid
- Reflow the GPU and CPU if you still can't get pic
- replace caps
- Might be a dead RSX tho?


CECHE:


- needs a delid
- use 4 caps per NEC
 
That strange the clamp only apply pressure on the cell and rsx no where else if that was the case it may be the metal case that enclose the whole board try checking the board if there is any sign of warping by checking it with a straight metal ruler


Not quite it's close enough by the NEC caps on the Cell Bottom side that the EFI shield can put pressure on the caps.

I am blaming myself here not the design.

Next time I will solder the caps like MyMateVince and it should be good.
 
@Edwired Nah, this is thermal compound really dry. My brand new 40Gb got YLOD, but bebore I had temperatures issues like I described here, and that was when the console was only 3 years old. Imagine a BC with more than 10 years with the same grease. That thermal C. must be drier than a real camel toe lol.

@TItans_Test_Team I do know what's going on, or at least I believe. As soon as I delid those CELLs I'll post here the results. And about the wires, why not? ^^
 
@Naked_Snake1995, you'll be happy to hear that my first attempt of fixing a fat 3-sec YLOD PS3 was a success! Thank you for your excellent tutorial.

It was quite an adventure though.

I ordered a CECHE from eBay a week ago. The seller shipped it with inadequate packaging so pieces of plastic broke from the case (2 corners from top side broke, some screw standoffs broke). It turns out the seller mistakenly shipped me a CECHA instead of a CECHE. I replaced all of the NEC/TOKIN caps from the top of the board while leaving the ones on the bottom side intact (50/50 method).

On first boot, I didn't get an image so I turned it off and did the video reset. The display came up, but the image was distorted (not artifacts, but swirly and twisted). I set the time and date then the image reset to normal. I turned it off to hook up the bluray drive to do some testing. When it booted up a second time, there were artifacts so I shut it off and then took the IHS off of the RSX (waiting for fishing line to arrive to delid the CELL). After I put fresh paste between the RSX and IHS, the artifacts went away.

Next up, bluray drive problem--it wouldn't allow a disc to be inserted. So I took the drive apart and reset the gears. This time it accepted the disc, but wouldn't spin and wouldn't eject. I took the drive apart again and got it to accept and eject discs, but it still wouldn't spin. After another few more times of taking it apart and putting it back together, I finally got the drive working.

I wanted to test The Last of Us, but the firmware was on 3.30 so it wanted to update to 4.43 so I let it. Update fails at 62%--error code 8002F1F9 indicated that it was the bluetooth/wifi board. I spent another 2 hours trying to figure this out. I took a bluetooth/wifi board from another PS3 (same revision) but it still didn't work. It turns out I didn't have the ribbon cable inserted/latched properly on the motherboard side. After I inserted/latched the ribbon cable properly, the update finished (bluetooth/wifi board wasn't defective).

All in all, I spent about 10 hours on this PS3. Once I get the fishing line, I'll delid the CELL and then install CFW on it.

r6l0WIv.jpg


dQCCVlh.jpg
 
Last edited:
@Naked_Snake1995, you'll be happy to hear that my first attempt of fixing a fat 3-sec YLOD PS3 was a success! Thank you for your excellent tutorial.

It was quite an adventure though.

I ordered a CECHE from eBay a week ago. The seller shipped it with inadequate packaging so pieces of plastic broke from the case (2 corners from top side broke, some screw standoffs broke). It turns out the seller mistakenly shipped me a CECHA instead of a CECHE. I replaced all of the NEC/TOKIN caps from the top of the board while leaving the ones on the bottom side intact (50/50 method).

On first boot, I didn't get an image so I turned it off and did the video reset. The display came up, but the image was distorted (not artifacts, but swirly and twisted). I set the time and date then the image reset to normal. I turned it off to hook up the bluray drive to do some testing. When it booted up a second time, there were artifacts so I shut it off and then took the IHS off of the RSX (waiting for fishing line to arrive to delid the CELL). After I put fresh paste between the RSX and IHS, the artifacts went away.

Next up, bluray drive problem--it wouldn't allow a disc to be inserted. So I took the drive apart and reset the gears. This time it accepted the disc, but wouldn't spin and wouldn't eject. I took the drive apart again and got it to accept and eject discs, but it still wouldn't spin. After another few more times of taking it apart and putting it back together, I finally got the drive working.

I wanted to test The Last of Us, but the firmware was on 3.30 so it wanted to update to 4.43 so I let it. Update fails at 62%--error code 8002F1F9 indicated that it was the bluetooth/wifi board. I spent another 2 hours trying to figure this out. I took a bluetooth/wifi board from another PS3 (same revision) but it still didn't work. It turns out I didn't have the ribbon cable inserted/latched properly on the motherboard side. After I inserted/latched the ribbon cable properly, the update finished (bluetooth/wifi board wasn't defective).

All in all, I spent about 10 hours on this PS3. Once I get the fishing line, I'll delid the CELL and then install CFW on it.

r6l0WIv.jpg


dQCCVlh.jpg
Those tantalums look so tidy! The ones I bought are slightly too big (AVX TAJD477M006RNJ EDIT: fixed link to datasheet), so it is a pain to get them in there right. Do you mind sharing the specs on the tantalums you used (manufacturer, model #, whatever you got)? I've been amazed at the variety of sizes and specs available...
 
Last edited:
Those tantalums look so tidy! The ones I bought are slightly too big (AVX TAJD477M006RNJ), so it is a pain to get them in there right. Do you mind sharing the specs on the tantalums you used (manufacturer, model #, whatever you got)? I've been amazed at the variety of sizes and specs available...

Thank you for the kind words.

As for the tantalums, these are the exact ones I bought: https://www.newark.com/panasonic/2r5tpe470mc/tantalum-capacitor-470uf-2-5v/dp/98W0352

They're in the same family as the other Panasonic ones others have posted. I'm not exactly sure why Newark sells these for $0.068 each. The Chinese sellers on eBay and AliExpress sell them for anywhere from $0.21 to $0.25 or more. I actually cancelled my AliExpress order because they wouldn't ship until Feb 4th (after Chinese New Year).

I bought 400 for under $36 shipped. If you're in the US, choose USPS as the shipping method and it'll come out to be $5.95 for shipping, which is cheaper than UPS or FedEx. Note: during checkout, they won't display the shipping charge if you choose USPS--you'll only see it once they process your order. It only took 3 days to arrive.
 
Yeap those are the ones i am using and never failed me. I went for 330 though as to be usable on both models(fat+slim)

Sent from the Island of Venus
 
Back
Top