Hey all, I've been reading through this entire thread for the past week in my spare time and wanted to try to contribute to this thread by taking a basic analytical approach to this topic.
I have an 80GB PS3, model CECHE01 that i obtained from eBay for $30. I have another CECHE01 sitting in my closet that I've owned, but I got one from ebay to practice on.
So with this PS3 I want to take a more analytical approach to fixing the YLOD. It seems everyone is going directly to replacing the NEC/TOKIN capacitors and you guys are having mixed results, with the majority being successful. Others seem to have other underlying issues that are contributing to the YLOD.
My goal for today, is essentially break down this PS3, make some notes on its condition, clean it up, and start with what is known to fix - temporarily - the YLOD; The Heat Gun trick.
So first off, I connect power to the PS3. Flip the Power Supply switch.
We got a Red Light. Cool. This means there isn't anything out of order at the moment.
Now its time to press the Power button.
Immediate YLOD - roughly within 1-2 seconds of pressing the button.
So lets disassemble this unit and see if theres anything out of the ordinary.
Right off the bat, the rubber plug on the Security Torx screw is missing and warranty sticker is gone. This was definitely opened previously. And as I keep taking it apart I see more evidence of what looks like a quick job: The tape that holds the ribbon cable to the memory card reader is ripped. I don't care that the tape is ripped to be honest as its actually required so you have some slack on the cable so that you dont rip it out of the connector, or worse, rip the connector off.
So while I have the upper shell off, before breaking it down further, I noticed a couple posts that they were able to get the PS3 to boot to the XMB taking multiple attempts to boot by repeatedly pressing the power button over a period of time as the time to YLOD eventually gets longer until it fully boots. I did this over the course of 10minutes, it goes yellow immediately.
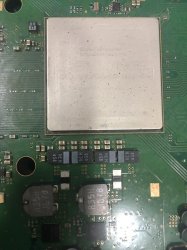
As I keep disassembling, I see more and more evidence of a possible reflow - there are smudges of thermal paste on the shield below the power supply (Which is an APS-226)
As someone who works on cars, and over 10 years ago I was modding PS1's and PS2's, when I do any work - I make sure to clean up after myself and make everything look like it was never touched. So the smudges of the previous guy on the motherboard shield, in one area even having some thermal paste smudged on one corner of it... It bothers me. Keep yourself clean and clean any mess. I'm OCD about cleanliness. Like honestly... if your job with the PS3 is done and you're about to close it up for the last time.... take some alcohol with a soft pad and wipe everything down. /rant
Anywho, keeping on to the teardown... brown dust, very minor buildup however, almost imperceptible smell of smoke (yuck), hdd cage has the highest buildup of this brown dust.
Here's another rant for you.... I used to smoke, I smoked for about 10 years and I finally quit. Cold Turkey. Pure Will-Power. No gums or pills to help. Its a disgusting habit and completely unhealthy. I have never smoked inside my house, nor indoors anywhere. The stench of stagnant smoke lingering everywhere makes me puke. Yes, I still smoked, but never indoors. Once I clean up all this nasty stuff from the metal components, you'll see exactly why its just terrible to be smoking indoors.
How did I quit? I came to the realization that I don't like the smell on my clothes and fingers, I like being able to breathe freely, I love to smell when people cook and love to be able to taste the food I eat. Sure smoking made me feel great after dinner but that's more of a psychological thing. So I just quit. It was rough for a little bit, but eventually I came to feel better than I can remember.
This looks like normal dust, just grey, but seems like this is quite old as its embedded in there in a few areas.
Even the crevices in the eat pipes have this old dust, so whoever and however many people took this console apart, they don't clean everything like I do.
Can't say I didn't expect this. This connector is so tiny and apparently it wasn't installed very well at the factory to begin with for this to happen. This was done by Mr. Thermal Goopy-Hands I would imagine.
When I was re-assembling the PS3 I was able to reinsert the pin into the connector plug with no issue, except the pin is easily removed from the plug, and the connector on the motherboard is pulled out, so its hard to separate the male/female connection (like two dogs mating

)
Keeping into the theme of finding more dust/tar buildup on the motherboard shield. The buildup was enough to cause heavy pitting on any metal surface, such as the HDD cage and the heat-sink assembly. The pitting is likely caused by the minor acidic properties of cigarette smoke particles (this is why your teeth get stained)
All of this dust/dirt/tar/smoke was cleaned off using 91% IPA but the damage was done.
It took a lot of time to clean partly because I had YouTube on the TV and would get distracted, but you do want to take your time with this since you don't want to mess anything up. Even if you're practicing repairing PS3's. Going slow helps make sure you keep track of what you're doing, and who knows, if you manage to fix it.... you can sell it on eBay for a nice profit. Photos of the cleaned up PS3 will come if I manage to repair this unit.

While taking all of the thermal pads off the motherboard, I noticed that the NEC/TOKINS had some very thin type of pad. More like a thick paper with adhesive. On the top side of the motherboard (installed in the shell) this "paper" on the NEC/TOKINs of the RSX had bubbled up. Is this evidence that the RSX or the capacitors, or both, had heated up enough that it caused it to bubble? In my experience with working on soldering audio wires for custom car audio, and then burning electrical tape by mistake - it would take a tremendous amount of heat for this to happen. Could this also just be the characteristic of the 'paper' when it reaches a certain temperature? this is surely an indication of some sort of overheat condition. However the capacitors look in great shape with no warping or damage. But now that I had time to think about it as I took a break from typing this post out, its definitely the result of a reflow. the one on the CELL looks perfect. I just threw them out because once i removed them, they had no adhesive left and were just stuck to the capacitors with the ink on their lettering.
Now comes the fun part. Stage 1 of YLOD repair.
As we all know, the 'heat gun trick' has been the go-to, albeit, temporary solution. Most who have done this method came to the conclusion that its a temporary measure at best and only really used to backup your data at the time, so that you can replace the PS3.
For this post, i will focus on the "heat gun trick" ONLY on the RSX as this was the age old, go-to method to revive a YLOD PS3 - for an hour, day, week, month, or year. Eventually, you'll get the YLOD again.
To make sure i didn't damage anything surrounding the RSX, i used kapton tape around it and as close to the GPU as possible, then added some aluminum foil attached to the first application of kapton tape so that i dont make a mistake and apply heat where I don't want it.
I used a Yihua 82BD+ soldering station. I set the hot air to as low as it will go, which for this unit was 212*C and using 35% airflow. Slow and steady movements for 15minutes.
I left the work area and ate dinner to let it all cool down. By this time I was at hour 4 of working on this PS3.
Assembled it all up, still YLOD.
It was a long day today and I'm not going to bother doing anymore work. Today was a lazy day off from work.
This weekend, i'll bring it back out to see if only heating the NEC/TOKINs for the RSX has any effect on the YLOD. Of course, if that doesn't work. Then we'll need to dive a little deeper.
I know my temp on the hot air was low, but I wanted to see what would happen. Very first thing I'm going to do before trying another alternative is to up the temp of the hot air to 350*C and some flux for another reflow attempt maybe.
One of the other things is to check all fuses and if any are blown, to find the cause and replace the component - such as this video that was shown earlier which fixed the YLOD.
Thats all for today folks.
 ), not because you added electrolytics. Stop it.