PS3 (Research/Experimental) - NEC/TOKIN Capacitors Replacement - YLOD

BeJZeeS.png

You'll notice that there is a little ridge on the CPU IHS that makes a 90-deg angle. If your tool isn't thin enough to get between the gap underneath the ridge where the silicone opening is, then it'll hit that ridge like a wall and you'll just be pushing against metal. That will cause you to dig into the substrate.

I used a Dremel and sand paper on my tool to get it thin and smooth enough. It still took me about an hour and multiple grinding/sanding sessions before it was thin enough.

You need to abandon the idea that you can get away without deliding! THIS WILL HAVE TO HAPPEN! Like everyone else that has experienced a YLOD, we rationalize the fan noise and overheating away, right up to the point it dies. Please, save you PS3 while you still can! Lol!
 
Last edited:
Hi everyone!

First of all thanks for all the sharing here. This topic permitted me to revive my PS3. The job was not very well done thought. My soldering iron is too big for these kind of jobs and the capacitors are very small so it was a nightmare to soldering that. Another nightmare was to remove the NEC capacitor.

Everything done and assembled the PS3 turns on but it has a problem. First the CPU temp while on PS3 Control Fan Unit software is around 68ººC and RSX is around 49ºC. CPU seems a little hot while on idle but let's ignore that for now. Now the real problem: HDMI output stopped working. I can only output image by AV cable. I don't know why how this happened. What I know (maybe it is related or even the problem) while I was soldering the caps some "small" piece (little circle in the image below, use the zoom to see it) de-soldered and I lost it. I don't know if it is a resistance or a capacitor or even if I'm able to fix it. My PS3 is a 80GB EUR model CECHK revision. Hope you can help me! Thanks for your attention and best regards!
DIA-002-1-876-912-22-CECHJ-CECHK-BACK.jpg
What capacitors did you use?
 
BeJZeeS.png

You'll notice that there is a little ridge on the CPU IHS that makes a 90-deg angle. If your tool isn't thin enough to get between the gap underneath the ridge where the silicone opening is, then it'll hit that ridge like a wall and you'll just be pushing against metal. That will cause you to dig into the substrate.

I used a Dremel and sand paper on my tool to get it thin and smooth enough. It still took me about an hour and multiple grinding/sanding sessions before it was thin enough.

You need to abandon the idea that you can get away without deliding! THIS WILL HAVE TO HAPPEN! Like everyone else that has experienced a YLOD, we rationalize the fan noise and overheating away, right up to the point it dies. Please, save you PS3 while you still can! Lol!

I want to delid it! I already delid the RSX. The Cell I couldn't get properly in the hole. And I was using a very thin small knife. I saw the NSC videos and tried to replicate but like I said when I inserted the knife in the small hole I couldn't get through and even scratched a little the PCB which I thought I destroyed the PS3 in that moment but fortunately not.

What capacitors did you use?

These ones
https://pt.aliexpress.com/item/32834487711.html?spm=a2g0s.9042311.0.0.29fcb90aIyePP5

So far so good
 
I attached leads(small gauge single strand on vias >.5" long) under the rsx and cell(opposite side of the board of chips) to very adjacent vias(Vdd,GND) and tried O-scope measurements. I don't know what the hell I'm doing, using suggested settings for time/div and volts/div didn't help with initial setup of the scope as far as setting it to DC, the trigger, etc. The only thing I was able to do was have a "flat" slightly fuzzy line represented on screen, that jumped upwards off the screen during attempted boot, and fell back down with ylod. Tried acquisition, saving ,etc...not intuitive at all for me. I'll have to get someone to help me who uses these regularly with the measurments next chance I get. Only on screen representation I could get was with using auto-scaling or whatever.

@RIP-Felix! that paper you provided on psd for PowerPC processor WAS a really good read, got me thinking my little daughter boards of caps I made are a nogo. BUT, I want to screencap O-scope of my current YLOD before trying my last attempt....
 
Heres sum pics. Only O-scope pic I accidentally got looks like autoscaling on, ps3 with power on, ready for [always failed] boot. When I tried to boot, the "signal" would shoot off upscreen and disappear until ylod kicks in, and it falls back down.

RIP-Felix! You done did hurt me feelings with thoughts of cold solder joints...So I cleaned 'em up real nice[my backside individual tantallums] :)
 

Attachments

  • FR4CuSubstrate.JPG
    FR4CuSubstrate.JPG
    195 KB · Views: 123
  • 8NowOnBackside.JPG
    8NowOnBackside.JPG
    206.3 KB · Views: 124
  • 8ZoomedIn.JPG
    8ZoomedIn.JPG
    352.2 KB · Views: 120
  • CrappyDaughterBoards.JPG
    CrappyDaughterBoards.JPG
    231.3 KB · Views: 128
  • scope_2.png
    scope_2.png
    26.8 KB · Views: 123
I attached leads(small gauge single strand on vias >.5" long) under the rsx and cell(opposite side of the board of chips) to very adjacent vias(Vdd,GND) and tried O-scope measurements. I don't know what the hell I'm doing, using suggested settings for time/div and volts/div didn't help with initial setup of the scope as far as setting it to DC, the trigger, etc. The only thing I was able to do was have a "flat" slightly fuzzy line represented on screen, that jumped upwards off the screen during attempted boot, and fell back down with ylod. Tried acquisition, saving ,etc...not intuitive at all for me. I'll have to get someone to help me who uses these regularly with the measurments next chance I get. Only on screen representation I could get was with using auto-scaling or whatever.

@RIP-Felix! that paper you provided on psd for PowerPC processor WAS a really good read, got me thinking my little daughter boards of caps I made are a nogo. BUT, I want to screencap O-scope of my current YLOD before trying my last attempt....

If the line is jumping off-screen, then your voltage isn't set high enough. Set it higher (5v?) so you can verify what the voltage actually is coming out as, and then make your way down from there.

Alternatively, you can scroll up into that range, if your scope supports that function.
 
I'm no expert with an oscilloscope either. My RIGOL unit came in yesterday and I've been messing with it a bit tonight. A few things I've noted so far. The reason the line jumps up when you turn the console is because it's measuring the voltage and you're so far zoomed in on the vertical axis (50mV) that it jumps up out of range.

What I did was set the Horizontal axis to 100ms so it'll capture the whole YLOD event. Then I set the vertical axis and trigger at 1 volt (CPU), and set to wait. Once ready, I pressed the PWR button, it triggered, captured the whole YLOD event. From there I zoomed way in on the line to see the voltage spikes above or below the DC voltage (CPU = 1.0). Lastly, I used the cursor to measure the transient spikes. I got this:
OzcDN2s.jpg
9vQLHe1.jpg
z6eRRKg.jpg
P0ivpZE.jpg

I don't know if those spikes are in the least bit significant. They measure at around 900MHz in duration, which is well beyond this scopes limit. So I question if they really exist. The noise floor for my probing technique seems very low, I'm not getting anything significant. Just those transient spikes.

I used a 10x probe set to 10x on the scope. I removed the antenna grounding clip and placed a grounding spring on it instead. Then I calibrated the probe before measuring the +/GND pins on the bottom side of the motherboard. There is a hole in the RF shielding right next to the CPU's tension spring. The RF shielding probably reduced the noise quite a bit. There are still a bunch of settings I need to figure out, like the bandwidth limit which I did have on for that test. I haven't tried it with the probe at 1x yet either.

I did manage to unlock the 100MHz option, but the rest of them came automatically enabled out of the box. I guess RIGOL gave up on gouging for more than just the 100MHz option.

My brain hurts and I need to check out for the night!

Pretty sure you should be using 1x mode only... 10x is for higher voltages than we're trying to measure here.
 
When I tried to boot, the "signal" would shoot off upscreen and disappear until ylod kicks in, and it falls back down.

50mV is good enough, and will be 5 times easier to find the signal. I know on the Rigol, I can save a snapshot, then go looking for the signal even if it wasn't on the screen. Remember when you're adjusting the volts per division, you want to see a signal that's at about 1.2V, so you're going to move the axis DOWN 1.2V.

From there I zoomed way in
I think you lose a ton of data when you do this (I believe, at least out of the box, it autoscales the sampling rate with the time/div), which would explain the funky images, but not the funky voltage.

I'd say start by cloning my "quick & dirty" method that we know gives workable results. Then you can change a single variable at a time so you know what the culprit is, and what kind of change each thing is actually causing.

So, start with ground clip on edge, pin probe jammed in a via. DC coupling, BW Limit off, probe switch and scope set to 10x. I don't bother adjusting the triggering since I'm saving an image. I hold the probe, hit power, then reach up and hit run/stop when it pops up. Yeah, yeah, whatever, it works. It'll look funky at first since it's not triggered, so just nudge either axis and it'll snap in to focus. I know I've sometimes had issues with the signal getting chopped and flattened if it's not at least partly on the screen when I save. So if I've been doing something else and switching back to "TOKIN mode", it takes a few tries to boot PS3, save, and adjust until I've got the signal actually on the screen to save the "real" image next time.

And for anyone getting 'scopes, your intention is probably to use them more than once for this. I'll assume you have some spare parts laying around then, so here's some stuff to copy to make life easier from now on:

upykJBi.jpg


Even if you have YLOD, the chips are still going to get superhot for a second or two. If you left the IHS on for now, that's plenty good even for repeated testing. Since I test them before and after rework to make sure I didn't affect their health, I made a little jig. You need some real cooling when the console is staying on for more than a few seconds. The IHS are thermal glued to the heatsink assembly, then I just put a slab of thick foam between the heatsink clamps and the board on the other side. Power supply wires lengthened and wire up the connector on the outside. This gives clear access to the probing points I use on the underside.
 
Something was bothering me, so I went back and checked my images from page 82. When I tested using electrolytic caps....I got YLOD with exactly 1.02 volt signals, totally clean and stable except for a few little data looking spikes on both CPU and GPU. Just like you're getting. I, uhhh..... this is over my head.

I can't imagine I changed any settings between tests and accidentally mimicked what you were doing for that one test only, so there's a clue in here somewhere.
 
Last edited:
So, I originally tried 50mV/Div at a 1uS H scale at a vertical position of 0v. That shows a line similar to your captures when PWR is off. That's just the normal noise floor. The problem was triggering. I could set the trigger to about 100mV and it would "catch" the signal at the moment it increased that much, but it wouldn't capture the entire event when zoomed in that far, just what fit on my screen. Maybe there's a setting somewhere. Regardless, that "capture" isn't what we're after. It's just the moment the voltage rose above 100mV in the first few uS after the PWR is on. I could increase my triggering to 1v and adjust my vertical position to match, but that would again only capture the first few uS after it first increases to 1.0V. I want it somewhere in the middle, or better to capture all of the event with as much detail as possible so I can scrub through it after the fact. The only way I found to do that so far is to set the Horizontal resolution to about 100mS/Div, then it tracks the whole event on one the scope's screen and I can zoom in afterwards. But would that capture enough detail?

There's gotta be an option to capture more than what fits on screen in memory. I remember Ste of HDretrovision talking about it on RetroRGB with Bob Neal in his Oscilloscopes Basics video for Analog RGB sync. This is the reason I got this scope. I wanted 4 channels, and you can't beat the options for the price.
 
Unfortunately, I'm not much help with the memory function. I pretty much only use the scope for laser eye patterns, clock adjustment, and this. Live triggering and single screen saves are all I ever need.

Catching the signal manually is a lot easier than it sounds after a few tries. Without burying my head in the instruction manual for the night, the best I can do is this: Hit the "Acquire" physical menu button. On the screen, go to "Mem Depth" and turn it up to the max. I don't know if that will expand it for the triggered capture, but it got quite a bit more for manual saves.

edit: I'd also be willing to bet if you download the PC software and get it all hooked up, you can probably save infinite data and look through it easier.
 
Last edited:
I think I'm starting to get the hang of it. Yes I can set the triggers and move the graph up/down when zoomed out. That's good for catching the wole event. Then I can zoom in on the parts I'm interested in. I can press "single" again and turn the console on to re-trigger, but in frame this time. Note, I used this trick to capture an AC waveform. Yes, this is DC voltage. But I'm interested in the AC noise from the DC-DC switching VRM (ripple). It should look like a sawtooth pattern as the load/caps drain and the VRM restores voltage, but it shouldn't be large (peak-peak).

I took a few captures, but I'm still playing with settings to be sure the measurements are significant. AKA, I'm not finding patterns in the noise, which is a legitimate trap for young players.
 
Okay more O-Scope images:
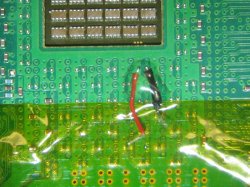
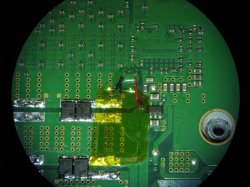
Probe set to 10x and Scope set to 10x. Probing CPU through convenient hole in the RF shielding on the BTM side of the motherboard. The probe is propped up so I don't have to hold it (Holding it actually increases the noise).
1CeLJnz.jpg


This is the entire YLOD event. Power increase from 0v to ~1.3v upon powering on (Rise). The voltage is steady on the plateau (the area I'm interested in to evaluate cap health and VRM performance) for half a second until the YLOD occurs and the voltage drops back to 0v with a characteristic transition as the caps discharge (fall). Notice this is DC coupled and the BW limit is off. I'm also not using High-Rez Aquire mode yet.
GCJfjoP.png


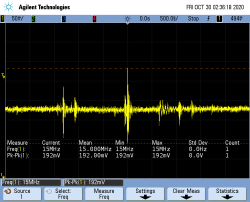
Closeup of the rise. 2.5ms for the voltage increase, not sure if that matters, but I did test it with another Power supply and it didn't change (for this motherboard). I don't know if this could be important to measure or not, but I wanted to record it juz cuz.
YUlwc82.png


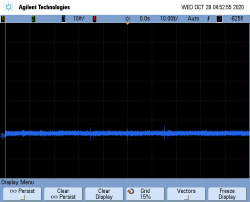
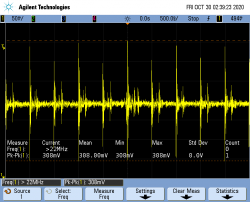
And even closer look now. 50mV/div, not much noise.
cZ0KEP4.png


Fully zoomed in on the vertical axis now. 10mV/div. Aquire mode is normal and while the Vpp says 30mV looks more like 20mV.
rSrN1AE.png


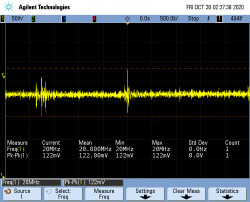
Decided to try out the High-Res Acquire Mode here. That really cleaned up the noise and allow us to see the sawtooth pattern. I'm was expecting this to be the VRM maintaining the voltage, but I wonder if it's charge/discharge cycles of capacitors. The switching frequency of the DC-DC switching regulator is 300KHz - 1 MHz. The frequency of these pulses appears to be more like 2 per division. 1uS/div is 1MHz/div. So 2 pulses per division is ~2MHz.
qbZCjsk.png


This is the same image zoomed in on the horizontal axis a little, just to see the sawtooth charge discharge cycles a bit easier. From these, I can't see anthing that would lead me to believer the Capacitors are not doing their job. This is a nice clean DC voltage.
1SqkiBm.png


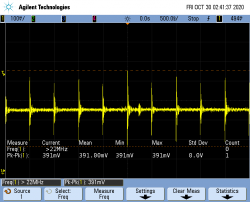
And here is where the YLOD occurs. I figured if I recorded the rise time, why not the fall time as well. 32.1mS before the voltage returns to 0 after a YLOD.
WAJ1tci.png

From these results, I can see that the CPU Voltage seems a bit high. Usually it's better high than low, if the CPU can't accept a voltage lower than +1.0v, but 1.1v - 1.3v seems excessive. I need a working console to compare against and I'm not about to risk my only working A01 to get this measurement.

I do have 2 more A01's on the way. One was described as working, but not reading discs. So I'll get control measurements from this one. The other was "acquired at an estate sale" and being sold untested. Seller didn't appear to know anything about PS3's, not having the power/AV cords to test (allegedly). It appears from the picture to still have the warranty sticker, but the angle didn't let me see if it was void. I'm going off an acute angle where the raised edge was just visible and aparantly quite strait (as if it had not been peeled at with a fingernail). The prices for them was better than verified working, but not as low as verified YLOD. I have high hopes that they will both be YLOD free, but I need more cannon fodder for my reballing education.

I do feel a bit bad about learning on A models, but I bought them - Their mine to abuse!
 
I never even noticed that high res mode, lol. It won't make a difference on the bad images since there's like no noise whatsoever, but it will really help me double check the healthy caps to make sure I didn't hurt them at all with all the drying and rework.

Changing out from TOKIN to tantalum definitely raises the voltage on both chips. I'd have to go searching through a hundred pages of this thread to find it again, but I think it was about 0.1mV? I may have only found bad TOKIN in 3 consoles, but I've changed a ton now for various experiments and that increase in voltage has been consistent.
 
squeept- I think I know the brief voltage discussion you 'member, I looked thru my initial screencaps I took as I read this thread, but don't have it at the moment...I believe there was a mention of ~just ask the bitcoin miner rig guys~ or something like that, all I had was this from pg48 on voltage.
RIP-Felix- I got some help today with an O-scope and got some screencaps, but not of my ylod event I finally got to see happen on screen as you did. I looked exactly like yours, really zoomed in looked like a big long "square" 'S". up to ~1.3vDC, then back down to zero. It was so unimpressive a looking event I didnt take any captures.

BUT I did finally get some of the cell and rsx during that second or so of voltage before zero again. I soldered solid strand small leads to vias ~under~ each chip and secured in place with some UV glue. Then just used a plain ole 10x probe to clip to my little leads. I did see an adapter for 50ohm with 10 db attenuation, guess I shouda tried with that too, but didn't. I also tried to get the same capture with moving the gnd clip to a pc of solderbraid I had soldered to the giant ground plane around the outside of the mobo, but leaving the power one in place. There was a big difference in noise? I guess?
 

Attachments

  • pg48.jpg
    pg48.jpg
    496.1 KB · Views: 75
  • 50ohmThing.JPG
    50ohmThing.JPG
    67.4 KB · Views: 77
  • CellHookup.JPG
    CellHookup.JPG
    272.1 KB · Views: 74
  • RsxHookup.JPG
    RsxHookup.JPG
    210.6 KB · Views: 68
  • CELLadjacentViasUnderChip.png
    CELLadjacentViasUnderChip.png
    35 KB · Views: 73
  • CELLhotOnViaGndOnBoardPerimeterGndPlane.png
    CELLhotOnViaGndOnBoardPerimeterGndPlane.png
    36.5 KB · Views: 71
  • RSXadjacentViasUnderChip.png
    RSXadjacentViasUnderChip.png
    35.3 KB · Views: 72
  • RSXhotOnViaGndOnBoardPerimeterGndPlane.png
    RSXhotOnViaGndOnBoardPerimeterGndPlane.png
    33.5 KB · Views: 73
RIP-Felix! You done did hurt me feelings with thoughts of cold solder joints...So I cleaned 'em up real nice[my backside individual tantallums] :)
I was probably a bit overly critical, they looked better than my last attempt. So I shouldn't judge!
BUT I did finally get some of the cell and rsx during that second or so of voltage before zero again. I soldered solid strand small leads to vias ~under~ each chip and secured in place with some UV glue. Then just used a plain ole 10x probe to clip to my little leads. I did see an adapter for 50ohm with 10 db attenuation, guess I shouda tried with that too, but didn't. I also tried to get the same capture with moving the gnd clip to a pc of solderbraid I had soldered to the giant ground plane around the outside of the mobo, but leaving the power one in place. There was a big difference in noise? I guess?
If you used a ground clip (3inch thing hanging off probe with aligator clip) then it will act as an antenna picking up RF interference. The spikes you got for the CPU with the outter GND plan look alot like the spikes @squeepts was getting before using the ground spring inside the area local to the CPU (which is isolated electrically from the rest of the board to reduce cross talk between this sensitive region and the less sensitive areas). So yeah, it's noise. Just to confirm, that's the "Plateau" region @ ~1.3v after the voltage rise, but before the YLOD and fall?

The spikes on the CELL graph you took of adjacent VIAs could be data, noise, or nothing. I'm not sure, but the rest of it looks similar to the graphs @squeept and I got. One thing that kinda worries me about the copper foil plane Idea you went with is that it might increase the inductance. Doing this could change the "tuning" of the second stage filter such that it allows more noise. Maybe, that what those spikes are, but this is a total shot in the dark. Also, it's hard to tell where the RSX side leads are soldered to from the picture, but it looks wrong to me. The tiny bypass caps to the left look like there is a VIA above and below each that's would be ideal. However, you would need to abrade the mask to solder to them. The GND wire could go on the larger VIA that's already exposed and closest to the Bypass cap. Cell Side looks perfect!

Changing out from TOKIN to tantalum definitely raises the voltage on both chips. I'd have to go searching through a hundred pages of this thread to find it again, but I think it was about 0.1mV? I may have only found bad TOKIN in 3 consoles, but I've changed a ton now for various experiments and that increase in voltage has been consistent.
Hmm, that's strange. Honestly it concerns me a bit. The point is to match the tokins in every way possible, and if the Voltage increases significantly, that's not what I'm looking for.

Did that A01 you were talking about come in? If you could take a series of captures similar to my last post, that would give us a baseline with the tokins. Tracking says one of my PS3's should be coming in Saturday. I can verify your results with that one, hopefully this weekend.
The tutorial is based on a COK-002, I think, but my board is actually a COK-001 and I was able to connect and run all the commands. Where did you run into problems?
I was confused about the "diag" conductor, but I see it's just for grounding later in the process. Also, the eep checksum business has me leery. It's kinda complicated and the example is only an example, something I have to figure out specific to my board. This is more coding than I'm comfortable with. I wish there was video showing the process.
 
The guy that helped me with the scope said my "signal" looked really clean with the adjacent vias connected but much more noise when GND attached to larger GND plane... Yeah, ~1.29V at plateau, then back to zero. As far as my hookups, I didn't reference any dwg's or diagrams, I just tested power or gnd rail to absent cap locations or test points away from other caps under the chips. I chose locations based on resulting resistances of <=0.21ohms to what I was testing for with a good meter. I'm certain my red is VDD and blk is GND for each chip.
I assume this[my screencaps] doesn't show evidence of bad caps? Obviously replacing all the caps didn't allow boot for this CECHH machine, but I didn't assume it would in the first place. I still think maybe bga damage from originally separating mobo from heatsinks with the OG dried up paste that was all glued together. BUT, I've learned how to remove nec's and replace without causing any damage, and how to delid and repaste without any damage, so it might be time to move on to my one any only CECHA model I've had dead forever...Guess I need to learn all this syscon stuff also...
 
Besides those spikes, your results look like mine. I would say that your caps are performing as mine are - just fine. I guess the voltage increase thing is normal, as @squeept reported it too. So yeah, the next step is to get the error log off the SYSCON to try and narrow down the problem.

Reading more into the SYSCON process, I think I get what it means. My USB TTL series cable arrived today, so I think I'll give it a go this weekend.
 
Back
Top