So the USB adapter I linked has a connector on the end designed to be connected to the pins on a raspberry pi. It's the same square connector used for PC's HDD LED +/- , PWR btn +/GND, and front I/O. Since you've worked on PC's you'll know what I mean. So you just need to be able to connect to that. Breadboard wires are ideal, but you could hack something together using your own wires and a JST connector or something. You'll figure it out with a little ingenuity.
And for the delid tool...
Make one of these to delid the CPU:
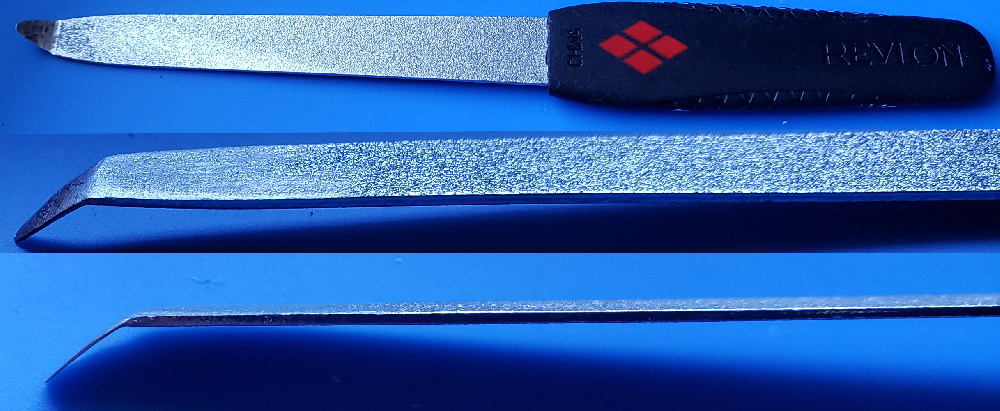
Heat up the end of a fingernail file (buy one from the store, don't grab one from the GF or Misses unless you have a death wish). Use a lighter to heat the tip up and make the metal malleable, then bend ~1cm of the tip to an angle with pliers. Now use a dremel with a sanding stone to grind away the bottom of the tip and make it very thin. It needs to be able to fit underneath the heat spreader on the CPU. Notice there is a gap in the silicone glue on one side:

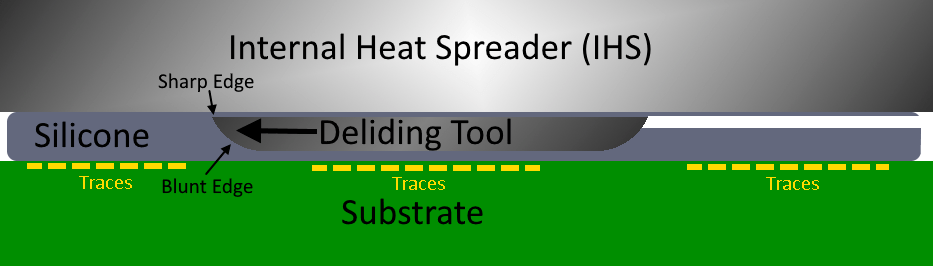
Use sand paper to blunt the bottom edge of the tool so it can't dig into the substrate, where the traces are on the CPU. That'll destroy them. Just rub the tool along some paper and if it glides smooth you'll be fine. Now use some vasoline or grease to get the tool started. Place it under the edge of the heat spreader and use firm steady pressure. Brace with both hand so you don't slip. Once the tool begin cutting it will ride along a cushion of silicone and the blunt edge will force the sharp cutting edge against the Heat spreader. Now just cut along the edge of the chip, all the way around it. Be careful at the end, when you're about to cut through or you can slip and cut something you don't want to. Just watch this video and you'll have a good idea how to do it.
For the GPU, you need to use a different method:
NSC is pretty long winded, but he shows how to safely delid the RSX earlier in the video. His method is good for doing it cold, but I don't really like his method. It's longer and hard to get a good angle. And his hammer scares the sh!t out of me! I prefer to use hot air (hair drier works too) to warm the RSX for a minute or so (not directly on the chip, but in circular motions 4-5 inches above it just, to get the glue warm, not hot). This softens the thermal adhesive enough so you can pop off the RSX heat Spreader. I use a card and a thin butter knife. The side that faces the CPU, with traces going between them, doesn't have any SMD components like the other 3 sides do. So you can only do this on that side. Heat, insert the card, then use the butter knife to get under the edge of the heat spreader. Be sure you get under the heat spreader, not just on the edge of it. You actually need to get underneath it so you can gently add prying force. Slowly add pressure until the glue gives and the heat spreader pops off. The card protects the substrate from the
blunt metal edge of the butter knife. Use something thinner if you can't get under the edge with your butter knife, but be sure it's blunt or it can ding into the substrate (even digging through the card first). It need to be thin enough to get under, but have enough girth to not bend when you pry up.
Sounds complicated but the process is actually quite easy, only takes a few minutes. The hardest par is making the proper CPU deliding tool. It took me about an hour shaving down the tip to get it thin enough to fit under the IHS. I'd shave it a bit, test. Shave away a bit more, then test. Sand, test. eventually I got it to work. I have delided about six consoles now and the CPU is the easiest because of that tool. Most people can delid their RSX pretty easily, but are deterred by the silicone on the CPU. The CPU really needs it or the console will suffer from overheating.

 Best of luck with the experiment! I'm excited to see where this goes!
 I should probably do this soon though. As for jailbreaking. I have done this with all my systems already and have Webman mod. There are too many good features to not jailbreak IMO.


