PS3 (Research/Experimental) - NEC/TOKIN Capacitors Replacement - YLOD

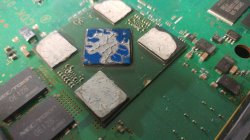
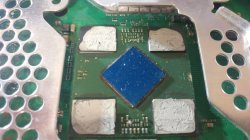
All the PS3 i did the replacement was with tantalums with value 330uf 2.5v (the black ones), on a CECHA01 , CECHE01 and a CECHL01 they are all working fine with those caps. Also when i was welding the tantalums i scratched the masking varnish on every tokin space to have more freedom soldering and to have better contact between the soldering tin and the motherboard (i never trusted the negative rail of the nec's in the mobo).

All i want to do now is a delid on my A01 and my E01 but im not confident in myself to do that because is risky. Also im hoping to buy a ylod B01 and a PSU APS-231 for my A01.


Maybe I should desolder one cap off each spot and see what happens then?

On my board that is.

I am rather suspect that something else may have died on my board but it doesn't make sense if it can boot for about 6 seconds before yloding again.
 
Maybe I should desolder one cap off each spot and see what happens then?

On my board that is.

I am rather suspect that something else may have died on my board but it doesn't make sense if it can boot for about 6 seconds before yloding again.
Perhaps you can try with 3 tantalums on each tokin to see what happens as ur stating (but i dunno if that's gonna make any difference as many users in the thread used 4 tantalums with values like yours on each tokin and they are working fine). You can try to scratch the masking varnish too if u want and them resolder again the tantalums like i did in this photo of my A01.
 

Attachments

  • IMG_20191222_022530.jpg
    IMG_20191222_022530.jpg
    2.5 MB · Views: 198
Perhaps you can try with 3 tantalums on each tokin to see what happens as ur stating (but i dunno if that's gonna make any difference as many users in the thread used 4 tantalums with values like yours on each tokin and they are working fine). You can try to scratch the masking varnish too if u want and them resolder again the tantalums like i did in this photo of my A01.


I'm going to try doing something like:

but I won't be scratching stuff off since I know as long as it touches a point it'll be okay.

Nice layout btw I think it's neat. Swastika style set up. But if it works then it's doing its job.

On a side note, I recently got another motherboard with a 3 second YLOD.

Aside from the regular heat gun reflow and a delid gone wrong I think I should try fixing this one.

Anybody think that is too much damage on the RSX to fix or is a reball with an intact RSX needed?

note the right side of the RSX there is a small chip into the RSX from a bad delid.

Not sure if I am correct but if the RSX is bad maybe the PS3 would have YLOD immedidately and not 3 seconds after?
 

Attachments

  • d.jpeg
    d.jpeg
    109.8 KB · Views: 180
Failed delid's have to my knowledge(and reading) always resulted in insta ylod. No delay. By which I mean functionally it sounds like the rsx isn't fubar.
 
Failed delid's have to my knowledge(and reading) always resulted in insta ylod. No delay. By which I mean functionally it sounds like the rsx isn't fubar.
this is what I think too

going to give this ps3 a shot as well. If I recall this ps3 has firmware less than 3.55

I'll need to remarry the bluray drive but it's worth a shot tomorrow to try and fix


come to think of it it's more like 2 seconds then ylod.
 
Last edited:
On a side note, I recently got another motherboard with a 3 second YLOD.

Aside from the regular heat gun reflow and a delid gone wrong I think I should try fixing this one.

Anybody think that is too much damage on the RSX to fix or is a reball with an intact RSX needed?

note the right side of the RSX there is a small chip into the RSX from a bad delid.

Not sure if I am correct but if the RSX is bad maybe the PS3 would have YLOD immedidately and not 3 seconds after?

Its a pretty bad photo for us to tell but judging by the size and comparing to ones i have sitting here it doesnt look good. By looking at the GPU there is a 1mm boarder around it before the trace layout starts which u would be able to see if u look closer yourself (Use a torch if u need to), i can see them clear as day just with the naked eye so u will see there are traces there. if uve reached the copper its dead.

I would also recommend u start removing the thermal adhesive from the rams and silicon from the CPU (same with the underside of IHS's if u haven't already?) from ur other board so u get better contact with the IHS's and its dies surface, at this stage u have a fair chance they wont make great contact since u left them on. i highly doubt this will be ur issue tho, lucky u didn't count ur chickens b4 they hatched when u made those assumptions earlier huh ;) haha

ur gauge wire is sufficient btw its thicker than most have used.
 
I'm going to try doing something like:

but I won't be scratching stuff off since I know as long as it touches a point it'll be okay.

Nice layout btw I think it's neat. Swastika style set up. But if it works then it's doing its job.

On a side note, I recently got another motherboard with a 3 second YLOD.

Aside from the regular heat gun reflow and a delid gone wrong I think I should try fixing this one.

Anybody think that is too much damage on the RSX to fix or is a reball with an intact RSX needed?

note the right side of the RSX there is a small chip into the RSX from a bad delid.

Not sure if I am correct but if the RSX is bad maybe the PS3 would have YLOD immedidately and not 3 seconds after?

There's a nice chunk taken out of the side of the RSX... your going to be extremely lucky if your haven't killed it...
 
The way i managed to take off ihs the rsx is to put two metal pry tool facing the cell one is laying flat and use the second to add upward force when quickly heating with a heatgun in a circular motion should take about 30 seconds to a minute on high setting but take it easy when it going to pop off you dont want to pry any of the die or caps. The cell on the other hand is a whole different story you would need a really thin pry tool but it alot more work as you need abit of heat to make the compound between the ihs and chip abit soft to work with but without heat it a risk to scratch deep enough on the silcone chip like your man on the above video he went in too rough to destroy the chip
 
Yah Vince butchered the cell. It's kinda frustrating given that the conventional knowledge/suggestions for how to delid safely(as much as possible given the risks) using a palette knife have been around for years(mention of it starts by 2017).

I mean seriously a palette knife is a few dollars... Perfectly fixable unit gouged to death.
 
I wondering of an idea is to freeze the ihs with dry ice with acetone in a small metal bowl to bring the freezing temperature about -70c to somewhat make the bond brittle between ihs and chip so it can be remove easily since i been looking online nothing shows up. Wondering if this could be possible than risking stabbing the chip to death

Or a mini vice like in intel cpu delidding method
 
freeze the ihs with dry ice with acetone in a small metal bowl to bring the freezing temperature about -70c to somewhat make the bond brittle between ihs and chip so it can be remove easily

This has got to be the stupidest idea I have heard of in a long time, you want to put acetone near your PS3, be my guest, do you have any idea how destructive this chemical can be.

Also the dry ice could, most likely 100% will, freeze the protective lacquer layer over the CELL and shatter it as well as the CELL die from being so cold. You may as well use liquid nitrogen if your going to try something this extreme.
 
I know but it just an idea it dont mean im going to do it but what other choice do we have to delid the cell

Options? We have the well documented option involving using a palette knife(or if you're super lucky the original IHS buster). The fact is while Acetone would probably handle the adhesive like a champ, it would also probably wreck anything else it touches(seriously there's a reason you stick to cleaning pcbs with mild vinegar as well as isopropyl). The tolerance to have the acetone only in contact with the adhesive is probably tighter than just using a palette knife.

While it's good to try and think outside the box it's probably better to think of a way to apply an existing known working solution more reliably. Towards that end some sort of vice that could carefully control the height and depth of the tool would probably be more useful and easier to use.
 
Yeah true it just these epoxy bond or whatever it is that makes it unrealistic method for putting the ihs to the chip then again making it difficult for people to remove it paired with the worse thermal paste no wonder it a pain like intel shoot themselves in the foot for using crap thermal paste resulting really high temperature on the cores. No wonder manufacturers cut so much corners just to make a profit on each individual products
 
Here is a good video on how to delid:

Personally I included a video earlier on how to remove the NEC caps and that is the same tool I use to delid the CPU and GPU (with the addition of a flat head screw driver)

The RSX was damaged from several years back. This board I believe was one of the earliest boards I have ever got and has been this way for a long time until I unboxed it recently. I believe this was one of my first attempts at delidding so the damage was because of inexperience nearly a decade ago.

I can delid much easier and without issues now so it's not really an issue for me.

It was unfortunate to see Vince mess up the CELL but he did many other things right so there is still lots that is beneficial to see from his video. Maybe his next video can he how to reball the cell?
 
Nsc's videos are super super useful. Probably some of the best examples of how to do it and he makes a good point of taking your time. Probably the only reason my first delid went so damn well. Though I wish he would do a good comparison showing decibel and temperature control of the various ps3 fan models.
 
Great news everybody. This cracked RSX chip works for now. Displays picture still and I can still use the XMB.

I took the liberty of removing the caps on the bottom side of the board but won't touch the top side.

I'm so surprised this still works.

Covered the cracked chip area with kapton.
 

Attachments

  • 20200129_190905.jpg
    20200129_190905.jpg
    7.3 MB · Views: 203
Great news everybody. This cracked RSX chip works for now. Displays picture still and I can still use the XMB.

I took the liberty of removing the caps on the bottom side of the board but won't touch the top side.

I'm so surprised this still works.

Covered the cracked chip area with kapton.
Ur so lucky dude D: ! btw that's a CECHA01/B01 mobo ? have u changed the nec's on that ps3 ?
 
Great news everybody. This cracked RSX chip works for now. Displays picture still and I can still use the XMB.

I took the liberty of removing the caps on the bottom side of the board but won't touch the top side.

I'm so surprised this still works.

Covered the cracked chip area with kapton.
That's bloody amazing. You probably have the single most damaged but somehow still functional rsx anywhere. Since it means somehow despite the damage not a single trace was broken. Would probably reccomend something more permanent than kapton, granted I would now have severe reservation about removing the kapton on the off chance it disturbs the traces.
 
Great news everybody. This cracked RSX chip works for now. Displays picture still and I can still use the XMB.

I took the liberty of removing the caps on the bottom side of the board but won't touch the top side.

I'm so surprised this still works.

Covered the cracked chip area with kapton.

You lucky sod.... You should of really covered that damage with a clear coat brush on lacquer and not with kapton tape, it would of protected it better and lasted a lot longer.
 
Back
Top